
|
rsm_core package from robot_statemachine reporobot_statemachine rsm_additions rsm_core rsm_msgs rsm_rqt_plugins rsm_rviz_plugins |
ROS Distro
|
Package Summary
| Version | 1.1.3 |
| License | BSD |
| Build type | CATKIN |
| Use | RECOMMENDED |
Repository Summary
| Checkout URI | https://github.com/MarcoStb1993/robot_statemachine.git |
| VCS Type | git |
| VCS Version | master |
| Last Updated | 2021-03-15 |
| Dev Status | MAINTAINED |
| Released | RELEASED |
| Contributing |
Help Wanted (-)
Good First Issues (-) Pull Requests to Review (-) |
Package Description
Additional Links
Maintainers
- Marco Steinbrink
Authors
- Marco Steinbrink
RSM Core
The Robot Statemachine’s core components will be explained first and it’s usage afterwards, including examples and tutorials for writing plugins, including them into the RSM and setting up a robot. Also, handling the GUI and starting a simulation with the RSM is explained.
Documentation
The RSM consists of various non-customizable and custom states that are based on the Base State. The former non-customizable states and the Base State are a part of this package containing the RSM’s basics.
To handle state transitions the State Interface is used. Robot Control Mux coordinates the actual control of the robot’s movement while the Service Provider contains services, publishers and subscribers for communication between states and updating the GUI. To be able to handle arbitrary robots, the RSM relies on Plugins that can be implemented depending on the robot. The implemented states can be seen in the biref class diagram below. It only shows the most important aspects and is not complete!

Base State
The base state for all states of the RSM features the following four main functions:
- onSetup
- onEntry
- onActive
- onExit
The function onSetup is called immediately after it was constructed and should be used to initialize the state. The function onEntry is run before the state’s onActive method is executed for the first time and should be used to start up the processing in the state. The latter is the state’s primary method that is executed periodically and contains it’s main logic. onExit is called before the state will be destroyed and should take care of leaving the state cleanly.
To realize interrupts in the RSM, the following five functions need to be implemented:
- onExplorationStart
- onExplorationStop
- onWaypointFollowingStart
- onWaypointFollowingStop
- onInterrupt
These functions handle commands issued from the GUI or the use of teleoperation by telling the current state which command or interrupt occurred and let the state handle it. The method onInterrupt receives the type of interrupt which are also defined in the Base State and are listed below:
- INTERRUPT_END: Former interrupt ended (only relevant to specific interrupt handlers)
- EMERGENCY_STOP_INTERRUPT: Emergency Software Stop was pushed in the GUI
- TELEOPERATION_INTERRUPT: Teleoperation was used
- SIMPLE_GOAL_INTERRUPT: A navigation goal was issued through the RViz GUI
- SIMPLE_GOAL_STOP_INTERRUPT: The navigation goal was stopped in the GUI
The four other methods receive a reference to a bool and a string variable. The former informs if the request was successful and the desired action will be executed (true) or not (false) and the latter features a descriptive text.
The Base State holds a reference to the State Interface which has to be used for state transitions. It also has a variable with it’s name that is necessary to display the current state in the GUI and needs to be set in the onSetup or onEntry method. Furthermore, this name contains information if the state is part of an autonomous behavior. More details will follow later
State Interface
The State Interface holds a reference to the current state and handles state transitions. It also provides references to plugins created for exploration, navigation, mapping or routines.
The State Interface provides the method transitionToVolatileState which will initiate a transition to the state provided as an argument. The provided argument is a boost::shared_ptr of the Base State type. This can be one of the known non-customizable states or a custom state defined through a plugin.
To access these plugins State Interface offers the method getPluginState which takes the plugin type and optionally a plugin routine name as parameters. The former can be one of the following types:
- CALCULATEGOAL_STATE
- NAVIGATION_STATE
- MAPPING_STATE
- ROUTINE_STATE
For a ROUTINE_STATE the routine name needs to be provided as well, otherwise this parameter can remain empty. The other plugin states are set by parameters provided to State Interface on launch. If no plugin type was specified but only a name, arbitrary plugins can be created and returned for state transition. If no plugin type and name were received or the desired plugin to be created does not exist, the Idle State will be returned and an error message put out.
State Interface subscribes to the stateInfo and simpleGoal topics to issue interrupts to the currently active state. Furthermore, it offers the two services startStopExploration and startStopWaypointFollowing which call the particular function in the active state.
The State Interface updates the currently active state periodically through it’s awake function. This function also executes the state transition initiated by transitionToVolatileState and calls the active state’s methods.
Robot Control Mux
The Robot Control Mux (=Multiplexer) controls the velocity commands sent to the ROS node interfacing the motor controllers. In a simple configuration, a navigation or teleoperation node would output velocity commands that will be received by the motor controller interface and move the robot. To enable high level control of the input the motor controller receives, the Robot Control Mux should be the only node in the setup publishing directly on the topic the motor controller interface subscribes to.
Velocity commands generated by navigation should be published to an autonomy topic and velocity commands issued by teleoperation to a teleoperation topic. These two topics are subscribed by the Robot Control Mux that decides which or if any topic will be forwarded. The two input and the output topic’s names are set by parameters at launch.
Which topic will be conducted is based on the operation mode which can be one of the following:
- Autonomy
- Stopped
- Teleoperation
For Autonomy and Teleoperation the respective topic is propagated to the motor controller interface. If the operation mode is set to Stopped a command velocity of zero for all directions is published. The operation mode can be set through the GUI by a service Robot Control Mux is providing. It is published to the GUI for display as well. If a teleoperation command is issued, the mode automatically switches to Teleoperation. When in Teleoperation mode, a timer is started to supervise if new commands are being issued. If no new commands are received for the timer duration (which is set through a parameter), Teleoperation is replaced with the Stopped mode. The same functionality can also be activated for commands from a joystick by setting the respective parameters.
If the software emergency stop is activated in the GUI, the operation mode is handled as Stopped and cannot be changed until the stop button is released again.
Service Provider
The Service Provider handles the communication between the different states and saves data throughout state transitions. Therefore it offers a lot of services to save and retrieve variables for the core functionality of the RSM.
It offers all services to control waypoint following which includes adding, moving and removing single waypoints, setting their visited and unreachable variables and the routine to be executed upon reaching the waypoint. Furthermore, all waypoints can be retrieved and reset which effectively sets visited and unreachable to false. The waypoint following mode can be set and the list of all available routines retrieved. The latter is given as a parameter to the Service Provider. The list of waypoints is also published.
For setting and retrieving the current navigation goal the Service Provider is offering services. In addition, the current robot pose can be retrieved and is calculated from the transform of the map to the robot’s base footprint. Furthermore, when a navigation goal is completed, a respective service must be called that handles waypoint following and exploration for a successful or unsuccessful completion.
The Service Provider hosts services for exploration that enable setting and getting the exploration mode. It is also published. When the mode is set to Interrupt, goals can become obsolete. This means the exploration algorithm has found more rewarding goals to go to.
Furthermore, it advertises services for setting and retrieving the reverse mode, which is also published.
Non-customizable states
The core state machine already features the following states for direct usage:
- Boot State: Is the first state to be called and subscribes to a service which tells it when all necessary systems are available and ready to use. Then it initiates a transition to the Idle State. Can only be interrupted by the software emergency stop.
- Emergency Stop State: State being called when the software emergency stop was pushed. Only allows transition to Idle State when button is released.
- Idle State: Standard state when no commands were issued. Allows transitions to all other states through interrupts.
- Teleoperation State: State being called when teleoperation commands were issued. Only transitions to Idle State when teleoperation timed out and Emergency Stop State when receiving the respective interrupt.
- Waypoint Following State: Handles the waypoint following functionality by providing the next navigation goal depending on the status of all waypoints and the waypoint following mode. Normally transitions to the navigation state plugin. Can be interrupted by the software emergency stop and teleoperation which leads to a transition to the particular state. If waypoint following is stopped, transitions to Idle State.
Plugins
The RSM package requires three different plugin states, one for exploration to calculate the next goal, one for navigation and one for mapping. The first is called when exploration is started or a previous exploration target was mapped successfully and should interface an exploration package like explore lite which finds unexplored regions in the map and extract a next goal from it. The second should interface a package for navigation like the ROS navigation stack and update the RSM according to the navigation’s progress. The last is called when an exploration goal is reached and can include movements for better map acquisition or similar behaviors.
Also, up to ten plugins states can be included for the waypoint following routines that are executed upon reaching a waypoint. They are not necessary for the RSM like the plugins mentioned above. These routines can be implemented to enable arbitrary behavior when reaching a certain waypoint, for example inspecting gauge valves with a camera.
More plugins can be added if additional states during exploration or waypoint following are desired. These can only be called from other implemented plugin states as the basic RSM only includes transitions to the plugins described above. For example, if you have a robot able to climb stairs and you detect stairs during navigation, you can then call another plugin for stair-climbing and afterwards transition back to normal navigation.
File truncated at 100 lines see the full file
Changelog for package rsm_core
1.1.3 (2019-08-29)
- Added all dependencies to CMakeLists and package.xml, that were missing previously
- Contributors: MarcoStb1993
1.1.2 (2019-08-28)
1.1.1 (2019-08-05)
- added changelogs
- Fixed some dependencies for the new names
- Changed package names, this time for real
- Contributors: MarcoStb1993
Package Dependencies
| Deps | Name |
|---|---|
| roscpp | |
| tf | |
| actionlib | |
| actionlib_msgs | |
| pluginlib | |
| rsm_msgs | |
| std_msgs | |
| std_srvs | |
| geometry_msgs | |
| sensor_msgs | |
| catkin |
System Dependencies
Dependant Packages
| Name | Deps |
|---|---|
| robot_statemachine | |
| rsm_additions |
Launch files
- launch/rsm.launch
- launch RSM
-
- update_frequency [default: 20]
- robot_frame [default: /base_footprint]
- mapping_plugin [default: rsm::MappingDummyState]
- calculate_goal_plugin [default: rsm::CalculateGoalState]
- navigation_plugin [default: rsm::NavigationState]
- autonomy_cmd_vel_topic [default: /autonomy/cmd_vel]
- teleoperation_cmd_vel_topic [default: /teleoperation/cmd_vel]
- cmd_vel_topic [default: /cmd_vel]
- joystick_used [default: false]
- joystick_topic [default: joy]
- teleoperation_idle_timer [default: 0.5]
- waypoint_routines [default: []]
Messages
Services
Plugins
Recent questions tagged rsm_core at Robotics Stack Exchange
|
|
rsm_core package from robot_statemachine reporobot_statemachine rsm_additions rsm_core rsm_msgs rsm_rqt_plugins rsm_rviz_plugins |
ROS Distro
|
Package Summary
| Version | 1.1.3 |
| License | BSD |
| Build type | CATKIN |
| Use | RECOMMENDED |
Repository Summary
| Checkout URI | https://github.com/MarcoStb1993/robot_statemachine.git |
| VCS Type | git |
| VCS Version | master |
| Last Updated | 2021-03-15 |
| Dev Status | MAINTAINED |
| Released | RELEASED |
| Contributing |
Help Wanted (-)
Good First Issues (-) Pull Requests to Review (-) |
Package Description
Additional Links
Maintainers
- Marco Steinbrink
Authors
- Marco Steinbrink
RSM Core
The Robot Statemachine’s core components will be explained first and it’s usage afterwards, including examples and tutorials for writing plugins, including them into the RSM and setting up a robot. Also, handling the GUI and starting a simulation with the RSM is explained.
Documentation
The RSM consists of various non-customizable and custom states that are based on the Base State. The former non-customizable states and the Base State are a part of this package containing the RSM’s basics.
To handle state transitions the State Interface is used. Robot Control Mux coordinates the actual control of the robot’s movement while the Service Provider contains services, publishers and subscribers for communication between states and updating the GUI. To be able to handle arbitrary robots, the RSM relies on Plugins that can be implemented depending on the robot. The implemented states can be seen in the biref class diagram below. It only shows the most important aspects and is not complete!
Base State
The base state for all states of the RSM features the following four main functions:
- onSetup
- onEntry
- onActive
- onExit
The function onSetup is called immediately after it was constructed and should be used to initialize the state. The function onEntry is run before the state’s onActive method is executed for the first time and should be used to start up the processing in the state. The latter is the state’s primary method that is executed periodically and contains it’s main logic. onExit is called before the state will be destroyed and should take care of leaving the state cleanly.
To realize interrupts in the RSM, the following five functions need to be implemented:
- onExplorationStart
- onExplorationStop
- onWaypointFollowingStart
- onWaypointFollowingStop
- onInterrupt
These functions handle commands issued from the GUI or the use of teleoperation by telling the current state which command or interrupt occurred and let the state handle it. The method onInterrupt receives the type of interrupt which are also defined in the Base State and are listed below:
- INTERRUPT_END: Former interrupt ended (only relevant to specific interrupt handlers)
- EMERGENCY_STOP_INTERRUPT: Emergency Software Stop was pushed in the GUI
- TELEOPERATION_INTERRUPT: Teleoperation was used
- SIMPLE_GOAL_INTERRUPT: A navigation goal was issued through the RViz GUI
- SIMPLE_GOAL_STOP_INTERRUPT: The navigation goal was stopped in the GUI
The four other methods receive a reference to a bool and a string variable. The former informs if the request was successful and the desired action will be executed (true) or not (false) and the latter features a descriptive text.
The Base State holds a reference to the State Interface which has to be used for state transitions. It also has a variable with it’s name that is necessary to display the current state in the GUI and needs to be set in the onSetup or onEntry method. Furthermore, this name contains information if the state is part of an autonomous behavior. More details will follow later
State Interface
The State Interface holds a reference to the current state and handles state transitions. It also provides references to plugins created for exploration, navigation, mapping or routines.
The State Interface provides the method transitionToVolatileState which will initiate a transition to the state provided as an argument. The provided argument is a boost::shared_ptr of the Base State type. This can be one of the known non-customizable states or a custom state defined through a plugin.
To access these plugins State Interface offers the method getPluginState which takes the plugin type and optionally a plugin routine name as parameters. The former can be one of the following types:
- CALCULATEGOAL_STATE
- NAVIGATION_STATE
- MAPPING_STATE
- ROUTINE_STATE
For a ROUTINE_STATE the routine name needs to be provided as well, otherwise this parameter can remain empty. The other plugin states are set by parameters provided to State Interface on launch. If no plugin type was specified but only a name, arbitrary plugins can be created and returned for state transition. If no plugin type and name were received or the desired plugin to be created does not exist, the Idle State will be returned and an error message put out.
State Interface subscribes to the stateInfo and simpleGoal topics to issue interrupts to the currently active state. Furthermore, it offers the two services startStopExploration and startStopWaypointFollowing which call the particular function in the active state.
The State Interface updates the currently active state periodically through it’s awake function. This function also executes the state transition initiated by transitionToVolatileState and calls the active state’s methods.
Robot Control Mux
The Robot Control Mux (=Multiplexer) controls the velocity commands sent to the ROS node interfacing the motor controllers. In a simple configuration, a navigation or teleoperation node would output velocity commands that will be received by the motor controller interface and move the robot. To enable high level control of the input the motor controller receives, the Robot Control Mux should be the only node in the setup publishing directly on the topic the motor controller interface subscribes to.
Velocity commands generated by navigation should be published to an autonomy topic and velocity commands issued by teleoperation to a teleoperation topic. These two topics are subscribed by the Robot Control Mux that decides which or if any topic will be forwarded. The two input and the output topic’s names are set by parameters at launch.
Which topic will be conducted is based on the operation mode which can be one of the following:
- Autonomy
- Stopped
- Teleoperation
For Autonomy and Teleoperation the respective topic is propagated to the motor controller interface. If the operation mode is set to Stopped a command velocity of zero for all directions is published. The operation mode can be set through the GUI by a service Robot Control Mux is providing. It is published to the GUI for display as well. If a teleoperation command is issued, the mode automatically switches to Teleoperation. When in Teleoperation mode, a timer is started to supervise if new commands are being issued. If no new commands are received for the timer duration (which is set through a parameter), Teleoperation is replaced with the Stopped mode. The same functionality can also be activated for commands from a joystick by setting the respective parameters.
If the software emergency stop is activated in the GUI, the operation mode is handled as Stopped and cannot be changed until the stop button is released again.
Service Provider
The Service Provider handles the communication between the different states and saves data throughout state transitions. Therefore it offers a lot of services to save and retrieve variables for the core functionality of the RSM.
It offers all services to control waypoint following which includes adding, moving and removing single waypoints, setting their visited and unreachable variables and the routine to be executed upon reaching the waypoint. Furthermore, all waypoints can be retrieved and reset which effectively sets visited and unreachable to false. The waypoint following mode can be set and the list of all available routines retrieved. The latter is given as a parameter to the Service Provider. The list of waypoints is also published.
For setting and retrieving the current navigation goal the Service Provider is offering services. In addition, the current robot pose can be retrieved and is calculated from the transform of the map to the robot’s base footprint. Furthermore, when a navigation goal is completed, a respective service must be called that handles waypoint following and exploration for a successful or unsuccessful completion.
The Service Provider hosts services for exploration that enable setting and getting the exploration mode. It is also published. When the mode is set to Interrupt, goals can become obsolete. This means the exploration algorithm has found more rewarding goals to go to.
Furthermore, it advertises services for setting and retrieving the reverse mode, which is also published.
Non-customizable states
The core state machine already features the following states for direct usage:
- Boot State: Is the first state to be called and subscribes to a service which tells it when all necessary systems are available and ready to use. Then it initiates a transition to the Idle State. Can only be interrupted by the software emergency stop.
- Emergency Stop State: State being called when the software emergency stop was pushed. Only allows transition to Idle State when button is released.
- Idle State: Standard state when no commands were issued. Allows transitions to all other states through interrupts.
- Teleoperation State: State being called when teleoperation commands were issued. Only transitions to Idle State when teleoperation timed out and Emergency Stop State when receiving the respective interrupt.
- Waypoint Following State: Handles the waypoint following functionality by providing the next navigation goal depending on the status of all waypoints and the waypoint following mode. Normally transitions to the navigation state plugin. Can be interrupted by the software emergency stop and teleoperation which leads to a transition to the particular state. If waypoint following is stopped, transitions to Idle State.
Plugins
The RSM package requires three different plugin states, one for exploration to calculate the next goal, one for navigation and one for mapping. The first is called when exploration is started or a previous exploration target was mapped successfully and should interface an exploration package like explore lite which finds unexplored regions in the map and extract a next goal from it. The second should interface a package for navigation like the ROS navigation stack and update the RSM according to the navigation’s progress. The last is called when an exploration goal is reached and can include movements for better map acquisition or similar behaviors.
Also, up to ten plugins states can be included for the waypoint following routines that are executed upon reaching a waypoint. They are not necessary for the RSM like the plugins mentioned above. These routines can be implemented to enable arbitrary behavior when reaching a certain waypoint, for example inspecting gauge valves with a camera.
More plugins can be added if additional states during exploration or waypoint following are desired. These can only be called from other implemented plugin states as the basic RSM only includes transitions to the plugins described above. For example, if you have a robot able to climb stairs and you detect stairs during navigation, you can then call another plugin for stair-climbing and afterwards transition back to normal navigation.
File truncated at 100 lines see the full file
Changelog for package rsm_core
1.1.3 (2019-08-29)
- Added all dependencies to CMakeLists and package.xml, that were missing previously
- Contributors: MarcoStb1993
1.1.2 (2019-08-28)
1.1.1 (2019-08-05)
- added changelogs
- Fixed some dependencies for the new names
- Changed package names, this time for real
- Contributors: MarcoStb1993
Package Dependencies
| Deps | Name |
|---|---|
| roscpp | |
| tf | |
| actionlib | |
| actionlib_msgs | |
| pluginlib | |
| rsm_msgs | |
| std_msgs | |
| std_srvs | |
| geometry_msgs | |
| sensor_msgs | |
| catkin |
System Dependencies
Dependant Packages
| Name | Deps |
|---|---|
| robot_statemachine | |
| rsm_additions |
Launch files
- launch/rsm.launch
- launch RSM
-
- update_frequency [default: 20]
- robot_frame [default: /base_footprint]
- mapping_plugin [default: rsm::MappingDummyState]
- calculate_goal_plugin [default: rsm::CalculateGoalState]
- navigation_plugin [default: rsm::NavigationState]
- autonomy_cmd_vel_topic [default: /autonomy/cmd_vel]
- teleoperation_cmd_vel_topic [default: /teleoperation/cmd_vel]
- cmd_vel_topic [default: /cmd_vel]
- joystick_used [default: false]
- joystick_topic [default: joy]
- teleoperation_idle_timer [default: 0.5]
- waypoint_routines [default: []]
Messages
Services
Plugins
Recent questions tagged rsm_core at Robotics Stack Exchange
|
|
rsm_core package from robot_statemachine reporobot_statemachine rsm_additions rsm_core rsm_msgs rsm_rqt_plugins rsm_rviz_plugins |
ROS Distro
|
Package Summary
| Version | 1.2.1 |
| License | BSD |
| Build type | CATKIN |
| Use | RECOMMENDED |
Repository Summary
| Checkout URI | https://github.com/MarcoStb1993/robot_statemachine.git |
| VCS Type | git |
| VCS Version | melodic-devel |
| Last Updated | 2022-02-10 |
| Dev Status | MAINTAINED |
| Released | RELEASED |
| Contributing |
Help Wanted (-)
Good First Issues (-) Pull Requests to Review (-) |
Package Description
Additional Links
Maintainers
- Marco Steinbrink
Authors
- Marco Steinbrink
RSM Core
The Robot Statemachine’s core components will be explained first and it’s usage afterwards, including examples and tutorials for writing plugins, including them into the RSM and setting up a robot. Also, handling the GUI and starting a simulation with the RSM is explained.
Documentation
The RSM consists of various non-customizable and custom states that are based on the Base State. The former non-customizable states and the Base State are a part of this package containing the RSM’s basics.
To handle state transitions the State Interface is used. Robot Control Mux coordinates the actual control of the robot’s movement while the Service Provider contains services, publishers and subscribers for communication between states and updating the GUI. To be able to handle arbitrary robots, the RSM relies on Plugins that can be implemented depending on the robot. The implemented states can be seen in the biref class diagram below. It only shows the most important aspects and is not complete!
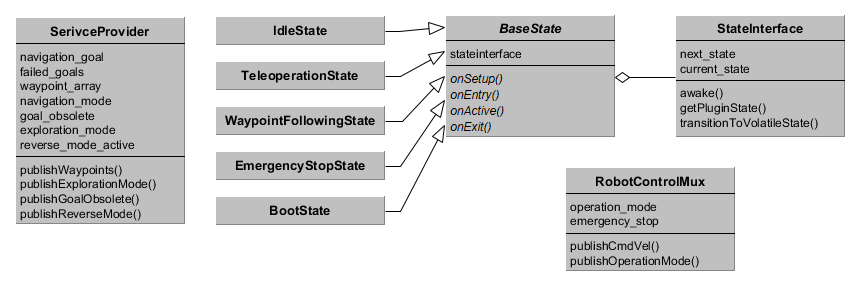
Base State
The base state for all states of the RSM features the following four main functions:
- onSetup
- onEntry
- onActive
- onExit
The function onSetup is called immediately after it was constructed and should be used to initialize the state. The function onEntry is run before the state’s onActive method is executed for the first time and should be used to start up the processing in the state. The latter is the state’s primary method that is executed periodically and contains it’s main logic. onExit is called before the state will be destroyed and should take care of leaving the state cleanly.
To realize interrupts in the RSM, the following five functions need to be implemented:
- onExplorationStart
- onExplorationStop
- onWaypointFollowingStart
- onWaypointFollowingStop
- onInterrupt
These functions handle commands issued from the GUI or the use of teleoperation by telling the current state which command or interrupt occurred and let the state handle it. The method onInterrupt receives the type of interrupt which are also defined in the Base State and are listed below:
- INTERRUPT_END: Former interrupt ended (only relevant to specific interrupt handlers)
- EMERGENCY_STOP_INTERRUPT: Emergency Software Stop was pushed in the GUI
- TELEOPERATION_INTERRUPT: Teleoperation was used
- SIMPLE_GOAL_INTERRUPT: A navigation goal was issued through the RViz GUI
- SIMPLE_GOAL_STOP_INTERRUPT: The navigation goal was stopped in the GUI
The four other methods receive a reference to a bool and a string variable. The former informs if the request was successful and the desired action will be executed (true) or not (false) and the latter features a descriptive text.
The Base State holds a reference to the State Interface which has to be used for state transitions. It also has a variable with it’s name that is necessary to display the current state in the GUI and needs to be set in the onSetup or onEntry method. Furthermore, this name contains information if the state is part of an autonomous behavior. More details will follow later
State Interface
The State Interface holds a reference to the current state and handles state transitions. It also provides references to plugins created for exploration, navigation, mapping or routines.
The State Interface provides the method transitionToVolatileState which will initiate a transition to the state provided as an argument. The provided argument is a boost::shared_ptr of the Base State type. This can be one of the known non-customizable states or a custom state defined through a plugin.
To access these plugins State Interface offers the method getPluginState which takes the plugin type and optionally a plugin routine name as parameters. The former can be one of the following types:
- CALCULATEGOAL_STATE
- NAVIGATION_STATE
- MAPPING_STATE
- ROUTINE_STATE
For a ROUTINE_STATE the routine name needs to be provided as well, otherwise this parameter can remain empty. The other plugin states are set by parameters provided to State Interface on launch. If no plugin type was specified but only a name, arbitrary plugins can be created and returned for state transition. If no plugin type and name were received or the desired plugin to be created does not exist, the Idle State will be returned and an error message put out.
State Interface subscribes to the stateInfo and simpleGoal topics to issue interrupts to the currently active state. Furthermore, it offers the two services startStopExploration and startStopWaypointFollowing which call the particular function in the active state.
The State Interface updates the currently active state periodically through it’s awake function. This function also executes the state transition initiated by transitionToVolatileState and calls the active state’s methods.
Robot Control Mux
The Robot Control Mux (=Multiplexer) controls the velocity commands sent to the ROS node interfacing the motor controllers. In a simple configuration, a navigation or teleoperation node would output velocity commands that will be received by the motor controller interface and move the robot. To enable high level control of the input the motor controller receives, the Robot Control Mux should be the only node in the setup publishing directly on the topic the motor controller interface subscribes to.
Velocity commands generated by navigation should be published to an autonomy topic and velocity commands issued by teleoperation to a teleoperation topic. These two topics are subscribed by the Robot Control Mux that decides which or if any topic will be forwarded. The two input and the output topic’s names are set by parameters at launch.
Which topic will be conducted is based on the operation mode which can be one of the following:
- Autonomy
- Stopped
- Teleoperation
For Autonomy and Teleoperation the respective topic is propagated to the motor controller interface. If the operation mode is set to Stopped a command velocity of zero for all directions is published. The operation mode can be set through the GUI by a service Robot Control Mux is providing. It is published to the GUI for display as well. If a teleoperation command is issued, the mode automatically switches to Teleoperation. When in Teleoperation mode, a timer is started to supervise if new commands are being issued. If no new commands are received for the timer duration (which is set through a parameter), Teleoperation is replaced with the Stopped mode. The same functionality can also be activated for commands from a joystick by setting the respective parameters.
If the software emergency stop is activated in the GUI, the operation mode is handled as Stopped and cannot be changed until the stop button is released again.
Service Provider
The Service Provider handles the communication between the different states and saves data throughout state transitions. Therefore it offers a lot of services to save and retrieve variables for the core functionality of the RSM.
It offers all services to control waypoint following which includes adding, moving and removing single waypoints, setting their visited and unreachable variables and the routine to be executed upon reaching the waypoint. Furthermore, all waypoints can be retrieved and reset which effectively sets visited and unreachable to false. The waypoint following mode can be set and the list of all available routines retrieved. The latter is given as a parameter to the Service Provider. The list of waypoints is also published.
For setting and retrieving the current navigation goal the Service Provider is offering services. In addition, the current robot pose can be retrieved and is calculated from the transform of the map to the robot’s base footprint. Furthermore, when a navigation goal is completed, a respective service must be called that handles waypoint following and exploration for a successful or unsuccessful completion.
The Service Provider hosts services for exploration that enable setting and getting the exploration mode. It is also published. When the mode is set to Interrupt, goals can become obsolete. This means the exploration algorithm has found more rewarding goals to go to.
Furthermore, it advertises services for setting and retrieving the reverse mode, which is also published.
Non-customizable states
The core state machine already features the following states for direct usage:
- Boot State: Is the first state to be called and subscribes to a service which tells it when all necessary systems are available and ready to use. Then it initiates a transition to the Idle State. Can only be interrupted by the software emergency stop.
- Emergency Stop State: State being called when the software emergency stop was pushed. Only allows transition to Idle State when button is released.
- Idle State: Standard state when no commands were issued. Allows transitions to all other states through interrupts.
- Teleoperation State: State being called when teleoperation commands were issued. Only transitions to Idle State when teleoperation timed out and Emergency Stop State when receiving the respective interrupt.
- Waypoint Following State: Handles the waypoint following functionality by providing the next navigation goal depending on the status of all waypoints and the waypoint following mode. Normally transitions to the navigation state plugin. Can be interrupted by the software emergency stop and teleoperation which leads to a transition to the particular state. If waypoint following is stopped, transitions to Idle State.
Plugins
The RSM package requires three different plugin states, one for exploration to calculate the next goal, one for navigation and one for mapping. The first is called when exploration is started or a previous exploration target was mapped successfully and should interface an exploration package like explore lite which finds unexplored regions in the map and extract a next goal from it. The second should interface a package for navigation like the ROS navigation stack and update the RSM according to the navigation’s progress. The last is called when an exploration goal is reached and can include movements for better map acquisition or similar behaviors.
Also, up to ten plugins states can be included for the waypoint following routines that are executed upon reaching a waypoint. They are not necessary for the RSM like the plugins mentioned above. These routines can be implemented to enable arbitrary behavior when reaching a certain waypoint, for example inspecting gauge valves with a camera.
More plugins can be added if additional states during exploration or waypoint following are desired. These can only be called from other implemented plugin states as the basic RSM only includes transitions to the plugins described above. For example, if you have a robot able to climb stairs and you detect stairs during navigation, you can then call another plugin for stair-climbing and afterwards transition back to normal navigation.
File truncated at 100 lines see the full file
Changelog for package rsm_core
1.2.1 (2020-11-24)
1.2.0 (2020-11-04)
- Added parameter for navigation behavior on idle timer callback and gazeboToTf changed to ground plane
- Replaced simulated kinect with Intel RealSense to adapt to husky simulator melodic
- Now starts exploration with mapping state
- Exploration Goal Status is now published as a topic to prevent service deadlocks
- Removed failed goal services and added a publisher
- Added GoalCompleted service to give more detailed feedback over navigation completed status
- Added prefix to state name to identify autonomy behavior
- moved goalObsolete service to Additions and exploration completed goal out of navigation completed service
- Fix wrong error message on service failure
- Added class and state diagram to documentation
- Added tutorial details for creating Calculate Goal and Navigation plugins
- Added services for handling completed navigation goals to remove the logic from the navigation plugin
- Moved logic regarding explore_lite to AdditionsServiceProvider from ServiceProvider where they should belong
- Removed double maintainer tags
- Updated README with joystick listener addition
- Added joystick topic for teleoperation interrupt
- Properly reset shared_ptr to prevent errors on close
- Contributors: Marco Steinbrink, MarcoStb1993, marco
1.1.3 (2019-08-29)
- Added all dependencies to CMakeLists and package.xml, that were missing previously
- Contributors: MarcoStb1993
1.1.2 (2019-08-28)
1.1.1 (2019-08-05)
- added changelogs
- Fixed some dependencies for the new names
- Changed package names, this time for real
- Contributors: MarcoStb1993
Package Dependencies
| Deps | Name |
|---|---|
| roscpp | |
| tf | |
| actionlib | |
| actionlib_msgs | |
| pluginlib | |
| rsm_msgs | |
| std_msgs | |
| std_srvs | |
| geometry_msgs | |
| sensor_msgs | |
| catkin |
System Dependencies
Dependant Packages
| Name | Deps |
|---|---|
| robot_statemachine | |
| rsm_additions |
Launch files
- launch/rsm.launch
- launch RSM
-
- update_frequency [default: 20]
- robot_frame [default: /base_footprint]
- mapping_plugin [default: rsm::MappingDummyState]
- calculate_goal_plugin [default: rsm::CalculateGoalState]
- navigation_plugin [default: rsm::NavigationState]
- autonomy_cmd_vel_topic [default: /autonomy/cmd_vel]
- teleoperation_cmd_vel_topic [default: /teleoperation/cmd_vel]
- cmd_vel_topic [default: /cmd_vel]
- joystick_used [default: false]
- joystick_topic [default: joy]
- teleoperation_idle_timer [default: 0.5]
- waypoint_routines [default: []]
Messages
Services
Plugins
Recent questions tagged rsm_core at Robotics Stack Exchange
|
|
rsm_core package from robot_statemachine reporobot_statemachine rsm_additions rsm_core rsm_msgs rsm_rqt_plugins rsm_rviz_plugins |
ROS Distro
|
Package Summary
| Version | 1.1.3 |
| License | BSD |
| Build type | CATKIN |
| Use | RECOMMENDED |
Repository Summary
| Checkout URI | https://github.com/MarcoStb1993/robot_statemachine.git |
| VCS Type | git |
| VCS Version | master |
| Last Updated | 2021-03-15 |
| Dev Status | MAINTAINED |
| Released | RELEASED |
| Contributing |
Help Wanted (-)
Good First Issues (-) Pull Requests to Review (-) |
Package Description
Additional Links
Maintainers
- Marco Steinbrink
Authors
- Marco Steinbrink
RSM Core
The Robot Statemachine’s core components will be explained first and it’s usage afterwards, including examples and tutorials for writing plugins, including them into the RSM and setting up a robot. Also, handling the GUI and starting a simulation with the RSM is explained.
Documentation
The RSM consists of various non-customizable and custom states that are based on the Base State. The former non-customizable states and the Base State are a part of this package containing the RSM’s basics.
To handle state transitions the State Interface is used. Robot Control Mux coordinates the actual control of the robot’s movement while the Service Provider contains services, publishers and subscribers for communication between states and updating the GUI. To be able to handle arbitrary robots, the RSM relies on Plugins that can be implemented depending on the robot. The implemented states can be seen in the biref class diagram below. It only shows the most important aspects and is not complete!
Base State
The base state for all states of the RSM features the following four main functions:
- onSetup
- onEntry
- onActive
- onExit
The function onSetup is called immediately after it was constructed and should be used to initialize the state. The function onEntry is run before the state’s onActive method is executed for the first time and should be used to start up the processing in the state. The latter is the state’s primary method that is executed periodically and contains it’s main logic. onExit is called before the state will be destroyed and should take care of leaving the state cleanly.
To realize interrupts in the RSM, the following five functions need to be implemented:
- onExplorationStart
- onExplorationStop
- onWaypointFollowingStart
- onWaypointFollowingStop
- onInterrupt
These functions handle commands issued from the GUI or the use of teleoperation by telling the current state which command or interrupt occurred and let the state handle it. The method onInterrupt receives the type of interrupt which are also defined in the Base State and are listed below:
- INTERRUPT_END: Former interrupt ended (only relevant to specific interrupt handlers)
- EMERGENCY_STOP_INTERRUPT: Emergency Software Stop was pushed in the GUI
- TELEOPERATION_INTERRUPT: Teleoperation was used
- SIMPLE_GOAL_INTERRUPT: A navigation goal was issued through the RViz GUI
- SIMPLE_GOAL_STOP_INTERRUPT: The navigation goal was stopped in the GUI
The four other methods receive a reference to a bool and a string variable. The former informs if the request was successful and the desired action will be executed (true) or not (false) and the latter features a descriptive text.
The Base State holds a reference to the State Interface which has to be used for state transitions. It also has a variable with it’s name that is necessary to display the current state in the GUI and needs to be set in the onSetup or onEntry method. Furthermore, this name contains information if the state is part of an autonomous behavior. More details will follow later
State Interface
The State Interface holds a reference to the current state and handles state transitions. It also provides references to plugins created for exploration, navigation, mapping or routines.
The State Interface provides the method transitionToVolatileState which will initiate a transition to the state provided as an argument. The provided argument is a boost::shared_ptr of the Base State type. This can be one of the known non-customizable states or a custom state defined through a plugin.
To access these plugins State Interface offers the method getPluginState which takes the plugin type and optionally a plugin routine name as parameters. The former can be one of the following types:
- CALCULATEGOAL_STATE
- NAVIGATION_STATE
- MAPPING_STATE
- ROUTINE_STATE
For a ROUTINE_STATE the routine name needs to be provided as well, otherwise this parameter can remain empty. The other plugin states are set by parameters provided to State Interface on launch. If no plugin type was specified but only a name, arbitrary plugins can be created and returned for state transition. If no plugin type and name were received or the desired plugin to be created does not exist, the Idle State will be returned and an error message put out.
State Interface subscribes to the stateInfo and simpleGoal topics to issue interrupts to the currently active state. Furthermore, it offers the two services startStopExploration and startStopWaypointFollowing which call the particular function in the active state.
The State Interface updates the currently active state periodically through it’s awake function. This function also executes the state transition initiated by transitionToVolatileState and calls the active state’s methods.
Robot Control Mux
The Robot Control Mux (=Multiplexer) controls the velocity commands sent to the ROS node interfacing the motor controllers. In a simple configuration, a navigation or teleoperation node would output velocity commands that will be received by the motor controller interface and move the robot. To enable high level control of the input the motor controller receives, the Robot Control Mux should be the only node in the setup publishing directly on the topic the motor controller interface subscribes to.
Velocity commands generated by navigation should be published to an autonomy topic and velocity commands issued by teleoperation to a teleoperation topic. These two topics are subscribed by the Robot Control Mux that decides which or if any topic will be forwarded. The two input and the output topic’s names are set by parameters at launch.
Which topic will be conducted is based on the operation mode which can be one of the following:
- Autonomy
- Stopped
- Teleoperation
For Autonomy and Teleoperation the respective topic is propagated to the motor controller interface. If the operation mode is set to Stopped a command velocity of zero for all directions is published. The operation mode can be set through the GUI by a service Robot Control Mux is providing. It is published to the GUI for display as well. If a teleoperation command is issued, the mode automatically switches to Teleoperation. When in Teleoperation mode, a timer is started to supervise if new commands are being issued. If no new commands are received for the timer duration (which is set through a parameter), Teleoperation is replaced with the Stopped mode. The same functionality can also be activated for commands from a joystick by setting the respective parameters.
If the software emergency stop is activated in the GUI, the operation mode is handled as Stopped and cannot be changed until the stop button is released again.
Service Provider
The Service Provider handles the communication between the different states and saves data throughout state transitions. Therefore it offers a lot of services to save and retrieve variables for the core functionality of the RSM.
It offers all services to control waypoint following which includes adding, moving and removing single waypoints, setting their visited and unreachable variables and the routine to be executed upon reaching the waypoint. Furthermore, all waypoints can be retrieved and reset which effectively sets visited and unreachable to false. The waypoint following mode can be set and the list of all available routines retrieved. The latter is given as a parameter to the Service Provider. The list of waypoints is also published.
For setting and retrieving the current navigation goal the Service Provider is offering services. In addition, the current robot pose can be retrieved and is calculated from the transform of the map to the robot’s base footprint. Furthermore, when a navigation goal is completed, a respective service must be called that handles waypoint following and exploration for a successful or unsuccessful completion.
The Service Provider hosts services for exploration that enable setting and getting the exploration mode. It is also published. When the mode is set to Interrupt, goals can become obsolete. This means the exploration algorithm has found more rewarding goals to go to.
Furthermore, it advertises services for setting and retrieving the reverse mode, which is also published.
Non-customizable states
The core state machine already features the following states for direct usage:
- Boot State: Is the first state to be called and subscribes to a service which tells it when all necessary systems are available and ready to use. Then it initiates a transition to the Idle State. Can only be interrupted by the software emergency stop.
- Emergency Stop State: State being called when the software emergency stop was pushed. Only allows transition to Idle State when button is released.
- Idle State: Standard state when no commands were issued. Allows transitions to all other states through interrupts.
- Teleoperation State: State being called when teleoperation commands were issued. Only transitions to Idle State when teleoperation timed out and Emergency Stop State when receiving the respective interrupt.
- Waypoint Following State: Handles the waypoint following functionality by providing the next navigation goal depending on the status of all waypoints and the waypoint following mode. Normally transitions to the navigation state plugin. Can be interrupted by the software emergency stop and teleoperation which leads to a transition to the particular state. If waypoint following is stopped, transitions to Idle State.
Plugins
The RSM package requires three different plugin states, one for exploration to calculate the next goal, one for navigation and one for mapping. The first is called when exploration is started or a previous exploration target was mapped successfully and should interface an exploration package like explore lite which finds unexplored regions in the map and extract a next goal from it. The second should interface a package for navigation like the ROS navigation stack and update the RSM according to the navigation’s progress. The last is called when an exploration goal is reached and can include movements for better map acquisition or similar behaviors.
Also, up to ten plugins states can be included for the waypoint following routines that are executed upon reaching a waypoint. They are not necessary for the RSM like the plugins mentioned above. These routines can be implemented to enable arbitrary behavior when reaching a certain waypoint, for example inspecting gauge valves with a camera.
More plugins can be added if additional states during exploration or waypoint following are desired. These can only be called from other implemented plugin states as the basic RSM only includes transitions to the plugins described above. For example, if you have a robot able to climb stairs and you detect stairs during navigation, you can then call another plugin for stair-climbing and afterwards transition back to normal navigation.
File truncated at 100 lines see the full file
Changelog for package rsm_core
1.1.3 (2019-08-29)
- Added all dependencies to CMakeLists and package.xml, that were missing previously
- Contributors: MarcoStb1993
1.1.2 (2019-08-28)
1.1.1 (2019-08-05)
- added changelogs
- Fixed some dependencies for the new names
- Changed package names, this time for real
- Contributors: MarcoStb1993
Package Dependencies
| Deps | Name |
|---|---|
| roscpp | |
| tf | |
| actionlib | |
| actionlib_msgs | |
| pluginlib | |
| rsm_msgs | |
| std_msgs | |
| std_srvs | |
| geometry_msgs | |
| sensor_msgs | |
| catkin |
System Dependencies
Dependant Packages
| Name | Deps |
|---|---|
| robot_statemachine | |
| rsm_additions |
Launch files
- launch/rsm.launch
- launch RSM
-
- update_frequency [default: 20]
- robot_frame [default: /base_footprint]
- mapping_plugin [default: rsm::MappingDummyState]
- calculate_goal_plugin [default: rsm::CalculateGoalState]
- navigation_plugin [default: rsm::NavigationState]
- autonomy_cmd_vel_topic [default: /autonomy/cmd_vel]
- teleoperation_cmd_vel_topic [default: /teleoperation/cmd_vel]
- cmd_vel_topic [default: /cmd_vel]
- joystick_used [default: false]
- joystick_topic [default: joy]
- teleoperation_idle_timer [default: 0.5]
- waypoint_routines [default: []]