
|
raspimouse_ros2_examples package from raspimouse_ros2_examples reporaspimouse_ros2_examples |
|
|
Package Summary
| Tags | No category tags. |
| Version | 2.2.1 |
| License | Apache License 2.0 |
| Build type | AMENT_CMAKE |
| Use | RECOMMENDED |
Repository Summary
| Checkout URI | https://github.com/rt-net/raspimouse_ros2_examples.git |
| VCS Type | git |
| VCS Version | humble-devel |
| Last Updated | 2024-08-28 |
| Dev Status | MAINTAINED |
| CI status | No Continuous Integration |
| Released | RELEASED |
| Tags | No category tags. |
| Contributing |
Help Wanted (0)
Good First Issues (0) Pull Requests to Review (0) |
Package Description
Additional Links
Maintainers
- RT Corporation
Authors
- ShotaAk
- Daisuke Sato
- Shuhei Kozasa
| English | 日本語 |
raspimouse_ros2_examples
![]()
ROS 2 examples for Raspberry Pi Mouse.
ROS1 examples is here.
To run on Gazebo, click here.
<img src=https://rt-net.github.io/images/raspberry-pi-mouse/raspberry_pi_mouse.JPG width=500 />
Supported ROS 2 distributions
- Foxy
- Humble (This branch)
Requirements
- Raspberry Pi Mouse
- https://rt-net.jp/products/raspberrypimousev3/
- Linux OS
- Ubuntu server 22.04
- https://ubuntu.com/download/raspberry-pi
- Device Driver
- ROS
- Raspberry Pi Mouse ROS 2 package
- https://github.com/rt-net/raspimouse2
- Remote Computer (Optional)
- ROS
- Raspberry Pi Mouse ROS 2 package
- https://github.com/rt-net/raspimouse2
Installation
$ cd ~/ros2_ws/src
# Clone package
$ git clone -b $ROS_DISTRO-devel https://github.com/rt-net/raspimouse_ros2_examples.git

# Install dependencies
$ rosdep install -r -y --from-paths . --ignore-src

# Build & Install
$ cd ~/ros2_ws
$ colcon build --symlink-install
$ source ~/ros2_ws/install/setup.bash
License
This repository is licensed under the Apache 2.0, see LICENSE for details.
How To Use Examples
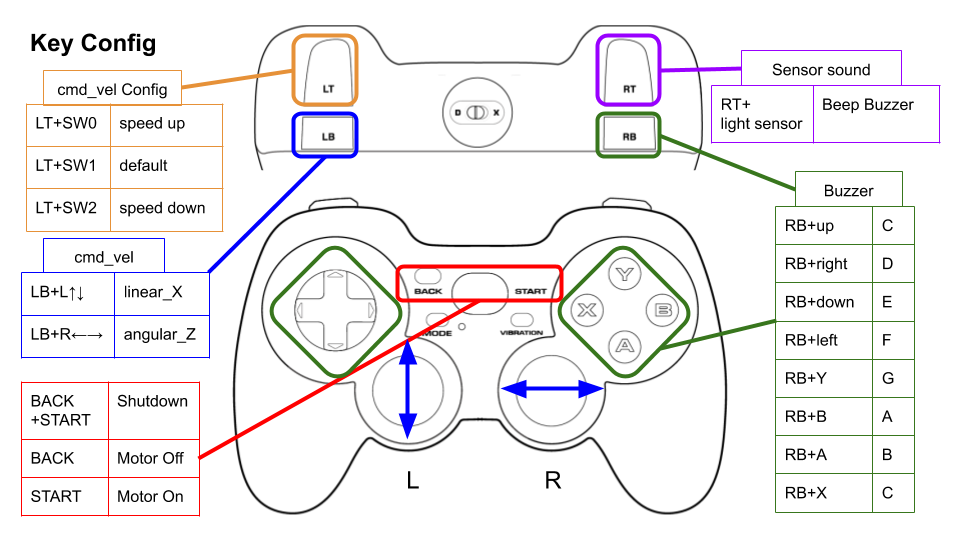
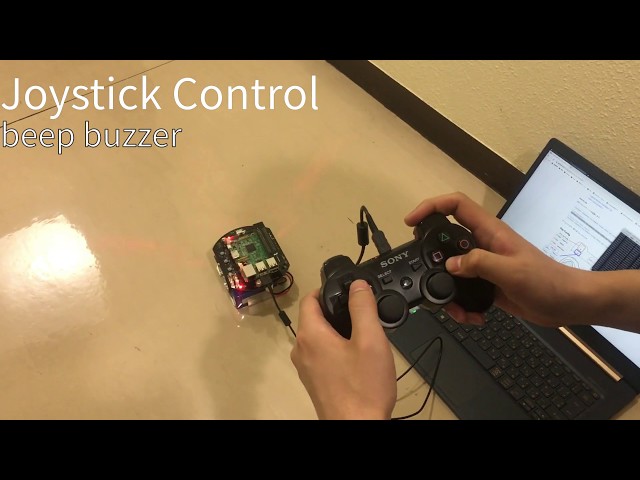
joystick_control
This is an example to use joystick controller to control a Raspberry Pi Mouse.
Requirements
- Joystick Controller
How to use
Launch nodes with the following command:
# Use F710
$ ros2 launch raspimouse_ros2_examples teleop_joy.launch.py joydev:="/dev/input/js0" joyconfig:=f710 mouse:=true

# Use DUALSHOCK 3
$ ros2 launch raspimouse_ros2_examples teleop_joy.launch.py joydev:="/dev/input/js0" joyconfig:=dualshock3 mouse:=true

# Control from remote computer
## on RaspberryPiMouse
$ ros2 run raspimouse raspimouse
## on remote computer
$ ros2 launch raspimouse_ros2_examples teleop_joy.launch.py mouse:=false
This picture shows the default key configuration.
To use Logicool Wireless Gamepad F710, set the input mode to D (DirectInput Mode).
Configure
Key assignments can be edited with key numbers in ./config/joy_f710.yml or ./config/joy_dualshock3.yml.
button_shutdown_1       : 8
button_shutdown_2       : 9

button_motor_off        : 8
button_motor_on         : 9

button_cmd_enable       : 4
Videos
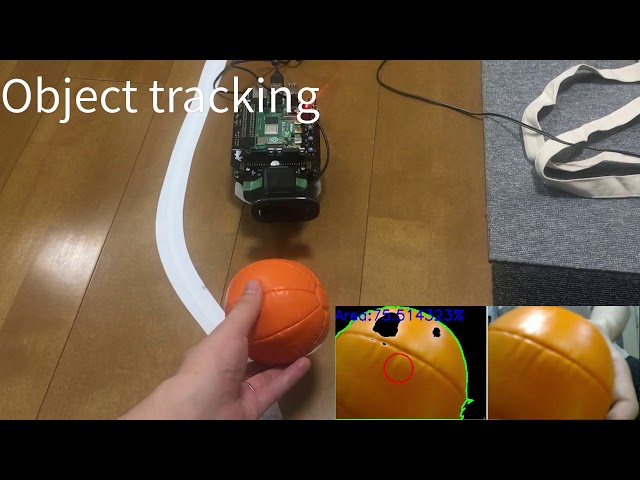
object_tracking
<img src=https://rt-net.github.io/images/raspberry-pi-mouse/object_tracking.JPG width=500 />
This is an example to use RGB camera images and OpenCV library for object tracking.
Requirements
- Web camera
- Camera mount
- Orange ball(Optional)
- Software
- OpenCV
- v4l-utils
Installation
Install a camera mount and a web camera to Raspberry Pi Mouse, then connect the camera to the Raspberry Pi.
How to use
Turn off automatic adjustment parameters of a camera (auto focus, auto while balance, etc.) with the following command:
$ cd ~/ros2_ws/src/raspimouse_ros2_examples/config
$ ./configure_camera.bash
Then, launch nodes with the following command:
$ ros2 launch raspimouse_ros2_examples object_tracking.launch.py video_device:=/dev/video0
This sample publishes two topics: camera/color/image_raw for the camera image and result_image for the object detection image.
These images can be viewed with RViz
or rqt_image_view.
Viewing an image may cause the node to behave unstable and not publish cmd_vel or image topics.
<img src=https://rt-net.github.io/images/raspberry-pi-mouse/object_tracking_ros2.png width=500 />
Configure
Edit ./src/object_tracking_component.cpp
to change a color of tracking target.
If the object detection accuracy is poor, adjust the camera exposure and parameters in the function
void Tracker::tracking(const cv::Mat & input_frame, cv::Mat & result_frame)
{
  cv::inRange(hsv, cv::Scalar(9, 100, 100), cv::Scalar(29, 255, 255), extracted_bin);  // Orange
  // cv::inRange(hsv, cv::Scalar(60, 100, 100), cv::Scalar(80, 255, 255), extracted_bin);  // Green
  // cv::inRange(hsv, cv::Scalar(100, 100, 100), cv::Scalar(120, 255, 255), extracted_bin);  // Blue
Videos
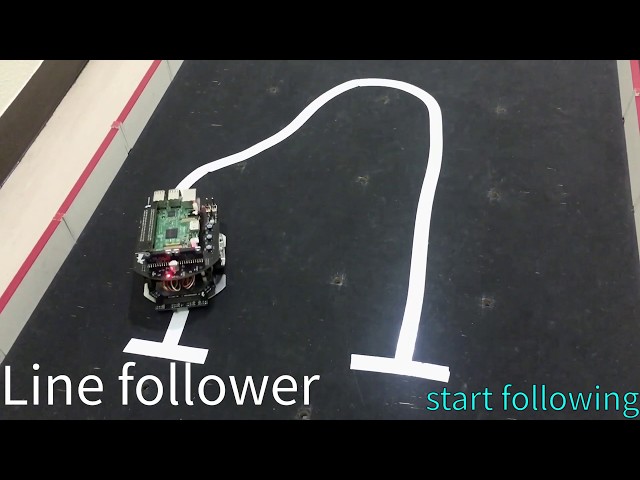
line_follower
<img src=https://rt-net.github.io/images/raspberry-pi-mouse/mouse_with_line_trace_sensor.JPG width=500 />
This is an example for line following.
Requirements
- Line following sensor
- Field and lines for following (Optional)
Installation
Install a line following sensor unit to Raspberry Pi Mouse.
How to use
Launch nodes with the following command:
$ ros2 launch raspimouse_ros2_examples line_follower.launch.py
Next, place Raspberry Pi Mouse on a field and press SW2 to sample sensor values on the field.
<img src=https://rt-net.github.io/images/raspberry-pi-mouse/field_calibration.JPG width=500 />
Then, place Raspberry Pi Mouse to detect a line and press SW1 to sample sensor values on the line.
<img src=https://rt-net.github.io/images/raspberry-pi-mouse/line_calibration.JPG width=500 />
Last, place Raspberry Pi Mouse on the line and press SW0 to start line following.
<img src=https://rt-net.github.io/images/raspberry-pi-mouse/start_trace.JPG width=500 />
Press SW0 again to stop the following.
Configure
Edit ./src/line_follower_component.cpp to change a velocity command.
void Follower::publish_cmdvel_for_line_following(void)
{
  const double VEL_LINEAR_X = 0.08;  // m/s
  const double VEL_ANGULAR_Z = 0.8;  // rad/s
  const double LOW_VEL_ANGULAR_Z = 0.5;  // rad/s
Videos
camera_line_follower
<img src=https://rt-net.github.io/images/raspberry-pi-mouse/mouse_camera_line_trace_2.png width=500 />
This is an example for line following by RGB camera.
Requirements
- Web camera
- Camera mount
Installation
Install a camera mount and a web camera to Raspberry Pi Mouse, then connect the camera to the Raspberry Pi.
How to use
Then, launch nodes with the following command:
$ ros2 launch raspimouse_ros2_examples camera_line_follower.launch.py video_device:=/dev/video0
Place Raspberry Pi Mouse on the line and press SW2 to start line following.
Press SW0 to stop the following.
This sample publishes two topics: camera/color/image_raw for the camera image and result_image for the object detection image.
These images can be viewed with RViz
or rqt_image_view.
Viewing an image may cause the node to behave unstable and not publish cmd_vel or image topics.
<img src=https://rt-net.github.io/images/raspberry-pi-mouse/camera_line_trace.png width=500 />
Parameters
-
max_brightness- Type:
int - Default: 90
- Maximum threshold value for image binarisation.
- Type:
-
min_brightness- Type:
int - Default: 0
- Minimum threshold value for image binarisation.
- Type:
-
max_linear_vel- Type:
double - Default: 0.05
- Maximum linear velocity.
- Type:
-
max_angular_vel- Type:
double - Default: 0.8
- Maximum angular velocity.
- Type:
-
area_threthold- Type:
double - Default: 0.20
- Threshold value of the area of the line to start following.
- Type:
ros2 param set /camera_follower max_brightness 80
SLAM
<img src=https://rt-net.github.io/images/raspberry-pi-mouse/slam_toolbox_ros2.png width=500 />
SLAM and Navigation examples for Raspberry Pi Mouse is here.
direction_controller
<img src=https://www.rt-net.jp/wp-content/uploads/2018/02/img-usb9s_01.png width=500 />
This is an example to use an IMU sensor for direction control.
Requirements
- USB output 9 degrees IMU sensor module
- LiDAR Mount
- RT-USB-9axisIMU ROS Package.
- https://github.com/rt-net/rt_usb_9axisimu_driver
Installation
Install the IMU sensor module to the LiDAR mount.
<img src=https://rt-net.github.io/images/raspberry-pi-mouse/mouse_with_imu_2.JPG width=500 />
Install the LiDAR mount to the Raspberry Pi Mouse.
<img src=https://rt-net.github.io/images/raspberry-pi-mouse/mouse_with_imu_1.JPG width=500 />
How to use
Launch nodes on Raspberry Pi Mouse with the following command:
$ ros2 launch raspimouse_ros2_examples direction_controller.launch.py
Then, press SW0 ~ SW2 to change the control mode as following,
- SW0: Calibrate the gyroscope bias and reset a heading angle of Raspberry Pi Mouse to 0 rad.
- SW1: Start a direction control to keep the heading angle to 0 rad.
- Press SW0 ~ SW2 or tilt the body to sideways to finish the control.
- SW2: Start a direction control to change the heading angle to
-π ~ π rad.- Press SW0 ~ SW2 or tilt the body to sideways to finish the control.
Troubleshooting
The IMU might not be connected correctly.
Reconnect the USB cable several times and re-execute the above command.
Configure
Set parameters to configure gains of a PID controller for the direction control.
$ ros2 param set /direction_controller p_gain 10.0
Set parameter successful

$ ros2 param set /direction_controller i_gain 0.5
Set parameter successful

$ ros2 param set /direction_controller d_gain 0.0
Set parameter successful
Parameters
- p_gain
- Proportional gain of a PID controller for the direction control
- default: 10.0, min:0.0, max:30.0
- type: double
- i_gain
- Integral gain of a PID controller for the direction control
- default: 0.0, min:0.0, max:5.0
- type: double
- d_gain
- Derivative gain of a PID controller for the direction control
- default: 20.0, min:0.0, max:30.0
- type: double
- target_angle
- Target angle for the SW1 control mode.
- default: 0.0, min:-π, max:+π
- type: double
Publish topics
- heading_angle
- Heading angle of the robot that calculated from the IMU module sensor values.
- type: std_msgs/Float64
Videos

Changelog for package raspimouse_ros2_examples
2.2.1 (2024-08-28)
- サービスクライアントでexecutorを使用しない (#59)
- SubscriberとService Clientに別々のcallback_groupを設定 (#58)
- Contributors: ShotaAk, YusukeKato
2.2.0 (2024-03-05)
- READMEにSLAM&Navigationパッケージの案内を追加 (#53)
- Camera_FollowerクラスをCameraFollowerに変更 (#52)
- Update camera line follower: Set motor power with switch input. Add area_threthold param. (#51)
- Add velocity parameters for camera_line_follower (#50)
- カメラライントレースを修正 (#49)
- Change threthold of line detection
- Add usb_cam dependency (#48)
- RGBカメラによるライントレースの実装 (#47)
- リリースのためにCHANGELOG.rstとpackage.xmlを更新 (#45)
- Contributors: Shota Aoki, ShotaAk, YusukeKato
2.1.0 (2023-11-07)
- READMEにGazeboでも実行できることを追記 (#44)
- object_trackingにおいて画像トピックをサブスクライブするように変更 (#43)
- Contributors: YusukeKato
2.0.0 (2023-08-03)
- Humble対応 (#41)
- Contributors: Shuhei Kozasa
1.0.0 (2022-07-28)
- Update map command (#38)
- Adds config file for DUALSHOCK4 (#36)
- Update README for foxy-devel (#34)
- Remove node_ prefix from launch files (#33)
- Use ament_export_targets instead of ament_export_interfaces. (#31)
- Remove dashing check from CI (#32)
- Update rviz config to show scan and graph topics (#29)
- Add descriptions to READMEs for use_pulse_counters param settings (#28)
- Use joy_linux instead of joy (#27)
- Update CI to support ROS Foxy (#26)
- Update package.xml (#25)
- Install raspimouse2 and imu packages via rosdep command (#22)
- Add rt_usb_9axisimu_driver dependency to package.xml (#21)
- Add direction control example (#18)
- Use images of rt-net/images repo. (#17)
- Add lidar example (#14)
- Turn on/off leds with joy inputs (#15)
- Update Gamepad F710 usage in README (#13)
- Use multi threads in the object tracking example to stabilize the tracking (#11)
- update video link (#12)
- Merge teleop_joy launch files into one file. (#10)
- Add line follower examples (#9)
- Add object tracking sample (#8)
- Rename launch files (#7)
- Refactoring (#6)
- Support remote control (#5)
- Add Joystic example (#4)
- Add industrial_ci test settings (#3)
- Fix teleop.launch for flake8 check (#2)
- Add github workflow (#1)
- Contributors: Daisuke Sato, Shota Aoki, Shuhei Kozasa
Wiki Tutorials
Package Dependencies
System Dependencies
| Name |
|---|
| libopencv-dev |
| v4l-utils |
Dependant Packages
| Name | Deps |
|---|---|
| raspimouse_slam |
Launch files
Messages
Services
Plugins
Recent questions tagged raspimouse_ros2_examples at Robotics Stack Exchange
|
|
raspimouse_ros2_examples package from raspimouse_ros2_examples reporaspimouse_ros2_examples |
|
|
Package Summary
| Tags | No category tags. |
| Version | 1.0.0 |
| License | Apache License 2.0 |
| Build type | AMENT_CMAKE |
| Use | RECOMMENDED |
Repository Summary
| Checkout URI | https://github.com/rt-net/raspimouse_ros2_examples.git |
| VCS Type | git |
| VCS Version | foxy-devel |
| Last Updated | 2022-07-29 |
| Dev Status | MAINTAINED |
| CI status | No Continuous Integration |
| Released | RELEASED |
| Tags | No category tags. |
| Contributing |
Help Wanted (0)
Good First Issues (0) Pull Requests to Review (0) |
Package Description
Additional Links
Maintainers
- RT Corporation
Authors
- ShotaAk
- Daisuke Sato
- Shuhei Kozasa
| English | 日本語 |
raspimouse_ros2_examples
![]()
ROS 2 examples for Raspberry Pi Mouse.
ROS1 examples is here.
<img src=https://rt-net.github.io/images/raspberry-pi-mouse/raspberry_pi_mouse.JPG width=500 />
Requirements
- Raspberry Pi Mouse
- https://rt-net.jp/products/raspberrypimousev3/
- Linux OS
- Ubuntu server 20.04
- https://ubuntu.com/download/raspberry-pi
- Device Driver
- ROS
- Raspberry Pi Mouse ROS 2 package
- https://github.com/rt-net/raspimouse2
- Remote Computer (Optional)
- ROS
- Raspberry Pi Mouse ROS 2 package
- https://github.com/rt-net/raspimouse2
Installation
$ cd ~/ros2_ws/src
# Clone package
$ git clone -b $ROS_DISTRO-devel https://github.com/rt-net/raspimouse_ros2_examples

# Install dependencies
$ rosdep install -r -y --from-paths . --ignore-src

# Build & Install
$ cd ~/ros2_ws
$ colcon build --symlink-install
$ source ~/ros2_ws/install/setup.bash
License
This repository is licensed under the Apache 2.0, see LICENSE for details.
How To Use Examples
joystick_control
This is an example to use joystick controller to control a Raspberry Pi Mouse.
Requirements
- Joystick Controller
How to use
Launch nodes with the following command:
# Use F710
$ ros2 launch raspimouse_ros2_examples teleop_joy.launch.py joydev:="/dev/input/js0" joyconfig:=f710 mouse:=true

# Use DUALSHOCK 3
$ ros2 launch raspimouse_ros2_examples teleop_joy.launch.py joydev:="/dev/input/js0" joyconfig:=dualshock3 mouse:=true

# Control from remote computer
## on RaspberryPiMouse
$ ros2 run raspimouse raspimouse
## on remote computer
$ ros2 launch raspimouse_ros2_examples teleop_joy.launch.py mouse:=false
This picture shows the default key configuration.
To use Logicool Wireless Gamepad F710, set the input mode to D (DirectInput Mode).
Configure
Key assignments can be edited with key numbers in ./config/joy_f710.yml or ./config/joy_dualshock3.yml.
button_shutdown_1       : 8
button_shutdown_2       : 9

button_motor_off        : 8
button_motor_on         : 9

button_cmd_enable       : 4
Videos
object_tracking
<img src=https://rt-net.github.io/images/raspberry-pi-mouse/object_tracking.JPG width=500 />
This is an example to use RGB camera images and OpenCV library for object tracking.
Requirements
- Web camera
- Camera mount
- Orange ball(Optional)
- Software
- OpenCV
- v4l-utils
Installation
Install a camera mount and a web camera to Raspberry Pi Mouse, then connect the camera to the Raspberry Pi.
How to use
Turn off automatic adjustment parameters of a camera (auto focus, auto while balance, etc.) with the following command:
$ cd ~/ros2_ws/src/raspimouse_ros2_examples/config
$ ./configure_camera.bash
Then, launch nodes with the following command:
$ ros2 launch raspimouse_ros2_examples object_tracking.launch.py
This sample publishes two topics: raw_image for the camera image and result_image for the object detection image.
These images can be viewed with RViz
or rqt_image_view.
Viewing an image may cause the node to behave unstable and not publish cmd_vel or image topics.
<img src=https://rt-net.github.io/images/raspberry-pi-mouse/object_tracking_ros2.png width=500 />
Configure
Edit ./src/object_tracking_component.cpp
to change a color of tracking target.
If the object detection accuracy is poor, adjust the camera exposure and parameters in the function
void Tracker::tracking(const cv::Mat & input_frame, cv::Mat & result_frame)
{
  cv::inRange(hsv, cv::Scalar(9, 100, 100), cv::Scalar(29, 255, 255), extracted_bin);  // Orange
  // cv::inRange(hsv, cv::Scalar(60, 100, 100), cv::Scalar(80, 255, 255), extracted_bin);  // Green
  // cv::inRange(hsv, cv::Scalar(100, 100, 100), cv::Scalar(120, 255, 255), extracted_bin);  // Blue
Videos
line_follower
<img src=https://rt-net.github.io/images/raspberry-pi-mouse/mouse_with_line_trace_sensor.JPG width=500 />
This is an example for line following.
Requirements
- Line following sensor
- Field and lines for following (Optional)
Installation
Install a line following sensor unit to Raspberry Pi Mouse.
How to use
Launch nodes with the following command:
$ ros2 launch raspimouse_ros2_examples line_follower.launch.py
Next, place Raspberry Pi Mouse on a field and press SW2 to sample sensor values on the field.
<img src=https://rt-net.github.io/images/raspberry-pi-mouse/field_calibration.JPG width=500 />
Then, place Raspberry Pi Mouse to detect a line and press SW1 to sample sensor values on the line.
<img src=https://rt-net.github.io/images/raspberry-pi-mouse/line_calibration.JPG width=500 />
Last, place Raspberry Pi Mouse on the line and press SW0 to start line following.
<img src=https://rt-net.github.io/images/raspberry-pi-mouse/start_trace.JPG width=500 />
Press SW0 again to stop the following.
Configure
Edit ./src/line_follower_component.cpp to change a velocity command.
void Follower::publish_cmdvel_for_line_following(void)
{
  const double VEL_LINEAR_X = 0.08;  // m/s
  const double VEL_ANGULAR_Z = 0.8;  // rad/s
  const double LOW_VEL_ANGULAR_Z = 0.5;  // rad/s
Videos
SLAM
<img src=https://rt-net.github.io/images/raspberry-pi-mouse/slam_toolbox_ros2.png width=500 />
This is an example to use LiDAR and slam_toolbox for SLAM (Simultaneous Localization And Mapping).
Requirements
- LiDAR
<!– - URG-04LX-UG01
- RPLIDAR A1 –>
- LDS-01
- LiDAR Mount
- Joystick Controller (Optional)
Installation
Install a LiDAR to the Raspberry Pi Mouse.
- LDS-01
- <img src=https://rt-net.github.io/images/raspberry-pi-mouse/mouse_with_lds01.JPG width=500 />
How to use
Launch nodes on Raspberry Pi Mouse with the following command:
# LDS
$ ros2 launch raspimouse_ros2_examples mouse_with_lidar.launch.py lidar:=lds
Next, launch teleop_joy.launch.py to control Raspberry Pi Mouse with the following command:
# Use DUALSHOCK 3
$ ros2 launch raspimouse_ros2_examples teleop_joy.launch.py joydev:="/dev/input/js0" joyconfig:=dualshock3 mouse:=false
Then, launch the slam_toolbox package (on a remote computer recommend) with the following command:
$ ros2 launch raspimouse_ros2_examples slam.launch.py
After moving Raspberry Pi Mouse and making a map, run a node to save the map with the following command:
$ mkdir ~/maps
$ ros2 run nav2_map_server map_saver_cli -f ~/maps/mymap --ros-args -p save_map_timeout:=10000
Configure SLAM parameters
Edit ./config/mapper_params_offline.yaml to configure parameters of slam_toolbox package.
Configure Odometry calculation
Edit mouse.yml to set use_pulse_counters to true (default: false) then the raspimouse node calculate the odometry (/odom) from motor control pulse counts.
This improves the accuracy of self-localization.
raspimouse:
  ros__parameters:
    odometry_scale_left_wheel : 1.0
    odometry_scale_right_wheel: 1.0
    use_light_sensors         : true
    use_pulse_counters        : true
direction_controller
<img src=https://www.rt-net.jp/wp-content/uploads/2018/02/img-usb9s_01.png width=500 />
This is an example to use an IMU sensor for direction control.
Requirements
- USB output 9 degrees IMU sensor module
- LiDAR Mount
- RT-USB-9axisIMU ROS Package.
- https://github.com/rt-net/rt_usb_9axisimu_driver
Installation
Install the IMU sensor module to the LiDAR mount.
<img src=https://rt-net.github.io/images/raspberry-pi-mouse/mouse_with_imu_2.JPG width=500 />
Install the LiDAR mount to the Raspberry Pi Mouse.
<img src=https://rt-net.github.io/images/raspberry-pi-mouse/mouse_with_imu_1.JPG width=500 />
How to use
Launch nodes on Raspberry Pi Mouse with the following command:
$ ros2 launch raspimouse_ros2_examples direction_controller.launch.py
Then, press SW0 ~ SW2 to change the control mode as following,
- SW0: Calibrate the gyroscope bias and reset a heading angle of Raspberry Pi Mouse to 0 rad.
- SW1: Start a direction control to keep the heading angle to 0 rad.
- Press SW0 ~ SW2 or tilt the body to sideways to finish the control.
- SW2: Start a direction control to change the heading angle to
-π ~ π rad.- Press SW0 ~ SW2 or tilt the body to sideways to finish the control.
Configure
Set parameters to configure gains of a PID controller for the direction control.
$ ros2 param set /direction_controller p_gain 10.0
Set parameter successful

$ ros2 param set /direction_controller i_gain 0.5
Set parameter successful

$ ros2 param set /direction_controller d_gain 0.0
Set parameter successful
Parameters
- p_gain
- Proportional gain of a PID controller for the direction control
- default: 10.0, min:0.0, max:30.0
- type: double
- i_gain
- Integral gain of a PID controller for the direction control
- default: 0.0, min:0.0, max:5.0
- type: double
- d_gain
- Derivative gain of a PID controller for the direction control
- default: 20.0, min:0.0, max:30.0
- type: double
- target_angle
- Target angle for the SW1 control mode.
- default: 0.0, min:-π, max:+π
- type: double
Publish topics
- heading_angle
- Heading angle of the robot that calculated from the IMU module sensor values.
- type: std_msgs/Float64
Videos
Changelog for package raspimouse_ros2_examples
1.0.0 (2022-07-28)
- Update map command (#38)
- Adds config file for DUALSHOCK4 (#36)
- Update README for foxy-devel (#34)
- Remove node_ prefix from launch files (#33)
- Use ament_export_targets instead of ament_export_interfaces. (#31)
- Remove dashing check from CI (#32)
- Update rviz config to show scan and graph topics (#29)
- Add descriptions to READMEs for use_pulse_counters param settings (#28)
- Use joy_linux instead of joy (#27)
- Update CI to support ROS Foxy (#26)
- Update package.xml (#25)
- Install raspimouse2 and imu packages via rosdep command (#22)
- Add rt_usb_9axisimu_driver dependency to package.xml (#21)
- Add direction control example (#18)
- Use images of rt-net/images repo. (#17)
- Add lidar example (#14)
- Turn on/off leds with joy inputs (#15)
- Update Gamepad F710 usage in README (#13)
- Use multi threads in the object tracking example to stabilize the tracking (#11)
- update video link (#12)
- Merge teleop_joy launch files into one file. (#10)
- Add line follower examples (#9)
- Add object tracking sample (#8)
- Rename launch files (#7)
- Refactoring (#6)
- Support remote control (#5)
- Add Joystic example (#4)
- Add industrial_ci test settings (#3)
- Fix teleop.launch for flake8 check (#2)
- Add github workflow (#1)
- Contributors: Daisuke Sato, Shota Aoki, Shuhei Kozasa
Wiki Tutorials
Package Dependencies
System Dependencies
| Name |
|---|
| libopencv-dev |
| v4l-utils |
Dependant Packages
| Name | Deps |
|---|---|
| raspimouse_slam |