
|
jointstick package from jointstick repojointstick |
|
|
Package Summary
| Tags | No category tags. |
| Version | 0.9.1 |
| License | BSD-3-Clause |
| Build type | CATKIN |
| Use | RECOMMENDED |
Repository Summary
| Checkout URI | https://github.com/gstavrinos/jointstick.git |
| VCS Type | git |
| VCS Version | master |
| Last Updated | 2019-05-06 |
| Dev Status | MAINTAINED |
| CI status | Continuous Integration |
| Released | RELEASED |
| Tags | No category tags. |
| Contributing |
Help Wanted (0)
Good First Issues (0) Pull Requests to Review (0) |
Package Description
Additional Links
Maintainers
- George Stavrinos
Authors
- George Stavrinos
![]() Logo was created by combining two icons by https://thenounproject.com/prosymbols/
Logo was created by combining two icons by https://thenounproject.com/prosymbols/
A ROS node that allows you to move any* joint with any controller!
How to use it
Setup
The first step before teleoperating your robot, is to create some joystick bindings for it. For this, the joystick_setup.py script will help you. Assumptions that the setup script makes that you need to keep in mind:
* Your robot controllers are already runnning (simulated or real drivers). This is important because the setup script uses the controller_manager services to discover and analyse your robot's controllers.
* The joy_node of the joy package is running. This is important because the setup script subscribes to the /joy topic to save your bindings.
During setup the script will guide you through the process via messages in the console. When using the setup script for the first time(s) pay attention to the console messages to avoid wrong bindings.
As an example, two screenshots from the setup script as shown below, while creating bindings for a UR3 robot arm.
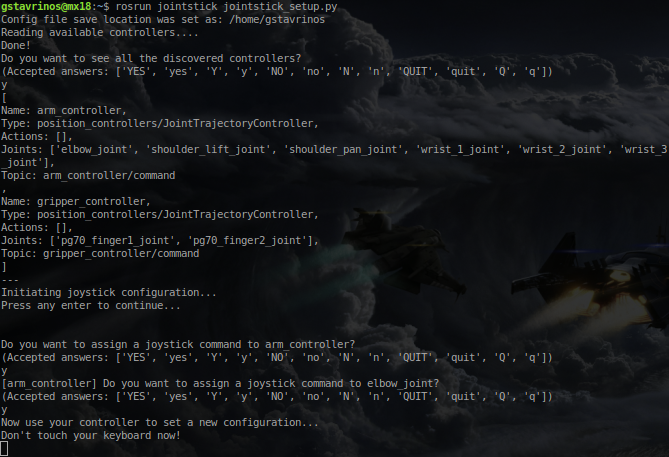
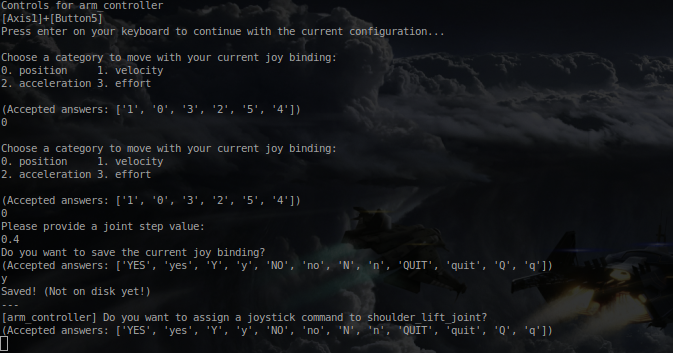
(Notice that in this screenshot the user is wrongly prompted twice to select a category. This is a known bug. Please send a PR or comment on the corresponding issue [#1] with your ideas.)
The setup script uses the jointstick_setup/config_file param to know where to save the file that contains your joystick bindings. If not such parameter is found, the config file is saved in your home directory. The configuration file name always contains the date and time of creation.
Tip 1
If you have made a wrong binding but you have already done too much work for your controllers, just save the configurations and then manually remove the wrong binding from the file. Since it's a .yaml, it's very human readable.
Tip 2
Based on the controller you are binding controls for, you will be asked by the setup script to provide some information. This should be straight forward, but keep in mind that you don't need to provide both directions for an axis. For example, if Axis1 is bound for the x direction, you don't have to provide two different bindings for the positive and negative direction, since the joystick axes provide both positive and negative values. The same does not apply for buttons. If Button1 on your keyboard is used to move your robot forward on the x axis, another button with negative value should be used to move your robot backwards, since joystick buttons always have a zero or positive value.
Teleoperation
The teleoperation node called jointstick.py, uses the joystick bindings you created using the jointstick_setup.py script to move your robot. In order to teleoperate your robot successfully, the following need to be running:
* Your robot controllers (simulated or real drivers). This is important because the teleoperation script uses the controller_manager services to discover your robot's controllers and create the equivalent publishers for each one of them.
* The joy_node of the joy package. This is important because the teleoperation script subscribes to the /joy topic to translate your bindings to robot movement.
With all the required nodes running you just have to use your joystick to move your robot.
The teleoperation script uses two parameters. The jointstick/config_file to know which bindings to load, and the jointstick/rate to set the publishing rate of the joystick commands.
Tip
By default the topics of the controllers are set to the default topics of each controller. You can edit your config file to match your robot's custom setup.
*Supported Controllers
Currently, the following controllers are supported by the setup and teleoperation scripts:
- effort_controllers/JointPositionController
- position_controllers/JointTrajectoryController
- diff_drive_controller/DiffDriveController
- steer_drive_controller/SteerDriveController
Changelog for package jointstick
0.9.1 (2019-05-06)
- First release
Wiki Tutorials
Source Tutorials
Package Dependencies
| Deps | Name | |
|---|---|---|
| 1 | catkin | |
| 2 | controller_manager_msgs | |
| 2 | trajectory_msgs | |
| 2 | geometry_msgs | |
| 2 | sensor_msgs | |
| 2 | nav_msgs | |
| 2 | std_msgs |
System Dependencies
Dependant Packages
Launch files
Messages
Services
Plugins
Recent questions tagged jointstick at Robotics Stack Exchange
|
|
jointstick package from jointstick repojointstick |
|
|
Package Summary
| Tags | No category tags. |
| Version | 0.9.1 |
| License | BSD-3-Clause |
| Build type | CATKIN |
| Use | RECOMMENDED |
Repository Summary
| Checkout URI | https://github.com/gstavrinos/jointstick.git |
| VCS Type | git |
| VCS Version | master |
| Last Updated | 2019-05-06 |
| Dev Status | MAINTAINED |
| CI status | Continuous Integration : 0 / 0 |
| Released | RELEASED |
| Tags | No category tags. |
| Contributing |
Help Wanted (0)
Good First Issues (0) Pull Requests to Review (0) |
Package Description
Additional Links
Maintainers
- George Stavrinos
Authors
- George Stavrinos
![]() Logo was created by combining two icons by https://thenounproject.com/prosymbols/
Logo was created by combining two icons by https://thenounproject.com/prosymbols/
A ROS node that allows you to move any* joint with any controller!
How to use it
Setup
The first step before teleoperating your robot, is to create some joystick bindings for it. For this, the joystick_setup.py script will help you. Assumptions that the setup script makes that you need to keep in mind:
* Your robot controllers are already runnning (simulated or real drivers). This is important because the setup script uses the controller_manager services to discover and analyse your robot's controllers.
* The joy_node of the joy package is running. This is important because the setup script subscribes to the /joy topic to save your bindings.
During setup the script will guide you through the process via messages in the console. When using the setup script for the first time(s) pay attention to the console messages to avoid wrong bindings.
As an example, two screenshots from the setup script as shown below, while creating bindings for a UR3 robot arm.
(Notice that in this screenshot the user is wrongly prompted twice to select a category. This is a known bug. Please send a PR or comment on the corresponding issue [#1] with your ideas.)
The setup script uses the jointstick_setup/config_file param to know where to save the file that contains your joystick bindings. If not such parameter is found, the config file is saved in your home directory. The configuration file name always contains the date and time of creation.
Tip 1
If you have made a wrong binding but you have already done too much work for your controllers, just save the configurations and then manually remove the wrong binding from the file. Since it's a .yaml, it's very human readable.
Tip 2
Based on the controller you are binding controls for, you will be asked by the setup script to provide some information. This should be straight forward, but keep in mind that you don't need to provide both directions for an axis. For example, if Axis1 is bound for the x direction, you don't have to provide two different bindings for the positive and negative direction, since the joystick axes provide both positive and negative values. The same does not apply for buttons. If Button1 on your keyboard is used to move your robot forward on the x axis, another button with negative value should be used to move your robot backwards, since joystick buttons always have a zero or positive value.
Teleoperation
The teleoperation node called jointstick.py, uses the joystick bindings you created using the jointstick_setup.py script to move your robot. In order to teleoperate your robot successfully, the following need to be running:
* Your robot controllers (simulated or real drivers). This is important because the teleoperation script uses the controller_manager services to discover your robot's controllers and create the equivalent publishers for each one of them.
* The joy_node of the joy package. This is important because the teleoperation script subscribes to the /joy topic to translate your bindings to robot movement.
With all the required nodes running you just have to use your joystick to move your robot.
The teleoperation script uses two parameters. The jointstick/config_file to know which bindings to load, and the jointstick/rate to set the publishing rate of the joystick commands.
Tip
By default the topics of the controllers are set to the default topics of each controller. You can edit your config file to match your robot's custom setup.
*Supported Controllers
Currently, the following controllers are supported by the setup and teleoperation scripts:
- effort_controllers/JointPositionController
- position_controllers/JointTrajectoryController
- diff_drive_controller/DiffDriveController
- steer_drive_controller/SteerDriveController
Changelog for package jointstick
0.9.1 (2019-05-06)
- First release
Wiki Tutorials
Source Tutorials
Package Dependencies
| Deps | Name | |
|---|---|---|
| 1 | catkin | |
| 2 | controller_manager_msgs | |
| 2 | trajectory_msgs | |
| 2 | geometry_msgs | |
| 2 | sensor_msgs | |
| 2 | nav_msgs | |
| 2 | std_msgs |