
|
py_trees_js package from py_trees_js repopy_trees_js |
|
|
Package Summary
| Tags | No category tags. |
| Version | 0.6.4 |
| License | BSD |
| Build type | AMENT_PYTHON |
| Use | RECOMMENDED |
Repository Summary
| Checkout URI | https://github.com/splintered-reality/py_trees_js.git |
| VCS Type | git |
| VCS Version | release/0.6.x |
| Last Updated | 2023-02-25 |
| Dev Status | MAINTAINED |
| CI status | No Continuous Integration |
| Released | RELEASED |
| Tags | No category tags. |
| Contributing |
Help Wanted (0)
Good First Issues (0) Pull Requests to Review (0) |
Package Description
Additional Links
Maintainers
- Daniel Stonier
Authors
- Daniel Stonier
PyTrees Js
[About] [Features] [Preview] [Exmaple - Simple Web App] [Example - PyQt App] [The JSON Specification]
About
Libraries for visualisation of runtime or replayed behaviour trees.
- ./js - a self-contained javascript library to build apps around
- py_trees_js - a python package that makes the js available as a pyqt resource
- py_trees_js.viewer - a demo pyqtwebengine app
See py_trees_ros_viewer for a fully fledged pyqt integration that uses py_trees_js.
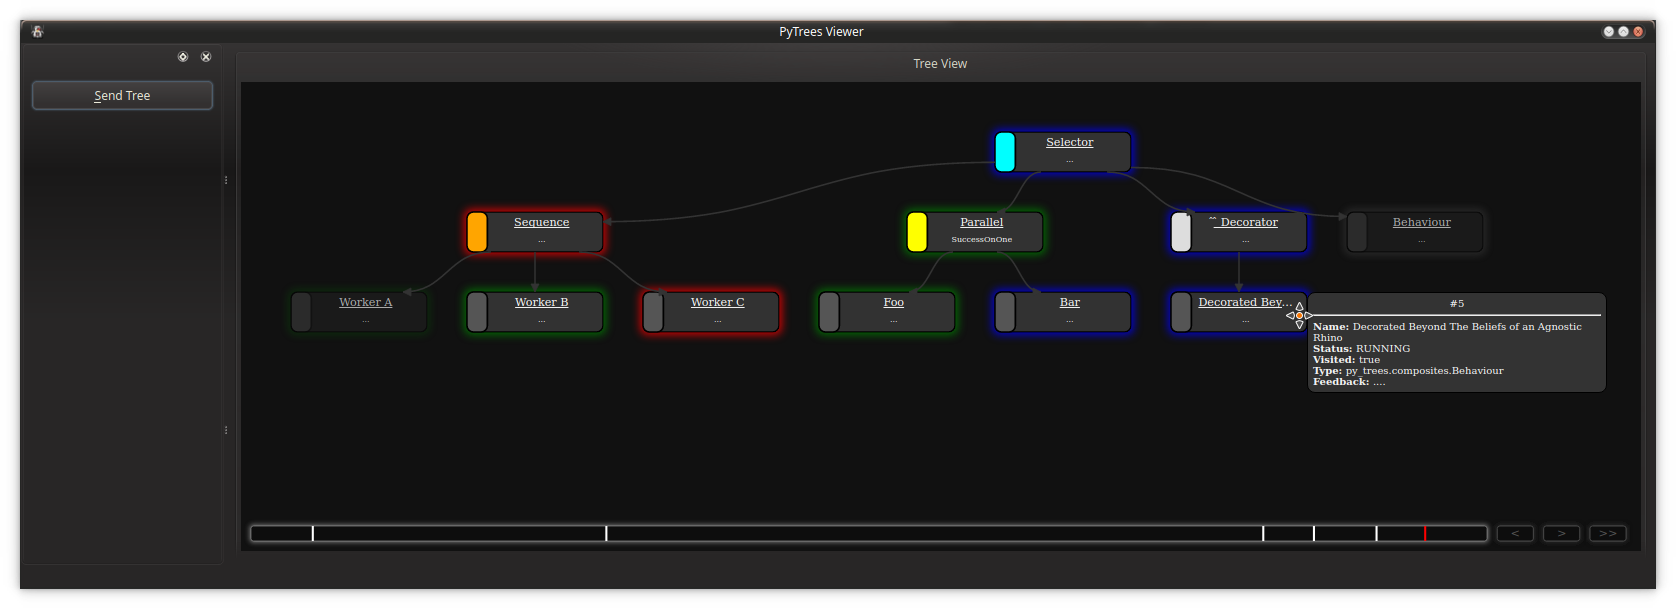
Features
- Visualise the runtime state of a behaviour tree
- Collapsible subtrees
- Zoom and scale contents to fit
- Timeline rewind & resume
- Blackboard key-value storage view
- Activity log view
Although designed for py_trees, the js libs (in particular, the interfaces) are not dependent on py_trees and could be used for other behaviour tree applications.
Preview
$ git clone https://github.com/splintered-reality/py_trees_js
$ code .
# Reopen the project in the devcontainer
$ poetry install
$ poetry shell
$ py-trees-demo-viewer


Example - Simple Web App
Building a complete application that can render a behaviour tree stream is an effort that can be decomposed into two tasks:
- Creating the web app for rendering trees and visualising a timeline
- Wrapping the web app in a framework and connecting it to an external stream
The first stage is purely an exercise with html, css and javascript. The latter will depend on your use case - it could be a qt-js hybrid application (as exemplified here) for developers, an electron application for cross-platform and mobile deployment or a cloud based service.
This section will walk through how to build a web application with the provided js libraries. An example of wrapping the web app within a Qt-Js application will follow.
To get started, let's begin with a basic html page with two divs, one for the tree canvas and one for the timeline:
<!doctype html>
<html>
<head>
  <meta charset="utf-8">
  <title>PyTrees Viewer</title>
  <style>
    html {
      height: 100%  /* canvas is intended to fill the screen, cascading heights achieves this */
    }
    body {
      margin: 0;
      overflow:hidden;  /* no scrollbars */
      height: 100%  /* canvas is intended to fill the screen, cascading heights achieves this */
    }
  </style>
</head>
<body>
  <div id="canvas"></div>
  <div id="timeline"></div>
</body>
</html>
Next, bring in the javascript libraries. For exemplar purposes, it is assumed here that the libraries have been made available alongside the html page - how is an integration detail depending on the mode of deployment (see next section for an example).
Note that the py_trees-<version>.js library has only one dependency, jointjs,
but that in turn has a few dependencies of it's own. The bundled libraries in the js/jointjs folder
of this repository correspond to the requirements for a specific version of jointjs and
have been tested to work with the accompany py_trees-<version>.js library.
You can verify that the libraries have been properly imported by calling py_trees.hello() which
will print version information of the loaded javascript libraries (if found) to the javascript console.
<!doctype html>
<html>
<head>
  <meta charset="utf-8">
  <title>PyTrees Viewer</title>
  <link rel="stylesheet" href="js/py_trees-0.6.0.css"/>
  <link rel="stylesheet" type="text/css" href="js/jointjs/joint-3.0.4.min.css"/>
  <script src="js/jointjs/dagre-0.8.4.min.js"></script>
  <script src="js/jointjs/graphlib-2.1.7.min.js"></script>
  <script src="js/jointjs/jquery-3.4.1.min.js"></script>
  <script src="js/jointjs/lodash-4.17.11.min.js"></script>
  <script src="js/jointjs/backbone-1.4.0.js"></script>
  <script src="js/jointjs/joint-3.0.4.min.js"></script>
  <script src="js/py_trees-0.6.0.js"></script>
  <!-- Web app integration css here -->
  <style>
    html {
      height: 100%  /* canvas is intended to fill the screen, cascading heights achieves this */
    }
    body {
      margin: 0;
      overflow:hidden;  /* no scrollbars */
      height: 100%  /* canvas is intended to fill the screen, cascading heights achieves this */
    }
  </style>
</head>
<body>
  <script type="text/javascript">
    py_trees.hello()
  </script>
  <div id="window">
    <div id="canvas"></div>
    <div id="timeline"></div>
  </div>
</body>
</html>
Output from py_trees.hello():
********************************************************************************
                               Py Trees JS

 A javascript library for visualisation of executing behaviour trees.

 Version & Dependency Info:
  - py_trees:  0.6.0
    - jointjs :  3.1.0
       - backbone:  1.4.0
       - dagre   :  0.8.4
       - jquery  :  3.4.1
       - lodash  :  4.17.11
********************************************************************************
In the next iteration, the canvas is initialised and a callback for accepting incoming trees from an external source is prepared. To test it, pass it the demo tree provided by the library.
<!doctype html>
<html>
<head>
  <meta charset="utf-8">
  <title>PyTrees Viewer</title>
  <link rel="stylesheet" href="js/py_trees-0.6.0.css"/>
  <link rel="stylesheet" type="text/css" href="js/jointjs/joint-3.0.4.min.css"/>
  <script src="js/jointjs/dagre-0.8.4.min.js"></script>
  <script src="js/jointjs/graphlib-2.1.7.min.js"></script>
  <script src="js/jointjs/jquery-3.4.1.min.js"></script>
  <script src="js/jointjs/lodash-4.17.11.min.js"></script>
  <script src="js/jointjs/backbone-1.4.0.js"></script>
  <script src="js/jointjs/joint-3.0.4.min.js"></script>
  <script src="js/py_trees-0.6.0.js"></script>
  <!-- Web app integration css here -->
  <style>
    html {
      height: 100%  /* canvas is intended to fill the screen, cascading heights achieves this */
    }
    body {
      margin: 0;
      overflow:hidden;  /* no scrollbars */
      height: 100%  /* canvas is intended to fill the screen, cascading heights achieves this */
    }
  </style>
</head>
<body>
  <script type="text/javascript">
    py_trees.hello()
  </script>
  <div id="window">
    <div id="canvas"></div>
    <div id="timeline"></div>
  </div>
  <script type="text/javascript">
    // rendering canvas
    canvas_graph = py_trees.canvas.create_graph()
    canvas_paper = py_trees.canvas.create_paper({graph: canvas_graph})

    render_tree = function({tree}) {
      py_trees.canvas.update_graph({graph: canvas_graph, tree: tree})
      py_trees.canvas.layout_graph({graph: canvas_graph})
      if ( canvas_graph.get('scale_content_to_fit') ) {
        py_trees.canvas.scale_content_to_fit(canvas_paper)
      }
      return "rendered"
    }
    render_tree({tree: py_trees.experimental.create_demo_tree_definition()})
  </script>
</body>
</html>
At this point, your web app should be visualising a single tree and zoom/collapse/scale to fit interactions functional. I'm happy, you should be too!
Adding a timeline to the application is optional, but the code does not change significantly and is a very useful feature to have. The built-in demo app's index.html does exactly this. The code is reproduced below for convenience.
<!doctype html>
<html>
<head>
  <meta charset="utf-8">
  <title>PyTrees Viewer</title>
  <link rel="stylesheet" href="js/py_trees-0.6.0.css"/>
  <link rel="stylesheet" type="text/css" href="js/jointjs/joint-3.0.4.min.css"/>
  <script src="js/jointjs/dagre-0.8.4.min.js"></script>
  <script src="js/jointjs/graphlib-2.1.7.min.js"></script>
  <script src="js/jointjs/jquery-3.4.1.min.js"></script>
  <script src="js/jointjs/lodash-4.17.11.min.js"></script>
  <script src="js/jointjs/backbone-1.4.0.js"></script>
  <script src="js/jointjs/joint-3.0.4.min.js"></script>
  <script src="js/py_trees-0.6.0.js"></script>
  <!-- Web app integration css here -->
  <style>
    html {
      height: 100%  /* canvas is intended to fill the screen, cascading heights achieves this */
    }
    body {
      margin: 0;
      overflow:hidden;  /* no scrollbars */
      height: 100%  /* canvas is intended to fill the screen, cascading heights achieves this */
    }
  </style>
</head>
<body>
  <script type="text/javascript">
    py_trees.hello()
  </script>
  <div id="window">
    <div id="canvas"></div>
    <div id="timeline"></div>
  </div>
  <script type="text/javascript">
    // rendering canvas
    canvas_graph = py_trees.canvas.create_graph()
    canvas_paper = py_trees.canvas.create_paper({graph: canvas_graph})

    // event timeline
    timeline_graph = py_trees.timeline.create_graph({event_cache_limit: 100});
    timeline_paper = py_trees.timeline.create_paper({
        timeline_graph: timeline_graph,
        canvas_graph: canvas_graph,
        canvas_paper: canvas_paper,
    })

    // react to window resizing events
    $(window).resize(function() {
      py_trees.canvas.on_window_resize(canvas_paper)
      py_trees.timeline.on_window_resize(timeline_paper)
    })

    render_tree = function({tree}) {
      py_trees.timeline.add_tree_to_cache({
          timeline_graph: timeline_graph,
          canvas_graph: canvas_graph,
          canvas_paper: canvas_paper,
          tree: tree
      })
      return "rendered"
    }
  </script>
</body>
</html>
Example - PyQt App
The py-trees-demo-viewer app is a qt-js hybrid application using qtwebengine.
Every time a qt button is pressed, an internally generated tree snapshot is sent to render_tree() in the embedded web application. From here, it is not too hard to
imagine connecting the qt application to an actual external source. The qt layer
then acts as a shim or relay transferring messages to the internal web app.
How does it work?
- The js libs are made available as a
.qrcresource [1] - A simple web app is made available as another
.qrcresource - Both resources are consumed by the QWebEngine View to serve the app
[1] This can be made available separately and as a dependency to the actual pyqt application. For instance, the py_trees_js package is a dependency of py_trees_ros_viewer.
In more detail...
The JS Libraries
- Bundle the javascript resources into a
.qrcfile - Generate the resources as a c++ library / python module
- Deploy the c++ library/python module in your development environment
In this case, the py_trees and jointjs javascript libraries have been listed
in py_trees_js/resources.qrc, generated using
py_trees_js/gen.bash, resulting in the importable module
py_trees_js/resources.py. From this point, any pythonic
Qt application wishing to visualise behaviour trees need only import this module from the py_trees_js package.
The Web App
- Bundle the
.html/.csspages into a.qrcfile - Import into directly into designer when building your Qt application
In this case, our web app (py_trees_js/viewer/html/index.html) has been rolled into py_trees_js/viewer/web_app.qrc which is directly loaded into py_trees_js/viewer/web_view.ui where the URL property of the QWebEngineView widget has been configured with the resources index.html.
You could alternatively, generate a module from the .qrc and import that into the
relevant python code as was done for the javascript resources.
The Qt Application
The Qt application can be designed in whatever way you're most comfortable with - via
Designer, pure C++ or python. In this case, Qt's Designer is used to produce the .ui
files which are generated into python modules and finally customised and brought together
as a PyQt5 application. Refer to py_trees_js/viewer for more details
or as a reference example from which to start your own Qt-Js hybrid application.
Key elements:
- Build your Qt application around a QWebEngineView widget
- Link/import the javascript module in the web engine view class
- Load the html page into the QWebEngineView view
Do not use the QWebView widget - this is deprecating in favour of the QWebEngineView widget. The most notable difference is that QWebView uses Qt's old webkit, while QWebEngineView makes use of Chromium's webkit.
Note that the second step automagically makes available the javascript resources to the application when it's loaded. It's not terribly fussy about where it gets loaded, see py_trees_js/viewer/web_view.py for an example:
# This is the module generated by running pyrcc5 on the js libraries .qrc
# It could have been equivalently deployed in a completely different python package
import py_trees_js.resources
Loading the web page can be accomplished in designer. Simply point it at your qresource file
and set the dynamic URL property on the QWebEngineView widget. Alternatively you can import
the resource module and load it via QWebEngineView's load api.
Qt-Js Interactions
Qt and JS can interact directly over snippets of javascript code (via runJavaScript()
or over QWebChannel (a mechanism similar to sigslots) where more complexity is needed.
The example application here calls on the render_tree() method we created earlier in
the web application to send trees to the app. Example code from py_trees_js/viewer/viewer.py which handles button clicks to cycle through a list of
demonstration trees:
def send_tree_response(reply):
    console.logdebug("reply: '{}' [viewer]".format(reply))


@qt_core.pyqtSlot()
def send_tree(web_view_page, demo_trees, unused_checked):
    demo_trees[send_tree.index]['timestamp'] = time.time()
    console.logdebug("send: tree '{}' [{}][viewer]".format(
        send_tree.index, demo_trees[send_tree.index]['timestamp'])
    )
    javascript_command = "render_tree({{tree: {}}})".format(demo_trees[send_tree.index])
    web_view_page.runJavaScript(javascript_command, send_tree_response)
    send_tree.index = 0 if send_tree.index == 2 else send_tree.index + 1

send_tree.index = 0
The JSON Specification
TODO: A JSon schema
Roughly, the specification expects json objects of the form:
- timestamp: int
- behaviours: dict[str, dict]
- (optional) visited_path: list[str]
- (optional) blackboard: {
- behaviours: dict[str, dict[str, str]],
- data: dict[str, str]
- }
- (optional) activity: list[str]
where each behaviour in the dict has specification:
- id: str
- status: Union[
INVALID,FAILURE,RUNNING,SUCCESS] - name: str
- colour:
- (optional) children: List[str]
- (optional) data:
Identification strings (id's) must be unique and are used as both keys for the behaviours dictionary, children and visited_path variables.
An example (extracted from py_trees.experimental.create_demo_tree_definition()):
{
    timestamp: 1563938995,
    visited_path: ['1', '2', '3', '4', '5', '7', '8'],
    behaviours: {
        '1': {
            id: '1',
            status: 'RUNNING',
            name: 'Selector',
            colour: '#00FFFF',
            children: ['2', '3', '4', '6'],
            data: {
                Type: 'py_trees.composites.Selector',
                Feedback: "Decision maker",
            },
        },
        '2': {
            id: '2',
            status: 'FAILURE',
            name: 'Worker',
            colour: '#FFA500',
            children: ['7', '8', '9'],
            data: {
                Type: 'py_trees.composites.Sequence',
                Feedback: "Worker"
            },
        },
    }
    'blackboard': {
        'behaviours': {  # key metadata per behaviour
            '2': {
                '/parameters/initial_value': 'r',
                '/state/worker': 'w'
            },
        },
        'data': {
            '/parameters/initial_value': 'foo',
            '/state/worker': 'bar',
        },
    'activity': [
        "<text style='color: blue;'>Worker initialised with 'foo'</text>'",
        "<text style='color: red;'>Worker wrote 'bar'</text>'",
    ]
}
Changelog
Forthcoming
- ...
0.6.4 (2022-02-24)
- [actions] pre-merge and update-cache, #146
- [actions] push containers, #144
- [poetry] update project to use poetry, #143
- [vscode] devcontainer workflows, #143
- [tests] basic tests, formatting, linting, #143
0.6.3 (2020-05-05)
- [js] remove buggy early view update and optimise them, #142
0.6.2 (2020-03-02)
- [js] bugfix accidentally ignored tree_cache size, #123
- ... missed a few pull requests inbetween
0.6.0 (2019-12-27)
- [js] accepting trees flagged with no status/graph change, #122
- [js] blackboard views, #125, #133, #122, #135, #136
0.5.1 (2019-10-26)
- [js] performance improvements, #120
- [js] highlighted links, #115
- [js] orthogonal link connections, for better visualisation
- [qt] capture screenshots, #114
0.5.0 (2019-08-29)
- [html] disable scrollbars, #110
- [js] robustness against identical timestamps, #109
- [js] improved window resize handling,
#111
- new public api
py_trees.canvas.on_window_resizeandpy_trees.timeline.on_window_resize
- new public api
0.4.0 (2019-08-13)
0.3.1 (2019-08-07)
0.2.0 (2019-08-01)
0.1.0 (2019-07-25)
Wiki Tutorials
Source Tutorials
Package Dependencies
System Dependencies
Dependant Packages
Launch files
Messages
Services
Plugins
Recent questions tagged py_trees_js at Robotics Stack Exchange
|
|
py_trees_js package from py_trees_js repopy_trees_js |
|
|
Package Summary
| Tags | No category tags. |
| Version | 0.6.4 |
| License | BSD |
| Build type | AMENT_PYTHON |
| Use | RECOMMENDED |
Repository Summary
| Checkout URI | https://github.com/splintered-reality/py_trees_js.git |
| VCS Type | git |
| VCS Version | devel |
| Last Updated | 2023-09-01 |
| Dev Status | MAINTAINED |
| CI status | No Continuous Integration |
| Released | RELEASED |
| Tags | No category tags. |
| Contributing |
Help Wanted (0)
Good First Issues (0) Pull Requests to Review (0) |
Package Description
Additional Links
Maintainers
- Daniel Stonier
Authors
- Daniel Stonier
PyTrees Js
[About] [Features] [Preview] [Exmaple - Simple Web App] [Example - PyQt App] [The JSON Specification]
About
Libraries for visualisation of runtime or replayed behaviour trees.
- ./js - a self-contained javascript library to build apps around
- py_trees_js - a python package that makes the js available as a pyqt resource
- py_trees_js.viewer - a demo pyqtwebengine app
See py_trees_ros_viewer for a fully fledged pyqt integration that uses py_trees_js.
Features
- Visualise the runtime state of a behaviour tree
- Collapsible subtrees
- Zoom and scale contents to fit
- Timeline rewind & resume
- Blackboard key-value storage view
- Activity log view
Although designed for py_trees, the js libs (in particular, the interfaces) are not dependent on py_trees and could be used for other behaviour tree applications.
Preview
With VSCode DevContainers and on a PC with an NVIDIA GPU:
- Install VSCode
- Install the NVIDIA Container Toolkit
- Clone and launch the demo:
$ git clone https://github.com/splintered-reality/py_trees_js
$ code .
$ cd py_trees_js

# Reopen the project in the devcontainer
$ (use CTRL-SHIFT-P if you miss VSCode's helper dialog)

# Setup and launch
$ poetry install
$ poetry run py-trees-demo-viewer

If you do not have a PC that meets those requirements, some alternative options:
- Install Poetry and PyQt on your system or in a venv. Clone and launch.
- If you're just interested in seeing the demo viewer,
pip install --user py_trees_jsand launch the viewer - Create your own devcontainer with something like the desktop-lite feature. If this works, send me a PR!
Example - Simple Web App
Building a complete application that can render a behaviour tree stream is an effort that can be decomposed into two tasks:
- Creating the web app for rendering trees and visualising a timeline
- Wrapping the web app in a framework and connecting it to an external stream
The first stage is purely an exercise with html, css and javascript. The latter will depend on your use case - it could be a qt-js hybrid application (as exemplified here) for developers, an electron application for cross-platform and mobile deployment or a cloud based service.
This section will walk through how to build a web application with the provided js libraries. An example of wrapping the web app within a Qt-Js application will follow.
To get started, let's begin with a basic html page with two divs, one for the tree canvas and one for the timeline:
<!doctype html>
<html>
<head>
  <meta charset="utf-8">
  <title>PyTrees Viewer</title>
  <style>
    html {
      height: 100%  /* canvas is intended to fill the screen, cascading heights achieves this */
    }
    body {
      margin: 0;
      overflow:hidden;  /* no scrollbars */
      height: 100%  /* canvas is intended to fill the screen, cascading heights achieves this */
    }
  </style>
</head>
<body>
  <div id="canvas"></div>
  <div id="timeline"></div>
</body>
</html>
Next, bring in the javascript libraries. For exemplar purposes, it is assumed here that the libraries have been made available alongside the html page - how is an integration detail depending on the mode of deployment (see next section for an example).
Note that the py_trees-<version>.js library has only one dependency, jointjs,
but that in turn has a few dependencies of it's own. The bundled libraries in the js/jointjs folder
of this repository correspond to the requirements for a specific version of jointjs and
have been tested to work with the accompany py_trees-<version>.js library.
You can verify that the libraries have been properly imported by calling py_trees.hello() which
will print version information of the loaded javascript libraries (if found) to the javascript console.
<!doctype html>
<html>
<head>
  <meta charset="utf-8">
  <title>PyTrees Viewer</title>
  <link rel="stylesheet" href="js/py_trees-0.6.0.css"/>
  <link rel="stylesheet" type="text/css" href="js/jointjs/joint-3.0.4.min.css"/>
  <script src="js/jointjs/dagre-0.8.4.min.js"></script>
  <script src="js/jointjs/graphlib-2.1.7.min.js"></script>
  <script src="js/jointjs/jquery-3.4.1.min.js"></script>
  <script src="js/jointjs/lodash-4.17.11.min.js"></script>
  <script src="js/jointjs/backbone-1.4.0.js"></script>
  <script src="js/jointjs/joint-3.0.4.min.js"></script>
  <script src="js/py_trees-0.6.0.js"></script>
  <!-- Web app integration css here -->
  <style>
    html {
      height: 100%  /* canvas is intended to fill the screen, cascading heights achieves this */
    }
    body {
      margin: 0;
      overflow:hidden;  /* no scrollbars */
      height: 100%  /* canvas is intended to fill the screen, cascading heights achieves this */
    }
  </style>
</head>
<body>
  <script type="text/javascript">
    py_trees.hello()
  </script>
  <div id="window">
    <div id="canvas"></div>
    <div id="timeline"></div>
  </div>
</body>
</html>
Output from py_trees.hello():
********************************************************************************
                               Py Trees JS

 A javascript library for visualisation of executing behaviour trees.

 Version & Dependency Info:
  - py_trees:  0.6.0
    - jointjs :  3.1.0
       - backbone:  1.4.0
       - dagre   :  0.8.4
       - jquery  :  3.4.1
       - lodash  :  4.17.11
********************************************************************************
In the next iteration, the canvas is initialised and a callback for accepting incoming trees from an external source is prepared. To test it, pass it the demo tree provided by the library.
<!doctype html>
<html>
<head>
  <meta charset="utf-8">
  <title>PyTrees Viewer</title>
  <link rel="stylesheet" href="js/py_trees-0.6.0.css"/>
  <link rel="stylesheet" type="text/css" href="js/jointjs/joint-3.0.4.min.css"/>
  <script src="js/jointjs/dagre-0.8.4.min.js"></script>
  <script src="js/jointjs/graphlib-2.1.7.min.js"></script>
  <script src="js/jointjs/jquery-3.4.1.min.js"></script>
  <script src="js/jointjs/lodash-4.17.11.min.js"></script>
  <script src="js/jointjs/backbone-1.4.0.js"></script>
  <script src="js/jointjs/joint-3.0.4.min.js"></script>
  <script src="js/py_trees-0.6.0.js"></script>
  <!-- Web app integration css here -->
  <style>
    html {
      height: 100%  /* canvas is intended to fill the screen, cascading heights achieves this */
    }
    body {
      margin: 0;
      overflow:hidden;  /* no scrollbars */
      height: 100%  /* canvas is intended to fill the screen, cascading heights achieves this */
    }
  </style>
</head>
<body>
  <script type="text/javascript">
    py_trees.hello()
  </script>
  <div id="window">
    <div id="canvas"></div>
    <div id="timeline"></div>
  </div>
  <script type="text/javascript">
    // rendering canvas
    canvas_graph = py_trees.canvas.create_graph()
    canvas_paper = py_trees.canvas.create_paper({graph: canvas_graph})

    render_tree = function({tree}) {
      py_trees.canvas.update_graph({graph: canvas_graph, tree: tree})
      py_trees.canvas.layout_graph({graph: canvas_graph})
      if ( canvas_graph.get('scale_content_to_fit') ) {
        py_trees.canvas.scale_content_to_fit(canvas_paper)
      }
      return "rendered"
    }
    render_tree({tree: py_trees.experimental.create_demo_tree_definition()})
  </script>
</body>
</html>
At this point, your web app should be visualising a single tree and zoom/collapse/scale to fit interactions functional. I'm happy, you should be too!
Adding a timeline to the application is optional, but the code does not change significantly and is a very useful feature to have. The built-in demo app's index.html does exactly this. The code is reproduced below for convenience.
<!doctype html>
<html>
<head>
  <meta charset="utf-8">
  <title>PyTrees Viewer</title>
  <link rel="stylesheet" href="js/py_trees-0.6.0.css"/>
  <link rel="stylesheet" type="text/css" href="js/jointjs/joint-3.0.4.min.css"/>
  <script src="js/jointjs/dagre-0.8.4.min.js"></script>
  <script src="js/jointjs/graphlib-2.1.7.min.js"></script>
  <script src="js/jointjs/jquery-3.4.1.min.js"></script>
  <script src="js/jointjs/lodash-4.17.11.min.js"></script>
  <script src="js/jointjs/backbone-1.4.0.js"></script>
  <script src="js/jointjs/joint-3.0.4.min.js"></script>
  <script src="js/py_trees-0.6.0.js"></script>
  <!-- Web app integration css here -->
  <style>
    html {
      height: 100%  /* canvas is intended to fill the screen, cascading heights achieves this */
    }
    body {
      margin: 0;
      overflow:hidden;  /* no scrollbars */
      height: 100%  /* canvas is intended to fill the screen, cascading heights achieves this */
    }
  </style>
</head>
<body>
  <script type="text/javascript">
    py_trees.hello()
  </script>
  <div id="window">
    <div id="canvas"></div>
    <div id="timeline"></div>
  </div>
  <script type="text/javascript">
    // rendering canvas
    canvas_graph = py_trees.canvas.create_graph()
    canvas_paper = py_trees.canvas.create_paper({graph: canvas_graph})

    // event timeline
    timeline_graph = py_trees.timeline.create_graph({event_cache_limit: 100});
    timeline_paper = py_trees.timeline.create_paper({
        timeline_graph: timeline_graph,
        canvas_graph: canvas_graph,
        canvas_paper: canvas_paper,
    })

    // react to window resizing events
    $(window).resize(function() {
      py_trees.canvas.on_window_resize(canvas_paper)
      py_trees.timeline.on_window_resize(timeline_paper)
    })

    render_tree = function({tree}) {
      py_trees.timeline.add_tree_to_cache({
          timeline_graph: timeline_graph,
          canvas_graph: canvas_graph,
          canvas_paper: canvas_paper,
          tree: tree
      })
      return "rendered"
    }
  </script>
</body>
</html>
Example - PyQt App
The py-trees-demo-viewer app is a qt-js hybrid application using qtwebengine.
Every time a qt button is pressed, an internally generated tree snapshot is sent to render_tree() in the embedded web application. From here, it is not too hard to
imagine connecting the qt application to an actual external source. The qt layer
then acts as a shim or relay transferring messages to the internal web app.
How does it work?
- The js libs are made available as a
.qrcresource [1] - A simple web app is made available as another
.qrcresource - Both resources are consumed by the QWebEngine View to serve the app
[1] This can be made available separately and as a dependency to the actual pyqt application. For instance, the py_trees_js package is a dependency of py_trees_ros_viewer.
In more detail...
The JS Libraries
- Bundle the javascript resources into a
.qrcfile - Generate the resources as a c++ library / python module
- Deploy the c++ library/python module in your development environment
In this case, the py_trees and jointjs javascript libraries have been listed
in py_trees_js/resources.qrc, generated using
py_trees_js/gen.bash, resulting in the importable module
py_trees_js/resources.py. From this point, any pythonic
Qt application wishing to visualise behaviour trees need only import this module from the py_trees_js package.
The Web App
- Bundle the
.html/.csspages into a.qrcfile - Import into directly into designer when building your Qt application
In this case, our web app (py_trees_js/viewer/html/index.html) has been rolled into py_trees_js/viewer/web_app.qrc which is directly loaded into py_trees_js/viewer/web_view.ui where the URL property of the QWebEngineView widget has been configured with the resources index.html.
You could alternatively, generate a module from the .qrc and import that into the
relevant python code as was done for the javascript resources.
The Qt Application
The Qt application can be designed in whatever way you're most comfortable with - via
Designer, pure C++ or python. In this case, Qt's Designer is used to produce the .ui
files which are generated into python modules and finally customised and brought together
as a PyQt5 application. Refer to py_trees_js/viewer for more details
or as a reference example from which to start your own Qt-Js hybrid application.
Key elements:
- Build your Qt application around a QWebEngineView widget
- Link/import the javascript module in the web engine view class
- Load the html page into the QWebEngineView view
Do not use the QWebView widget - this is deprecating in favour of the QWebEngineView widget. The most notable difference is that QWebView uses Qt's old webkit, while QWebEngineView makes use of Chromium's webkit.
Note that the second step automagically makes available the javascript resources to the application when it's loaded. It's not terribly fussy about where it gets loaded, see py_trees_js/viewer/web_view.py for an example:
# This is the module generated by running pyrcc5 on the js libraries .qrc
# It could have been equivalently deployed in a completely different python package
import py_trees_js.resources
Loading the web page can be accomplished in designer. Simply point it at your qresource file
and set the dynamic URL property on the QWebEngineView widget. Alternatively you can import
the resource module and load it via QWebEngineView's load api.
Qt-Js Interactions
Qt and JS can interact directly over snippets of javascript code (via runJavaScript()
or over QWebChannel (a mechanism similar to sigslots) where more complexity is needed.
The example application here calls on the render_tree() method we created earlier in
the web application to send trees to the app. Example code from py_trees_js/viewer/viewer.py which handles button clicks to cycle through a list of
demonstration trees:
def send_tree_response(reply):
    console.logdebug("reply: '{}' [viewer]".format(reply))


@qt_core.pyqtSlot()
def send_tree(web_view_page, demo_trees, unused_checked):
    demo_trees[send_tree.index]['timestamp'] = time.time()
    console.logdebug("send: tree '{}' [{}][viewer]".format(
        send_tree.index, demo_trees[send_tree.index]['timestamp'])
    )
    javascript_command = "render_tree({{tree: {}}})".format(demo_trees[send_tree.index])
    web_view_page.runJavaScript(javascript_command, send_tree_response)
    send_tree.index = 0 if send_tree.index == 2 else send_tree.index + 1

send_tree.index = 0
The JSON Specification
TODO: A JSon schema
Roughly, the specification expects json objects of the form:
- timestamp: int
- behaviours: dict[str, dict]
- (optional) visited_path: list[str]
- (optional) blackboard: {
- behaviours: dict[str, dict[str, str]],
- data: dict[str, str]
- }
- (optional) activity: list[str]
where each behaviour in the dict has specification:
- id: str
- status: Union[
INVALID,FAILURE,RUNNING,SUCCESS] - name: str
- colour:
- (optional) children: List[str]
- (optional) data:
Identification strings (id's) must be unique and are used as both keys for the behaviours dictionary, children and visited_path variables.
An example (extracted from py_trees.experimental.create_demo_tree_definition()):
{
    timestamp: 1563938995,
    visited_path: ['1', '2', '3', '4', '5', '7', '8'],
    behaviours: {
        '1': {
            id: '1',
            status: 'RUNNING',
            name: 'Selector',
            colour: '#00FFFF',
            children: ['2', '3', '4', '6'],
            data: {
                Type: 'py_trees.composites.Selector',
                Feedback: "Decision maker",
            },
        },
        '2': {
            id: '2',
            status: 'FAILURE',
            name: 'Worker',
            colour: '#FFA500',
            children: ['7', '8', '9'],
            data: {
                Type: 'py_trees.composites.Sequence',
                Feedback: "Worker"
            },
        },
    }
    'blackboard': {
        'behaviours': {  # key metadata per behaviour
            '2': {
                '/parameters/initial_value': 'r',
                '/state/worker': 'w'
            },
        },
        'data': {
            '/parameters/initial_value': 'foo',
            '/state/worker': 'bar',
        },
    'activity': [
        "<text style='color: blue;'>Worker initialised with 'foo'</text>'",
        "<text style='color: red;'>Worker wrote 'bar'</text>'",
    ]
}
Changelog
Forthcoming
- ...
0.6.4 (2022-02-24)
- [actions] pre-merge and update-cache, #146
- [actions] push containers, #144
- [poetry] update project to use poetry, #143
- [vscode] devcontainer workflows, #143
- [tests] basic tests, formatting, linting, #143
0.6.3 (2020-05-05)
- [js] remove buggy early view update and optimise them, #142
0.6.2 (2020-03-02)
- [js] bugfix accidentally ignored tree_cache size, #123
- ... missed a few pull requests inbetween
0.6.0 (2019-12-27)
- [js] accepting trees flagged with no status/graph change, #122
- [js] blackboard views, #125, #133, #122, #135, #136
0.5.1 (2019-10-26)
- [js] performance improvements, #120
- [js] highlighted links, #115
- [js] orthogonal link connections, for better visualisation
- [qt] capture screenshots, #114
0.5.0 (2019-08-29)
- [html] disable scrollbars, #110
- [js] robustness against identical timestamps, #109
- [js] improved window resize handling,
#111
- new public api
py_trees.canvas.on_window_resizeandpy_trees.timeline.on_window_resize
- new public api
0.4.0 (2019-08-13)
0.3.1 (2019-08-07)
0.2.0 (2019-08-01)
0.1.0 (2019-07-25)
Wiki Tutorials
Source Tutorials
Package Dependencies
System Dependencies
Dependant Packages
Launch files
Messages
Services
Plugins
Recent questions tagged py_trees_js at Robotics Stack Exchange
|
|
py_trees_js package from py_trees_js repopy_trees_js |
|
|
Package Summary
| Tags | No category tags. |
| Version | 0.6.4 |
| License | BSD |
| Build type | AMENT_PYTHON |
| Use | RECOMMENDED |
Repository Summary
| Checkout URI | https://github.com/splintered-reality/py_trees_js.git |
| VCS Type | git |
| VCS Version | devel |
| Last Updated | 2023-09-01 |
| Dev Status | MAINTAINED |
| CI status | No Continuous Integration |
| Released | RELEASED |
| Tags | No category tags. |
| Contributing |
Help Wanted (0)
Good First Issues (0) Pull Requests to Review (0) |
Package Description
Additional Links
Maintainers
- Daniel Stonier
Authors
- Daniel Stonier
PyTrees Js
[About] [Features] [Preview] [Exmaple - Simple Web App] [Example - PyQt App] [The JSON Specification]
About
Libraries for visualisation of runtime or replayed behaviour trees.
- ./js - a self-contained javascript library to build apps around
- py_trees_js - a python package that makes the js available as a pyqt resource
- py_trees_js.viewer - a demo pyqtwebengine app
See py_trees_ros_viewer for a fully fledged pyqt integration that uses py_trees_js.
Features
- Visualise the runtime state of a behaviour tree
- Collapsible subtrees
- Zoom and scale contents to fit
- Timeline rewind & resume
- Blackboard key-value storage view
- Activity log view
Although designed for py_trees, the js libs (in particular, the interfaces) are not dependent on py_trees and could be used for other behaviour tree applications.
Preview
With VSCode DevContainers and on a PC with an NVIDIA GPU:
- Install VSCode
- Install the NVIDIA Container Toolkit
- Clone and launch the demo:
$ git clone https://github.com/splintered-reality/py_trees_js
$ code .
$ cd py_trees_js

# Reopen the project in the devcontainer
$ (use CTRL-SHIFT-P if you miss VSCode's helper dialog)

# Setup and launch
$ poetry install
$ poetry run py-trees-demo-viewer
If you do not have a PC that meets those requirements, some alternative options:
- Install Poetry and PyQt on your system or in a venv. Clone and launch.
- If you're just interested in seeing the demo viewer,
pip install --user py_trees_jsand launch the viewer - Create your own devcontainer with something like the desktop-lite feature. If this works, send me a PR!
Example - Simple Web App
Building a complete application that can render a behaviour tree stream is an effort that can be decomposed into two tasks:
- Creating the web app for rendering trees and visualising a timeline
- Wrapping the web app in a framework and connecting it to an external stream
The first stage is purely an exercise with html, css and javascript. The latter will depend on your use case - it could be a qt-js hybrid application (as exemplified here) for developers, an electron application for cross-platform and mobile deployment or a cloud based service.
This section will walk through how to build a web application with the provided js libraries. An example of wrapping the web app within a Qt-Js application will follow.
To get started, let's begin with a basic html page with two divs, one for the tree canvas and one for the timeline:
<!doctype html>
<html>
<head>
  <meta charset="utf-8">
  <title>PyTrees Viewer</title>
  <style>
    html {
      height: 100%  /* canvas is intended to fill the screen, cascading heights achieves this */
    }
    body {
      margin: 0;
      overflow:hidden;  /* no scrollbars */
      height: 100%  /* canvas is intended to fill the screen, cascading heights achieves this */
    }
  </style>
</head>
<body>
  <div id="canvas"></div>
  <div id="timeline"></div>
</body>
</html>
Next, bring in the javascript libraries. For exemplar purposes, it is assumed here that the libraries have been made available alongside the html page - how is an integration detail depending on the mode of deployment (see next section for an example).
Note that the py_trees-<version>.js library has only one dependency, jointjs,
but that in turn has a few dependencies of it's own. The bundled libraries in the js/jointjs folder
of this repository correspond to the requirements for a specific version of jointjs and
have been tested to work with the accompany py_trees-<version>.js library.
You can verify that the libraries have been properly imported by calling py_trees.hello() which
will print version information of the loaded javascript libraries (if found) to the javascript console.
<!doctype html>
<html>
<head>
  <meta charset="utf-8">
  <title>PyTrees Viewer</title>
  <link rel="stylesheet" href="js/py_trees-0.6.0.css"/>
  <link rel="stylesheet" type="text/css" href="js/jointjs/joint-3.0.4.min.css"/>
  <script src="js/jointjs/dagre-0.8.4.min.js"></script>
  <script src="js/jointjs/graphlib-2.1.7.min.js"></script>
  <script src="js/jointjs/jquery-3.4.1.min.js"></script>
  <script src="js/jointjs/lodash-4.17.11.min.js"></script>
  <script src="js/jointjs/backbone-1.4.0.js"></script>
  <script src="js/jointjs/joint-3.0.4.min.js"></script>
  <script src="js/py_trees-0.6.0.js"></script>
  <!-- Web app integration css here -->
  <style>
    html {
      height: 100%  /* canvas is intended to fill the screen, cascading heights achieves this */
    }
    body {
      margin: 0;
      overflow:hidden;  /* no scrollbars */
      height: 100%  /* canvas is intended to fill the screen, cascading heights achieves this */
    }
  </style>
</head>
<body>
  <script type="text/javascript">
    py_trees.hello()
  </script>
  <div id="window">
    <div id="canvas"></div>
    <div id="timeline"></div>
  </div>
</body>
</html>
Output from py_trees.hello():
********************************************************************************
                               Py Trees JS

 A javascript library for visualisation of executing behaviour trees.

 Version & Dependency Info:
  - py_trees:  0.6.0
    - jointjs :  3.1.0
       - backbone:  1.4.0
       - dagre   :  0.8.4
       - jquery  :  3.4.1
       - lodash  :  4.17.11
********************************************************************************
In the next iteration, the canvas is initialised and a callback for accepting incoming trees from an external source is prepared. To test it, pass it the demo tree provided by the library.
<!doctype html>
<html>
<head>
  <meta charset="utf-8">
  <title>PyTrees Viewer</title>
  <link rel="stylesheet" href="js/py_trees-0.6.0.css"/>
  <link rel="stylesheet" type="text/css" href="js/jointjs/joint-3.0.4.min.css"/>
  <script src="js/jointjs/dagre-0.8.4.min.js"></script>
  <script src="js/jointjs/graphlib-2.1.7.min.js"></script>
  <script src="js/jointjs/jquery-3.4.1.min.js"></script>
  <script src="js/jointjs/lodash-4.17.11.min.js"></script>
  <script src="js/jointjs/backbone-1.4.0.js"></script>
  <script src="js/jointjs/joint-3.0.4.min.js"></script>
  <script src="js/py_trees-0.6.0.js"></script>
  <!-- Web app integration css here -->
  <style>
    html {
      height: 100%  /* canvas is intended to fill the screen, cascading heights achieves this */
    }
    body {
      margin: 0;
      overflow:hidden;  /* no scrollbars */
      height: 100%  /* canvas is intended to fill the screen, cascading heights achieves this */
    }
  </style>
</head>
<body>
  <script type="text/javascript">
    py_trees.hello()
  </script>
  <div id="window">
    <div id="canvas"></div>
    <div id="timeline"></div>
  </div>
  <script type="text/javascript">
    // rendering canvas
    canvas_graph = py_trees.canvas.create_graph()
    canvas_paper = py_trees.canvas.create_paper({graph: canvas_graph})

    render_tree = function({tree}) {
      py_trees.canvas.update_graph({graph: canvas_graph, tree: tree})
      py_trees.canvas.layout_graph({graph: canvas_graph})
      if ( canvas_graph.get('scale_content_to_fit') ) {
        py_trees.canvas.scale_content_to_fit(canvas_paper)
      }
      return "rendered"
    }
    render_tree({tree: py_trees.experimental.create_demo_tree_definition()})
  </script>
</body>
</html>
At this point, your web app should be visualising a single tree and zoom/collapse/scale to fit interactions functional. I'm happy, you should be too!
Adding a timeline to the application is optional, but the code does not change significantly and is a very useful feature to have. The built-in demo app's index.html does exactly this. The code is reproduced below for convenience.
<!doctype html>
<html>
<head>
  <meta charset="utf-8">
  <title>PyTrees Viewer</title>
  <link rel="stylesheet" href="js/py_trees-0.6.0.css"/>
  <link rel="stylesheet" type="text/css" href="js/jointjs/joint-3.0.4.min.css"/>
  <script src="js/jointjs/dagre-0.8.4.min.js"></script>
  <script src="js/jointjs/graphlib-2.1.7.min.js"></script>
  <script src="js/jointjs/jquery-3.4.1.min.js"></script>
  <script src="js/jointjs/lodash-4.17.11.min.js"></script>
  <script src="js/jointjs/backbone-1.4.0.js"></script>
  <script src="js/jointjs/joint-3.0.4.min.js"></script>
  <script src="js/py_trees-0.6.0.js"></script>
  <!-- Web app integration css here -->
  <style>
    html {
      height: 100%  /* canvas is intended to fill the screen, cascading heights achieves this */
    }
    body {
      margin: 0;
      overflow:hidden;  /* no scrollbars */
      height: 100%  /* canvas is intended to fill the screen, cascading heights achieves this */
    }
  </style>
</head>
<body>
  <script type="text/javascript">
    py_trees.hello()
  </script>
  <div id="window">
    <div id="canvas"></div>
    <div id="timeline"></div>
  </div>
  <script type="text/javascript">
    // rendering canvas
    canvas_graph = py_trees.canvas.create_graph()
    canvas_paper = py_trees.canvas.create_paper({graph: canvas_graph})

    // event timeline
    timeline_graph = py_trees.timeline.create_graph({event_cache_limit: 100});
    timeline_paper = py_trees.timeline.create_paper({
        timeline_graph: timeline_graph,
        canvas_graph: canvas_graph,
        canvas_paper: canvas_paper,
    })

    // react to window resizing events
    $(window).resize(function() {
      py_trees.canvas.on_window_resize(canvas_paper)
      py_trees.timeline.on_window_resize(timeline_paper)
    })

    render_tree = function({tree}) {
      py_trees.timeline.add_tree_to_cache({
          timeline_graph: timeline_graph,
          canvas_graph: canvas_graph,
          canvas_paper: canvas_paper,
          tree: tree
      })
      return "rendered"
    }
  </script>
</body>
</html>
Example - PyQt App
The py-trees-demo-viewer app is a qt-js hybrid application using qtwebengine.
Every time a qt button is pressed, an internally generated tree snapshot is sent to render_tree() in the embedded web application. From here, it is not too hard to
imagine connecting the qt application to an actual external source. The qt layer
then acts as a shim or relay transferring messages to the internal web app.
How does it work?
- The js libs are made available as a
.qrcresource [1] - A simple web app is made available as another
.qrcresource - Both resources are consumed by the QWebEngine View to serve the app
[1] This can be made available separately and as a dependency to the actual pyqt application. For instance, the py_trees_js package is a dependency of py_trees_ros_viewer.
In more detail...
The JS Libraries
- Bundle the javascript resources into a
.qrcfile - Generate the resources as a c++ library / python module
- Deploy the c++ library/python module in your development environment
In this case, the py_trees and jointjs javascript libraries have been listed
in py_trees_js/resources.qrc, generated using
py_trees_js/gen.bash, resulting in the importable module
py_trees_js/resources.py. From this point, any pythonic
Qt application wishing to visualise behaviour trees need only import this module from the py_trees_js package.
The Web App
- Bundle the
.html/.csspages into a.qrcfile - Import into directly into designer when building your Qt application
In this case, our web app (py_trees_js/viewer/html/index.html) has been rolled into py_trees_js/viewer/web_app.qrc which is directly loaded into py_trees_js/viewer/web_view.ui where the URL property of the QWebEngineView widget has been configured with the resources index.html.
You could alternatively, generate a module from the .qrc and import that into the
relevant python code as was done for the javascript resources.
The Qt Application
The Qt application can be designed in whatever way you're most comfortable with - via
Designer, pure C++ or python. In this case, Qt's Designer is used to produce the .ui
files which are generated into python modules and finally customised and brought together
as a PyQt5 application. Refer to py_trees_js/viewer for more details
or as a reference example from which to start your own Qt-Js hybrid application.
Key elements:
- Build your Qt application around a QWebEngineView widget
- Link/import the javascript module in the web engine view class
- Load the html page into the QWebEngineView view
Do not use the QWebView widget - this is deprecating in favour of the QWebEngineView widget. The most notable difference is that QWebView uses Qt's old webkit, while QWebEngineView makes use of Chromium's webkit.
Note that the second step automagically makes available the javascript resources to the application when it's loaded. It's not terribly fussy about where it gets loaded, see py_trees_js/viewer/web_view.py for an example:
# This is the module generated by running pyrcc5 on the js libraries .qrc
# It could have been equivalently deployed in a completely different python package
import py_trees_js.resources
Loading the web page can be accomplished in designer. Simply point it at your qresource file
and set the dynamic URL property on the QWebEngineView widget. Alternatively you can import
the resource module and load it via QWebEngineView's load api.
Qt-Js Interactions
Qt and JS can interact directly over snippets of javascript code (via runJavaScript()
or over QWebChannel (a mechanism similar to sigslots) where more complexity is needed.
The example application here calls on the render_tree() method we created earlier in
the web application to send trees to the app. Example code from py_trees_js/viewer/viewer.py which handles button clicks to cycle through a list of
demonstration trees:
def send_tree_response(reply):
    console.logdebug("reply: '{}' [viewer]".format(reply))


@qt_core.pyqtSlot()
def send_tree(web_view_page, demo_trees, unused_checked):
    demo_trees[send_tree.index]['timestamp'] = time.time()
    console.logdebug("send: tree '{}' [{}][viewer]".format(
        send_tree.index, demo_trees[send_tree.index]['timestamp'])
    )
    javascript_command = "render_tree({{tree: {}}})".format(demo_trees[send_tree.index])
    web_view_page.runJavaScript(javascript_command, send_tree_response)
    send_tree.index = 0 if send_tree.index == 2 else send_tree.index + 1

send_tree.index = 0
The JSON Specification
TODO: A JSon schema
Roughly, the specification expects json objects of the form:
- timestamp: int
- behaviours: dict[str, dict]
- (optional) visited_path: list[str]
- (optional) blackboard: {
- behaviours: dict[str, dict[str, str]],
- data: dict[str, str]
- }
- (optional) activity: list[str]
where each behaviour in the dict has specification:
- id: str
- status: Union[
INVALID,FAILURE,RUNNING,SUCCESS] - name: str
- colour:
- (optional) children: List[str]
- (optional) data:
Identification strings (id's) must be unique and are used as both keys for the behaviours dictionary, children and visited_path variables.
An example (extracted from py_trees.experimental.create_demo_tree_definition()):
{
    timestamp: 1563938995,
    visited_path: ['1', '2', '3', '4', '5', '7', '8'],
    behaviours: {
        '1': {
            id: '1',
            status: 'RUNNING',
            name: 'Selector',
            colour: '#00FFFF',
            children: ['2', '3', '4', '6'],
            data: {
                Type: 'py_trees.composites.Selector',
                Feedback: "Decision maker",
            },
        },
        '2': {
            id: '2',
            status: 'FAILURE',
            name: 'Worker',
            colour: '#FFA500',
            children: ['7', '8', '9'],
            data: {
                Type: 'py_trees.composites.Sequence',
                Feedback: "Worker"
            },
        },
    }
    'blackboard': {
        'behaviours': {  # key metadata per behaviour
            '2': {
                '/parameters/initial_value': 'r',
                '/state/worker': 'w'
            },
        },
        'data': {
            '/parameters/initial_value': 'foo',
            '/state/worker': 'bar',
        },
    'activity': [
        "<text style='color: blue;'>Worker initialised with 'foo'</text>'",
        "<text style='color: red;'>Worker wrote 'bar'</text>'",
    ]
}
Changelog
Forthcoming
- ...
0.6.4 (2022-02-24)
- [actions] pre-merge and update-cache, #146
- [actions] push containers, #144
- [poetry] update project to use poetry, #143
- [vscode] devcontainer workflows, #143
- [tests] basic tests, formatting, linting, #143
0.6.3 (2020-05-05)
- [js] remove buggy early view update and optimise them, #142
0.6.2 (2020-03-02)
- [js] bugfix accidentally ignored tree_cache size, #123
- ... missed a few pull requests inbetween
0.6.0 (2019-12-27)
- [js] accepting trees flagged with no status/graph change, #122
- [js] blackboard views, #125, #133, #122, #135, #136
0.5.1 (2019-10-26)
- [js] performance improvements, #120
- [js] highlighted links, #115
- [js] orthogonal link connections, for better visualisation
- [qt] capture screenshots, #114
0.5.0 (2019-08-29)
- [html] disable scrollbars, #110
- [js] robustness against identical timestamps, #109
- [js] improved window resize handling,
#111
- new public api
py_trees.canvas.on_window_resizeandpy_trees.timeline.on_window_resize
- new public api
0.4.0 (2019-08-13)
0.3.1 (2019-08-07)
0.2.0 (2019-08-01)
0.1.0 (2019-07-25)
Wiki Tutorials
Source Tutorials
Package Dependencies
System Dependencies
Dependant Packages
Launch files
Messages
Services
Plugins
Recent questions tagged py_trees_js at Robotics Stack Exchange
|
|
py_trees_js package from py_trees_js repopy_trees_js |
|
|
Package Summary
| Tags | No category tags. |
| Version | 0.6.4 |
| License | BSD |
| Build type | AMENT_PYTHON |
| Use | RECOMMENDED |
Repository Summary
| Checkout URI | https://github.com/splintered-reality/py_trees_js.git |
| VCS Type | git |
| VCS Version | release/0.6.x |
| Last Updated | 2023-02-25 |
| Dev Status | MAINTAINED |
| CI status | No Continuous Integration |
| Released | RELEASED |
| Tags | No category tags. |
| Contributing |
Help Wanted (0)
Good First Issues (0) Pull Requests to Review (0) |
Package Description
Additional Links
Maintainers
- Daniel Stonier
Authors
- Daniel Stonier
PyTrees Js
[About] [Features] [Preview] [Exmaple - Simple Web App] [Example - PyQt App] [The JSON Specification]
About
Libraries for visualisation of runtime or replayed behaviour trees.
- ./js - a self-contained javascript library to build apps around
- py_trees_js - a python package that makes the js available as a pyqt resource
- py_trees_js.viewer - a demo pyqtwebengine app
See py_trees_ros_viewer for a fully fledged pyqt integration that uses py_trees_js.
Features
- Visualise the runtime state of a behaviour tree
- Collapsible subtrees
- Zoom and scale contents to fit
- Timeline rewind & resume
- Blackboard key-value storage view
- Activity log view
Although designed for py_trees, the js libs (in particular, the interfaces) are not dependent on py_trees and could be used for other behaviour tree applications.
Preview
$ git clone https://github.com/splintered-reality/py_trees_js
$ code .
# Reopen the project in the devcontainer
$ poetry install
$ poetry shell
$ py-trees-demo-viewer
Example - Simple Web App
Building a complete application that can render a behaviour tree stream is an effort that can be decomposed into two tasks:
- Creating the web app for rendering trees and visualising a timeline
- Wrapping the web app in a framework and connecting it to an external stream
The first stage is purely an exercise with html, css and javascript. The latter will depend on your use case - it could be a qt-js hybrid application (as exemplified here) for developers, an electron application for cross-platform and mobile deployment or a cloud based service.
This section will walk through how to build a web application with the provided js libraries. An example of wrapping the web app within a Qt-Js application will follow.
To get started, let's begin with a basic html page with two divs, one for the tree canvas and one for the timeline:
<!doctype html>
<html>
<head>
  <meta charset="utf-8">
  <title>PyTrees Viewer</title>
  <style>
    html {
      height: 100%  /* canvas is intended to fill the screen, cascading heights achieves this */
    }
    body {
      margin: 0;
      overflow:hidden;  /* no scrollbars */
      height: 100%  /* canvas is intended to fill the screen, cascading heights achieves this */
    }
  </style>
</head>
<body>
  <div id="canvas"></div>
  <div id="timeline"></div>
</body>
</html>
Next, bring in the javascript libraries. For exemplar purposes, it is assumed here that the libraries have been made available alongside the html page - how is an integration detail depending on the mode of deployment (see next section for an example).
Note that the py_trees-<version>.js library has only one dependency, jointjs,
but that in turn has a few dependencies of it's own. The bundled libraries in the js/jointjs folder
of this repository correspond to the requirements for a specific version of jointjs and
have been tested to work with the accompany py_trees-<version>.js library.
You can verify that the libraries have been properly imported by calling py_trees.hello() which
will print version information of the loaded javascript libraries (if found) to the javascript console.
<!doctype html>
<html>
<head>
  <meta charset="utf-8">
  <title>PyTrees Viewer</title>
  <link rel="stylesheet" href="js/py_trees-0.6.0.css"/>
  <link rel="stylesheet" type="text/css" href="js/jointjs/joint-3.0.4.min.css"/>
  <script src="js/jointjs/dagre-0.8.4.min.js"></script>
  <script src="js/jointjs/graphlib-2.1.7.min.js"></script>
  <script src="js/jointjs/jquery-3.4.1.min.js"></script>
  <script src="js/jointjs/lodash-4.17.11.min.js"></script>
  <script src="js/jointjs/backbone-1.4.0.js"></script>
  <script src="js/jointjs/joint-3.0.4.min.js"></script>
  <script src="js/py_trees-0.6.0.js"></script>
  <!-- Web app integration css here -->
  <style>
    html {
      height: 100%  /* canvas is intended to fill the screen, cascading heights achieves this */
    }
    body {
      margin: 0;
      overflow:hidden;  /* no scrollbars */
      height: 100%  /* canvas is intended to fill the screen, cascading heights achieves this */
    }
  </style>
</head>
<body>
  <script type="text/javascript">
    py_trees.hello()
  </script>
  <div id="window">
    <div id="canvas"></div>
    <div id="timeline"></div>
  </div>
</body>
</html>
Output from py_trees.hello():
********************************************************************************
                               Py Trees JS

 A javascript library for visualisation of executing behaviour trees.

 Version & Dependency Info:
  - py_trees:  0.6.0
    - jointjs :  3.1.0
       - backbone:  1.4.0
       - dagre   :  0.8.4
       - jquery  :  3.4.1
       - lodash  :  4.17.11
********************************************************************************
In the next iteration, the canvas is initialised and a callback for accepting incoming trees from an external source is prepared. To test it, pass it the demo tree provided by the library.
<!doctype html>
<html>
<head>
  <meta charset="utf-8">
  <title>PyTrees Viewer</title>
  <link rel="stylesheet" href="js/py_trees-0.6.0.css"/>
  <link rel="stylesheet" type="text/css" href="js/jointjs/joint-3.0.4.min.css"/>
  <script src="js/jointjs/dagre-0.8.4.min.js"></script>
  <script src="js/jointjs/graphlib-2.1.7.min.js"></script>
  <script src="js/jointjs/jquery-3.4.1.min.js"></script>
  <script src="js/jointjs/lodash-4.17.11.min.js"></script>
  <script src="js/jointjs/backbone-1.4.0.js"></script>
  <script src="js/jointjs/joint-3.0.4.min.js"></script>
  <script src="js/py_trees-0.6.0.js"></script>
  <!-- Web app integration css here -->
  <style>
    html {
      height: 100%  /* canvas is intended to fill the screen, cascading heights achieves this */
    }
    body {
      margin: 0;
      overflow:hidden;  /* no scrollbars */
      height: 100%  /* canvas is intended to fill the screen, cascading heights achieves this */
    }
  </style>
</head>
<body>
  <script type="text/javascript">
    py_trees.hello()
  </script>
  <div id="window">
    <div id="canvas"></div>
    <div id="timeline"></div>
  </div>
  <script type="text/javascript">
    // rendering canvas
    canvas_graph = py_trees.canvas.create_graph()
    canvas_paper = py_trees.canvas.create_paper({graph: canvas_graph})

    render_tree = function({tree}) {
      py_trees.canvas.update_graph({graph: canvas_graph, tree: tree})
      py_trees.canvas.layout_graph({graph: canvas_graph})
      if ( canvas_graph.get('scale_content_to_fit') ) {
        py_trees.canvas.scale_content_to_fit(canvas_paper)
      }
      return "rendered"
    }
    render_tree({tree: py_trees.experimental.create_demo_tree_definition()})
  </script>
</body>
</html>
At this point, your web app should be visualising a single tree and zoom/collapse/scale to fit interactions functional. I'm happy, you should be too!
Adding a timeline to the application is optional, but the code does not change significantly and is a very useful feature to have. The built-in demo app's index.html does exactly this. The code is reproduced below for convenience.
<!doctype html>
<html>
<head>
  <meta charset="utf-8">
  <title>PyTrees Viewer</title>
  <link rel="stylesheet" href="js/py_trees-0.6.0.css"/>
  <link rel="stylesheet" type="text/css" href="js/jointjs/joint-3.0.4.min.css"/>
  <script src="js/jointjs/dagre-0.8.4.min.js"></script>
  <script src="js/jointjs/graphlib-2.1.7.min.js"></script>
  <script src="js/jointjs/jquery-3.4.1.min.js"></script>
  <script src="js/jointjs/lodash-4.17.11.min.js"></script>
  <script src="js/jointjs/backbone-1.4.0.js"></script>
  <script src="js/jointjs/joint-3.0.4.min.js"></script>
  <script src="js/py_trees-0.6.0.js"></script>
  <!-- Web app integration css here -->
  <style>
    html {
      height: 100%  /* canvas is intended to fill the screen, cascading heights achieves this */
    }
    body {
      margin: 0;
      overflow:hidden;  /* no scrollbars */
      height: 100%  /* canvas is intended to fill the screen, cascading heights achieves this */
    }
  </style>
</head>
<body>
  <script type="text/javascript">
    py_trees.hello()
  </script>
  <div id="window">
    <div id="canvas"></div>
    <div id="timeline"></div>
  </div>
  <script type="text/javascript">
    // rendering canvas
    canvas_graph = py_trees.canvas.create_graph()
    canvas_paper = py_trees.canvas.create_paper({graph: canvas_graph})

    // event timeline
    timeline_graph = py_trees.timeline.create_graph({event_cache_limit: 100});
    timeline_paper = py_trees.timeline.create_paper({
        timeline_graph: timeline_graph,
        canvas_graph: canvas_graph,
        canvas_paper: canvas_paper,
    })

    // react to window resizing events
    $(window).resize(function() {
      py_trees.canvas.on_window_resize(canvas_paper)
      py_trees.timeline.on_window_resize(timeline_paper)
    })

    render_tree = function({tree}) {
      py_trees.timeline.add_tree_to_cache({
          timeline_graph: timeline_graph,
          canvas_graph: canvas_graph,
          canvas_paper: canvas_paper,
          tree: tree
      })
      return "rendered"
    }
  </script>
</body>
</html>
Example - PyQt App
The py-trees-demo-viewer app is a qt-js hybrid application using qtwebengine.
Every time a qt button is pressed, an internally generated tree snapshot is sent to render_tree() in the embedded web application. From here, it is not too hard to
imagine connecting the qt application to an actual external source. The qt layer
then acts as a shim or relay transferring messages to the internal web app.
How does it work?
- The js libs are made available as a
.qrcresource [1] - A simple web app is made available as another
.qrcresource - Both resources are consumed by the QWebEngine View to serve the app
[1] This can be made available separately and as a dependency to the actual pyqt application. For instance, the py_trees_js package is a dependency of py_trees_ros_viewer.
In more detail...
The JS Libraries
- Bundle the javascript resources into a
.qrcfile - Generate the resources as a c++ library / python module
- Deploy the c++ library/python module in your development environment
In this case, the py_trees and jointjs javascript libraries have been listed
in py_trees_js/resources.qrc, generated using
py_trees_js/gen.bash, resulting in the importable module
py_trees_js/resources.py. From this point, any pythonic
Qt application wishing to visualise behaviour trees need only import this module from the py_trees_js package.
The Web App
- Bundle the
.html/.csspages into a.qrcfile - Import into directly into designer when building your Qt application
In this case, our web app (py_trees_js/viewer/html/index.html) has been rolled into py_trees_js/viewer/web_app.qrc which is directly loaded into py_trees_js/viewer/web_view.ui where the URL property of the QWebEngineView widget has been configured with the resources index.html.
You could alternatively, generate a module from the .qrc and import that into the
relevant python code as was done for the javascript resources.
The Qt Application
The Qt application can be designed in whatever way you're most comfortable with - via
Designer, pure C++ or python. In this case, Qt's Designer is used to produce the .ui
files which are generated into python modules and finally customised and brought together
as a PyQt5 application. Refer to py_trees_js/viewer for more details
or as a reference example from which to start your own Qt-Js hybrid application.
Key elements:
- Build your Qt application around a QWebEngineView widget
- Link/import the javascript module in the web engine view class
- Load the html page into the QWebEngineView view
Do not use the QWebView widget - this is deprecating in favour of the QWebEngineView widget. The most notable difference is that QWebView uses Qt's old webkit, while QWebEngineView makes use of Chromium's webkit.
Note that the second step automagically makes available the javascript resources to the application when it's loaded. It's not terribly fussy about where it gets loaded, see py_trees_js/viewer/web_view.py for an example:
# This is the module generated by running pyrcc5 on the js libraries .qrc
# It could have been equivalently deployed in a completely different python package
import py_trees_js.resources
Loading the web page can be accomplished in designer. Simply point it at your qresource file
and set the dynamic URL property on the QWebEngineView widget. Alternatively you can import
the resource module and load it via QWebEngineView's load api.
Qt-Js Interactions
Qt and JS can interact directly over snippets of javascript code (via runJavaScript()
or over QWebChannel (a mechanism similar to sigslots) where more complexity is needed.
The example application here calls on the render_tree() method we created earlier in
the web application to send trees to the app. Example code from py_trees_js/viewer/viewer.py which handles button clicks to cycle through a list of
demonstration trees:
def send_tree_response(reply):
    console.logdebug("reply: '{}' [viewer]".format(reply))


@qt_core.pyqtSlot()
def send_tree(web_view_page, demo_trees, unused_checked):
    demo_trees[send_tree.index]['timestamp'] = time.time()
    console.logdebug("send: tree '{}' [{}][viewer]".format(
        send_tree.index, demo_trees[send_tree.index]['timestamp'])
    )
    javascript_command = "render_tree({{tree: {}}})".format(demo_trees[send_tree.index])
    web_view_page.runJavaScript(javascript_command, send_tree_response)
    send_tree.index = 0 if send_tree.index == 2 else send_tree.index + 1

send_tree.index = 0
The JSON Specification
TODO: A JSon schema
Roughly, the specification expects json objects of the form:
- timestamp: int
- behaviours: dict[str, dict]
- (optional) visited_path: list[str]
- (optional) blackboard: {
- behaviours: dict[str, dict[str, str]],
- data: dict[str, str]
- }
- (optional) activity: list[str]
where each behaviour in the dict has specification:
- id: str
- status: Union[
INVALID,FAILURE,RUNNING,SUCCESS] - name: str
- colour:
- (optional) children: List[str]
- (optional) data:
Identification strings (id's) must be unique and are used as both keys for the behaviours dictionary, children and visited_path variables.
An example (extracted from py_trees.experimental.create_demo_tree_definition()):
{
    timestamp: 1563938995,
    visited_path: ['1', '2', '3', '4', '5', '7', '8'],
    behaviours: {
        '1': {
            id: '1',
            status: 'RUNNING',
            name: 'Selector',
            colour: '#00FFFF',
            children: ['2', '3', '4', '6'],
            data: {
                Type: 'py_trees.composites.Selector',
                Feedback: "Decision maker",
            },
        },
        '2': {
            id: '2',
            status: 'FAILURE',
            name: 'Worker',
            colour: '#FFA500',
            children: ['7', '8', '9'],
            data: {
                Type: 'py_trees.composites.Sequence',
                Feedback: "Worker"
            },
        },
    }
    'blackboard': {
        'behaviours': {  # key metadata per behaviour
            '2': {
                '/parameters/initial_value': 'r',
                '/state/worker': 'w'
            },
        },
        'data': {
            '/parameters/initial_value': 'foo',
            '/state/worker': 'bar',
        },
    'activity': [
        "<text style='color: blue;'>Worker initialised with 'foo'</text>'",
        "<text style='color: red;'>Worker wrote 'bar'</text>'",
    ]
}
Changelog
Forthcoming
- ...
0.6.4 (2022-02-24)
- [actions] pre-merge and update-cache, #146
- [actions] push containers, #144
- [poetry] update project to use poetry, #143
- [vscode] devcontainer workflows, #143
- [tests] basic tests, formatting, linting, #143
0.6.3 (2020-05-05)
- [js] remove buggy early view update and optimise them, #142
0.6.2 (2020-03-02)
- [js] bugfix accidentally ignored tree_cache size, #123
- ... missed a few pull requests inbetween
0.6.0 (2019-12-27)
- [js] accepting trees flagged with no status/graph change, #122
- [js] blackboard views, #125, #133, #122, #135, #136
0.5.1 (2019-10-26)
- [js] performance improvements, #120
- [js] highlighted links, #115
- [js] orthogonal link connections, for better visualisation
- [qt] capture screenshots, #114
0.5.0 (2019-08-29)
- [html] disable scrollbars, #110
- [js] robustness against identical timestamps, #109
- [js] improved window resize handling,
#111
- new public api
py_trees.canvas.on_window_resizeandpy_trees.timeline.on_window_resize
- new public api
0.4.0 (2019-08-13)
0.3.1 (2019-08-07)
0.2.0 (2019-08-01)
0.1.0 (2019-07-25)
Wiki Tutorials
Source Tutorials
Package Dependencies
System Dependencies
Dependant Packages
| Name | Repo | Deps |
|---|---|---|
| py_trees_ros_viewer | github-splintered-reality-py_trees_ros_viewer |
Launch files
Messages
Services
Plugins
Recent questions tagged py_trees_js at Robotics Stack Exchange
|
|
py_trees_js package from py_trees_js repopy_trees_js |
|
|
Package Summary
| Tags | No category tags. |
| Version | 0.5.1 |
| License | BSD |
| Build type | AMENT_PYTHON |
| Use | RECOMMENDED |
Repository Summary
| Checkout URI | https://github.com/splintered-reality/py_trees_js.git |
| VCS Type | git |
| VCS Version | release/0.5.x |
| Last Updated | 2019-10-29 |
| Dev Status | MAINTAINED |
| CI status | No Continuous Integration |
| Released | RELEASED |
| Tags | No category tags. |
| Contributing |
Help Wanted (0)
Good First Issues (0) Pull Requests to Review (0) |
Package Description
Additional Links
Maintainers
- Daniel Stonier
Authors
- Daniel Stonier
PyTrees Js
[About] [Roadmap] [Usage] [Example Qt-Js Integration] [The JSON Specification]
About
Javascript libraries for visualisation and monitoring of behaviour trees at runtime or when replaying a log.
- Visualise runtime snapshots of behaviour trees
- Collapse subtrees
- Zoom and scale contents to fit
- Timeline rewind & resume
Despite primarily catering for use cases with py_trees, these libraries can be used for behaviour trees in general since it requires only properties common to most behaviour tree implementations and flexibly opts into implementation specific data via passing of a key-value dictionary that is appropriately formatted in an implementation-agnostic manner inside the web application.
This repository also includes a hybrid Qt-JS application used for development and demonstration purposes.
For a quick preview of it's capabilities:
git clone https://github.com/splintered-reality/py_trees_js
cd py_trees_js
. ./virtualenv.bash
# launch the demo viewer
py-trees-demo-viewer
# OR launch the demo viewer with a js console for debugging
./scripts/py-trees-devel-viewer


Roadmap
See the Projects page for progress and planned milestones.
Usage
Building a complete application that can render a behaviour tree stream is an effort that can be decomposed into two tasks:
- Creating the web app for rendering trees and visualising a timeline
- Wrapping the web app in a framework and connecting it to an external stream
The first stage is purely an exercise with html, css and javascript. The latter will depend on your use case - it could be a qt-js hybrid application (as exemplified here) for developers, an electron application for cross-platform and mobile deployment or a cloud based service.
This section will walk through how to build a web application with the provided js libraries. An example of wrapping the web app within a Qt-Js application will follow.
To get started, let's begin with a basic html page with two divs, one for the tree canvas and one for the timeline:
<html>
<head>
  <meta charset="utf-8">
  <title>PyTrees Viewer</title>
</head>
<style>
  body {
    margin: 0;
    overflow:hidden;  <!-- no scrollbars -->
  }
</style>
<body>
  <div id="window">
    <div id="canvas"></div>
    <div id="timeline"></div>
  </div>
</body>
</html>
Next, bring in the javascript libraries. For exemplar purposes, it is assumed here that the libraries have been made available alongside the html page - how is an integration detail depending on the mode of deployment (see next section for an example).
Note that the py_trees-<version>.js library has only one dependency, jointjs,
but that in turn has a few dependencies of it's own. The bundled libraries in the js/jointjs folder
of this repository correspond to the requirements for a specific version of jointjs and
have been tested to work with the accompany py_trees-<version>.js library.
You can verify that the libraries have been properly imported by calling py_trees.hello() which
will print version information of the loaded javascript libraries (if found) to the javascript console.
<html>
<head>
  <meta charset="utf-8">
  <title>PyTrees Viewer</title>
</head>
<script src="js/jointjs/dagre-0.8.4.min.js"></script>
<script src="js/jointjs/graphlib-2.1.7.min.js"></script>
<script src="js/jointjs/jquery-3.4.1.min.js"></script>
<script src="js/jointjs/lodash-4.17.11.min.js"></script>
<script src="js/jointjs/backbone-1.4.0.js"></script>
<script src="js/jointjs/joint-3.0.4.min.js"></script>
<script src="js/py_trees-0.5.1.js"></script>
<link rel="stylesheet" href="js/py_trees-0.5.1.css">
<link rel="stylesheet" type="text/css" href="js/jointjs/joint-3.0.4.min.css"/>
<style>
  body {
    margin: 0;
    overflow:hidden;  <!-- no scrollbars -->
  }
</style>
<body>
  <script type="text/javascript">
    py_trees.hello()
  </script>
  <div id="window">
    <div id="canvas"></div>
    <div id="timeline"></div>
  </div>
</body>
</html>
Output from py_trees.hello():
********************************************************************************
                               Py Trees JS

 A javascript library for visualisation of executing behaviour trees.

 Version & Dependency Info:
  - py_trees:  0.3.1
    - jointjs :  3.0.4
       - backbone:  1.4.0
       - dagre   :  0.8.4
       - jquery  :  3.4.1
       - lodash  :  4.17.11
********************************************************************************
In the next iteration, the canvas is initialised and a callback for accepting incoming trees from an external source is prepared. To test it, pass it the demo tree provided by the library.
<html>
<head>
  <meta charset="utf-8">
  <title>PyTrees Viewer</title>
</head>
<script src="js/jointjs/dagre-0.8.4.min.js"></script>
<script src="js/jointjs/graphlib-2.1.7.min.js"></script>
<script src="js/jointjs/jquery-3.4.1.min.js"></script>
<script src="js/jointjs/lodash-4.17.11.min.js"></script>
<script src="js/jointjs/backbone-1.4.0.js"></script>
<script src="js/jointjs/joint-3.0.4.min.js"></script>
<script src="js/py_trees-0.5.1.js"></script>
<link rel="stylesheet" href="js/py_trees-0.5.1.css">
<link rel="stylesheet" type="text/css" href="js/jointjs/joint-3.0.4.min.css"/>
<style>
  body {
    margin: 0;
    overflow:hidden;  <!-- no scrollbars -->
  }
</style>
<body>
  <script type="text/javascript">
    py_trees.hello()
  </script>
  <div id="window">
    <div id="canvas"></div>
    <div id="timeline"></div>
  </div>
  <script type="text/javascript">
    // rendering canvas
    canvas_graph = py_trees.canvas.create_graph()
    canvas_paper = py_trees.canvas.create_paper({graph: canvas_graph})

    render_tree = function({tree}) {
      py_trees.canvas.update_graph({graph: canvas_graph, tree: tree})
      py_trees.canvas.layout_graph({graph: canvas_graph})
      if ( canvas_graph.get('scale_content_to_fit') ) {
        py_trees.canvas.scale_content_to_fit(canvas_paper)
      }
      return "rendered"
    }
    render_tree({tree: py_trees.experimental.create_demo_tree_definition()})
  </script>
</body>
</html>
At this point, your web app should be visualising a single tree and zoom/collapse/scale to fit interactions functional. I'm happy, you should be too!
Adding a timeline to the application is optional, but the code does not change significantly and is a very useful feature to have. The built-in demo app's index.html does exactly this. The code is reproduced below for convenience.
<html>
<head>
  <meta charset="utf-8">
  <title>PyTrees Viewer</title>
</head>
<script src="js/jointjs/dagre-0.8.4.min.js"></script>
<script src="js/jointjs/graphlib-2.1.7.min.js"></script>
<script src="js/jointjs/jquery-3.4.1.min.js"></script>
<script src="js/jointjs/lodash-4.17.11.min.js"></script>
<script src="js/jointjs/backbone-1.4.0.js"></script>
<script src="js/jointjs/joint-3.0.4.min.js"></script>
<script src="js/py_trees-0.5.1.js"></script>
<link rel="stylesheet" href="js/py_trees-0.5.1.css">
<link rel="stylesheet" type="text/css" href="js/jointjs/joint-3.0.4.min.css"/>
<style>
  body {
    margin: 0;
    overflow:hidden;  <!-- no scrollbars -->
  }
</style>
<body>
  <script type="text/javascript">
    py_trees.hello()
  </script>
  <div id="window">
    <div id="canvas"></div>
    <div id="timeline"></div>
  </div>
  <script type="text/javascript">
    // rendering canvas
    canvas_graph = py_trees.canvas.create_graph()
    canvas_paper = py_trees.canvas.create_paper({graph: canvas_graph})

    // event timeline
    timeline_graph = py_trees.timeline.create_graph({event_cache_limit: 100});
    timeline_paper = py_trees.timeline.create_paper({
        timeline_graph: timeline_graph,
        canvas_graph: canvas_graph,
        canvas_paper: canvas_paper,
    })

    // react to window resizing events
    $(window).resize(function() {
      py_trees.canvas.on_window_resize(canvas_paper)
      py_trees.timeline.on_window_resize(timeline_paper)
    })

    render_tree = function({tree}) {
      py_trees.timeline.add_tree_to_cache({
          timeline_graph: timeline_graph,
          canvas_graph: canvas_graph,
          canvas_paper: canvas_paper,
          tree: tree
      })
      return "rendered"
    }
  </script>
</body>
</html>
Example Qt-Js Integration
The demonstration application py-trees-demo-viewer is a qt-js hybrid application and serves
two purposes.
The first purpose is to demonstrate connecting an external source to the render_tree()
method in the web application (as defined above). The demo application here cycles through serialised trees whenever a Qt button is pressed.
The second purpose is to demonstrate the ease and utility of building a hybrid Qt-JS application. This is especially useful for robotics teams that lack a dedicated web team to help build and serve web applications. The usual problem is that developers need visual and interactive applications in their typical development workflow, whilst the product needs similar applications that can run as cloud services or on handheld devices. All too often, robotics developers build Qt applications to meet their needs but not the products, or endeavour to meet the product needs with web applications only to make their own development environment overly complex and cumbersome (and all too often not having the skills themselves to create polished web applications).
A Qt-Js hybrid application can help meet both needs. Javscript libraries can be
shared as libraries / modules (via the .qrc generation mechanisms), the application
itself can drop neatly into the developer's environment and if the Qt side endeavours
to merely wrap the bundled web application, then migrating to a cloud service / mobile
devices merely requires rewriting the wrapper to fit the framework of choice.
Step-by-step, how does this work?
The JS Libraries
The JS libraries are handled separately from the application and even deployed separately, with the obvious advantage that multiple applications can then take advantage of them without vendoring them into each and every application that uses them. Typical steps involve:
- Bundle the javascript resources into a
.qrcfile - Generate the resources as a c++ library / python module
- Deploy the c++ library/python module in your development environment
In this case, the py_trees and jointjs javascript libraries have been listed
in py_trees_js/resources.qrc, generated using
py_trees_js/gen.bash, resulting in the importable module
py_trees_js/resources.py. From this point, any pythonic
Qt application wishing to visualise behaviour trees need only import this module from the py_trees_js package.
The Web App
The web application itself is made available similarly via .qrc resources, though
the need to distribute it as a shareable package is not necessary. Typical steps involve:
- Bundle the
.html/.csspages into a.qrcfile - Import into directly into designer when building your Qt application
In this case, our web app (py_trees_js/viewer/html/index.html) has been rolled into py_trees_js/viewer/web_app.qrc which is directly loaded into py_trees_js/viewer/web_view.ui where the URL property of the QWebEngineView widget has been configured with the resources index.html.
You could alternatively, generate a module from the .qrc and import that into the
relevant python code as was done for the javascript resources.
The Qt Application
The Qt application can be designed in whatever way you're most comfortable with - via
Designer, pure C++ or python. In this case, Qt's Designer is used to produce the .ui
files which are generated into python modules and finally customised and brought together
as a PyQt5 application. Refer to py_trees_js/viewer for more details
or as a reference example from which to start your own Qt-Js hybrid application.
Key elements:
- Build your Qt application around a QWebEngineView widget
- Link/import the javascript module in the web engine view class
- Load the html page into the QWebEngineView view
Do not use the QWebView widget - this is deprecating in favour of the QWebEngineView widget. The most notable difference is that QWebView uses Qt's old webkit, while QWebEngineView makes use of Chromium's webkit.
Note that the second step automagically makes available the javascript resources to the application when it's loaded. It's not terribly fussy about where it gets loaded, see py_trees_js/viewer/web_view.py for an example:
# This is the module generated by running pyrcc5 on the js libraries .qrc
# It could have been equivalently deployed in a completely different python package
import py_trees_js.resources
Loading the web page can be accomplished in designer. Simply point it at your qresource file
and set the dynamic URL property on the QWebEngineView widget. Alternatively you can import
the resource module and load it via QWebEngineView's load api.
Qt-Js Interactions
Qt and JS can interact directly over snippets of javascript code (via runJavaScript()
or over QWebChannel (a mechanism similar to sigslots) where more complexity is needed.
The example application here calls on the render_tree() method we created earlier in
the web application to send trees to the app. Example code from py_trees_js/viewer/viewer.py which handles button clicks to cycle through a list of
demonstration trees:
def send_tree_response(reply):
    console.logdebug("reply: '{}' [viewer]".format(reply))


@qt_core.pyqtSlot()
def send_tree(web_view_page, demo_trees, unused_checked):
    demo_trees[send_tree.index]['timestamp'] = time.time()
    console.logdebug("send: tree '{}' [{}][viewer]".format(
        send_tree.index, demo_trees[send_tree.index]['timestamp'])
    )
    javascript_command = "render_tree({{tree: {}}})".format(demo_trees[send_tree.index])
    web_view_page.runJavaScript(javascript_command, send_tree_response)
    send_tree.index = 0 if send_tree.index == 2 else send_tree.index + 1

send_tree.index = 0
The JSON Specification
TODO: A JSon schema
Roughly, the specification expects json objects of the form:
- timestamp: int
- behaviours: dict[str, dict]
- (optional) visited_path: list[str]
where each behaviour in the dict has specification:
- id: str
- status: Union[
INVALID,FAILURE,RUNNING,SUCCESS] - name: str
- colour:
- (optional) children: List[str]
- (optional) data:
Identification strings (id's) must be unique and are used as both keys for the behaviours dictionary, children and visited_path variables.
An example (extracted from py_trees.experimental.create_demo_tree_definition()):
{
    timestamp: 1563938995,
    visited_path: ['1', '2', '3', '4', '5', '7', '8'],
    behaviours: {
        '1': {
            id: '1',
            status: 'RUNNING',
            name: 'Selector',
            colour: '#00FFFF',
            children: ['2', '3', '4', '6'],
            data: {
                Type: 'py_trees.composites.Selector',
                Feedback: "Decision maker",
            },
        },
        '2': {
            id: '2',
            status: 'FAILURE',
            name: 'Sequence',
            colour: '#FFA500',
            children: ['7', '8', '9'],
            data: {
                Type: 'py_trees.composites.Sequence',
                Feedback: "Worker"
            },
        },
    }
}
Changelog
Forthcoming
- ...
0.5.1 (2019-10-26)
- [js] performance improvements, #120
- [js] highlighted links, #115
- [js] orthogonal link connections, for better visualisation
- [qt] capture screenshots, #114
0.5.0 (2019-08-29)
- [html] disable scrollbars, #110
- [js] robustness against identical timestamps, #109
- [js] improved window resize handling,
#111
- new public api
py_trees.canvas.on_window_resizeandpy_trees.timeline.on_window_resize
- new public api
0.4.0 (2019-08-13)
0.3.1 (2019-08-07)
0.2.0 (2019-08-01)
0.1.0 (2019-07-25)
Wiki Tutorials
Source Tutorials
Package Dependencies
System Dependencies
Dependant Packages
| Name | Repo | Deps |
|---|---|---|
| py_trees_ros_viewer | github-splintered-reality-py_trees_ros_viewer |
Launch files
Messages
Services
Plugins
Recent questions tagged py_trees_js at Robotics Stack Exchange
|
|
py_trees_js package from py_trees_js repopy_trees_js |
|
|
Package Summary
| Tags | No category tags. |
| Version | 0.6.4 |
| License | BSD |
| Build type | AMENT_PYTHON |
| Use | RECOMMENDED |
Repository Summary
| Checkout URI | https://github.com/splintered-reality/py_trees_js.git |
| VCS Type | git |
| VCS Version | release/0.6.x |
| Last Updated | 2023-02-25 |
| Dev Status | MAINTAINED |
| CI status | No Continuous Integration |
| Released | RELEASED |
| Tags | No category tags. |
| Contributing |
Help Wanted (0)
Good First Issues (0) Pull Requests to Review (0) |
Package Description
Additional Links
Maintainers
- Daniel Stonier
Authors
- Daniel Stonier
PyTrees Js
[About] [Features] [Preview] [Exmaple - Simple Web App] [Example - PyQt App] [The JSON Specification]
About
Libraries for visualisation of runtime or replayed behaviour trees.
- ./js - a self-contained javascript library to build apps around
- py_trees_js - a python package that makes the js available as a pyqt resource
- py_trees_js.viewer - a demo pyqtwebengine app
See py_trees_ros_viewer for a fully fledged pyqt integration that uses py_trees_js.
Features
- Visualise the runtime state of a behaviour tree
- Collapsible subtrees
- Zoom and scale contents to fit
- Timeline rewind & resume
- Blackboard key-value storage view
- Activity log view
Although designed for py_trees, the js libs (in particular, the interfaces) are not dependent on py_trees and could be used for other behaviour tree applications.
Preview
$ git clone https://github.com/splintered-reality/py_trees_js
$ code .
# Reopen the project in the devcontainer
$ poetry install
$ poetry shell
$ py-trees-demo-viewer
Example - Simple Web App
Building a complete application that can render a behaviour tree stream is an effort that can be decomposed into two tasks:
- Creating the web app for rendering trees and visualising a timeline
- Wrapping the web app in a framework and connecting it to an external stream
The first stage is purely an exercise with html, css and javascript. The latter will depend on your use case - it could be a qt-js hybrid application (as exemplified here) for developers, an electron application for cross-platform and mobile deployment or a cloud based service.
This section will walk through how to build a web application with the provided js libraries. An example of wrapping the web app within a Qt-Js application will follow.
To get started, let's begin with a basic html page with two divs, one for the tree canvas and one for the timeline:
<!doctype html>
<html>
<head>
  <meta charset="utf-8">
  <title>PyTrees Viewer</title>
  <style>
    html {
      height: 100%  /* canvas is intended to fill the screen, cascading heights achieves this */
    }
    body {
      margin: 0;
      overflow:hidden;  /* no scrollbars */
      height: 100%  /* canvas is intended to fill the screen, cascading heights achieves this */
    }
  </style>
</head>
<body>
  <div id="canvas"></div>
  <div id="timeline"></div>
</body>
</html>
Next, bring in the javascript libraries. For exemplar purposes, it is assumed here that the libraries have been made available alongside the html page - how is an integration detail depending on the mode of deployment (see next section for an example).
Note that the py_trees-<version>.js library has only one dependency, jointjs,
but that in turn has a few dependencies of it's own. The bundled libraries in the js/jointjs folder
of this repository correspond to the requirements for a specific version of jointjs and
have been tested to work with the accompany py_trees-<version>.js library.
You can verify that the libraries have been properly imported by calling py_trees.hello() which
will print version information of the loaded javascript libraries (if found) to the javascript console.
<!doctype html>
<html>
<head>
  <meta charset="utf-8">
  <title>PyTrees Viewer</title>
  <link rel="stylesheet" href="js/py_trees-0.6.0.css"/>
  <link rel="stylesheet" type="text/css" href="js/jointjs/joint-3.0.4.min.css"/>
  <script src="js/jointjs/dagre-0.8.4.min.js"></script>
  <script src="js/jointjs/graphlib-2.1.7.min.js"></script>
  <script src="js/jointjs/jquery-3.4.1.min.js"></script>
  <script src="js/jointjs/lodash-4.17.11.min.js"></script>
  <script src="js/jointjs/backbone-1.4.0.js"></script>
  <script src="js/jointjs/joint-3.0.4.min.js"></script>
  <script src="js/py_trees-0.6.0.js"></script>
  <!-- Web app integration css here -->
  <style>
    html {
      height: 100%  /* canvas is intended to fill the screen, cascading heights achieves this */
    }
    body {
      margin: 0;
      overflow:hidden;  /* no scrollbars */
      height: 100%  /* canvas is intended to fill the screen, cascading heights achieves this */
    }
  </style>
</head>
<body>
  <script type="text/javascript">
    py_trees.hello()
  </script>
  <div id="window">
    <div id="canvas"></div>
    <div id="timeline"></div>
  </div>
</body>
</html>
Output from py_trees.hello():
********************************************************************************
                               Py Trees JS

 A javascript library for visualisation of executing behaviour trees.

 Version & Dependency Info:
  - py_trees:  0.6.0
    - jointjs :  3.1.0
       - backbone:  1.4.0
       - dagre   :  0.8.4
       - jquery  :  3.4.1
       - lodash  :  4.17.11
********************************************************************************
In the next iteration, the canvas is initialised and a callback for accepting incoming trees from an external source is prepared. To test it, pass it the demo tree provided by the library.
<!doctype html>
<html>
<head>
  <meta charset="utf-8">
  <title>PyTrees Viewer</title>
  <link rel="stylesheet" href="js/py_trees-0.6.0.css"/>
  <link rel="stylesheet" type="text/css" href="js/jointjs/joint-3.0.4.min.css"/>
  <script src="js/jointjs/dagre-0.8.4.min.js"></script>
  <script src="js/jointjs/graphlib-2.1.7.min.js"></script>
  <script src="js/jointjs/jquery-3.4.1.min.js"></script>
  <script src="js/jointjs/lodash-4.17.11.min.js"></script>
  <script src="js/jointjs/backbone-1.4.0.js"></script>
  <script src="js/jointjs/joint-3.0.4.min.js"></script>
  <script src="js/py_trees-0.6.0.js"></script>
  <!-- Web app integration css here -->
  <style>
    html {
      height: 100%  /* canvas is intended to fill the screen, cascading heights achieves this */
    }
    body {
      margin: 0;
      overflow:hidden;  /* no scrollbars */
      height: 100%  /* canvas is intended to fill the screen, cascading heights achieves this */
    }
  </style>
</head>
<body>
  <script type="text/javascript">
    py_trees.hello()
  </script>
  <div id="window">
    <div id="canvas"></div>
    <div id="timeline"></div>
  </div>
  <script type="text/javascript">
    // rendering canvas
    canvas_graph = py_trees.canvas.create_graph()
    canvas_paper = py_trees.canvas.create_paper({graph: canvas_graph})

    render_tree = function({tree}) {
      py_trees.canvas.update_graph({graph: canvas_graph, tree: tree})
      py_trees.canvas.layout_graph({graph: canvas_graph})
      if ( canvas_graph.get('scale_content_to_fit') ) {
        py_trees.canvas.scale_content_to_fit(canvas_paper)
      }
      return "rendered"
    }
    render_tree({tree: py_trees.experimental.create_demo_tree_definition()})
  </script>
</body>
</html>
At this point, your web app should be visualising a single tree and zoom/collapse/scale to fit interactions functional. I'm happy, you should be too!
Adding a timeline to the application is optional, but the code does not change significantly and is a very useful feature to have. The built-in demo app's index.html does exactly this. The code is reproduced below for convenience.
<!doctype html>
<html>
<head>
  <meta charset="utf-8">
  <title>PyTrees Viewer</title>
  <link rel="stylesheet" href="js/py_trees-0.6.0.css"/>
  <link rel="stylesheet" type="text/css" href="js/jointjs/joint-3.0.4.min.css"/>
  <script src="js/jointjs/dagre-0.8.4.min.js"></script>
  <script src="js/jointjs/graphlib-2.1.7.min.js"></script>
  <script src="js/jointjs/jquery-3.4.1.min.js"></script>
  <script src="js/jointjs/lodash-4.17.11.min.js"></script>
  <script src="js/jointjs/backbone-1.4.0.js"></script>
  <script src="js/jointjs/joint-3.0.4.min.js"></script>
  <script src="js/py_trees-0.6.0.js"></script>
  <!-- Web app integration css here -->
  <style>
    html {
      height: 100%  /* canvas is intended to fill the screen, cascading heights achieves this */
    }
    body {
      margin: 0;
      overflow:hidden;  /* no scrollbars */
      height: 100%  /* canvas is intended to fill the screen, cascading heights achieves this */
    }
  </style>
</head>
<body>
  <script type="text/javascript">
    py_trees.hello()
  </script>
  <div id="window">
    <div id="canvas"></div>
    <div id="timeline"></div>
  </div>
  <script type="text/javascript">
    // rendering canvas
    canvas_graph = py_trees.canvas.create_graph()
    canvas_paper = py_trees.canvas.create_paper({graph: canvas_graph})

    // event timeline
    timeline_graph = py_trees.timeline.create_graph({event_cache_limit: 100});
    timeline_paper = py_trees.timeline.create_paper({
        timeline_graph: timeline_graph,
        canvas_graph: canvas_graph,
        canvas_paper: canvas_paper,
    })

    // react to window resizing events
    $(window).resize(function() {
      py_trees.canvas.on_window_resize(canvas_paper)
      py_trees.timeline.on_window_resize(timeline_paper)
    })

    render_tree = function({tree}) {
      py_trees.timeline.add_tree_to_cache({
          timeline_graph: timeline_graph,
          canvas_graph: canvas_graph,
          canvas_paper: canvas_paper,
          tree: tree
      })
      return "rendered"
    }
  </script>
</body>
</html>
Example - PyQt App
The py-trees-demo-viewer app is a qt-js hybrid application using qtwebengine.
Every time a qt button is pressed, an internally generated tree snapshot is sent to render_tree() in the embedded web application. From here, it is not too hard to
imagine connecting the qt application to an actual external source. The qt layer
then acts as a shim or relay transferring messages to the internal web app.
How does it work?
- The js libs are made available as a
.qrcresource [1] - A simple web app is made available as another
.qrcresource - Both resources are consumed by the QWebEngine View to serve the app
[1] This can be made available separately and as a dependency to the actual pyqt application. For instance, the py_trees_js package is a dependency of py_trees_ros_viewer.
In more detail...
The JS Libraries
- Bundle the javascript resources into a
.qrcfile - Generate the resources as a c++ library / python module
- Deploy the c++ library/python module in your development environment
In this case, the py_trees and jointjs javascript libraries have been listed
in py_trees_js/resources.qrc, generated using
py_trees_js/gen.bash, resulting in the importable module
py_trees_js/resources.py. From this point, any pythonic
Qt application wishing to visualise behaviour trees need only import this module from the py_trees_js package.
The Web App
- Bundle the
.html/.csspages into a.qrcfile - Import into directly into designer when building your Qt application
In this case, our web app (py_trees_js/viewer/html/index.html) has been rolled into py_trees_js/viewer/web_app.qrc which is directly loaded into py_trees_js/viewer/web_view.ui where the URL property of the QWebEngineView widget has been configured with the resources index.html.
You could alternatively, generate a module from the .qrc and import that into the
relevant python code as was done for the javascript resources.
The Qt Application
The Qt application can be designed in whatever way you're most comfortable with - via
Designer, pure C++ or python. In this case, Qt's Designer is used to produce the .ui
files which are generated into python modules and finally customised and brought together
as a PyQt5 application. Refer to py_trees_js/viewer for more details
or as a reference example from which to start your own Qt-Js hybrid application.
Key elements:
- Build your Qt application around a QWebEngineView widget
- Link/import the javascript module in the web engine view class
- Load the html page into the QWebEngineView view
Do not use the QWebView widget - this is deprecating in favour of the QWebEngineView widget. The most notable difference is that QWebView uses Qt's old webkit, while QWebEngineView makes use of Chromium's webkit.
Note that the second step automagically makes available the javascript resources to the application when it's loaded. It's not terribly fussy about where it gets loaded, see py_trees_js/viewer/web_view.py for an example:
# This is the module generated by running pyrcc5 on the js libraries .qrc
# It could have been equivalently deployed in a completely different python package
import py_trees_js.resources
Loading the web page can be accomplished in designer. Simply point it at your qresource file
and set the dynamic URL property on the QWebEngineView widget. Alternatively you can import
the resource module and load it via QWebEngineView's load api.
Qt-Js Interactions
Qt and JS can interact directly over snippets of javascript code (via runJavaScript()
or over QWebChannel (a mechanism similar to sigslots) where more complexity is needed.
The example application here calls on the render_tree() method we created earlier in
the web application to send trees to the app. Example code from py_trees_js/viewer/viewer.py which handles button clicks to cycle through a list of
demonstration trees:
def send_tree_response(reply):
    console.logdebug("reply: '{}' [viewer]".format(reply))


@qt_core.pyqtSlot()
def send_tree(web_view_page, demo_trees, unused_checked):
    demo_trees[send_tree.index]['timestamp'] = time.time()
    console.logdebug("send: tree '{}' [{}][viewer]".format(
        send_tree.index, demo_trees[send_tree.index]['timestamp'])
    )
    javascript_command = "render_tree({{tree: {}}})".format(demo_trees[send_tree.index])
    web_view_page.runJavaScript(javascript_command, send_tree_response)
    send_tree.index = 0 if send_tree.index == 2 else send_tree.index + 1

send_tree.index = 0
The JSON Specification
TODO: A JSon schema
Roughly, the specification expects json objects of the form:
- timestamp: int
- behaviours: dict[str, dict]
- (optional) visited_path: list[str]
- (optional) blackboard: {
- behaviours: dict[str, dict[str, str]],
- data: dict[str, str]
- }
- (optional) activity: list[str]
where each behaviour in the dict has specification:
- id: str
- status: Union[
INVALID,FAILURE,RUNNING,SUCCESS] - name: str
- colour:
- (optional) children: List[str]
- (optional) data:
Identification strings (id's) must be unique and are used as both keys for the behaviours dictionary, children and visited_path variables.
An example (extracted from py_trees.experimental.create_demo_tree_definition()):
{
    timestamp: 1563938995,
    visited_path: ['1', '2', '3', '4', '5', '7', '8'],
    behaviours: {
        '1': {
            id: '1',
            status: 'RUNNING',
            name: 'Selector',
            colour: '#00FFFF',
            children: ['2', '3', '4', '6'],
            data: {
                Type: 'py_trees.composites.Selector',
                Feedback: "Decision maker",
            },
        },
        '2': {
            id: '2',
            status: 'FAILURE',
            name: 'Worker',
            colour: '#FFA500',
            children: ['7', '8', '9'],
            data: {
                Type: 'py_trees.composites.Sequence',
                Feedback: "Worker"
            },
        },
    }
    'blackboard': {
        'behaviours': {  # key metadata per behaviour
            '2': {
                '/parameters/initial_value': 'r',
                '/state/worker': 'w'
            },
        },
        'data': {
            '/parameters/initial_value': 'foo',
            '/state/worker': 'bar',
        },
    'activity': [
        "<text style='color: blue;'>Worker initialised with 'foo'</text>'",
        "<text style='color: red;'>Worker wrote 'bar'</text>'",
    ]
}
Changelog
Forthcoming
- ...
0.6.4 (2022-02-24)
- [actions] pre-merge and update-cache, #146
- [actions] push containers, #144
- [poetry] update project to use poetry, #143
- [vscode] devcontainer workflows, #143
- [tests] basic tests, formatting, linting, #143
0.6.3 (2020-05-05)
- [js] remove buggy early view update and optimise them, #142
0.6.2 (2020-03-02)
- [js] bugfix accidentally ignored tree_cache size, #123
- ... missed a few pull requests inbetween
0.6.0 (2019-12-27)
- [js] accepting trees flagged with no status/graph change, #122
- [js] blackboard views, #125, #133, #122, #135, #136
0.5.1 (2019-10-26)
- [js] performance improvements, #120
- [js] highlighted links, #115
- [js] orthogonal link connections, for better visualisation
- [qt] capture screenshots, #114
0.5.0 (2019-08-29)
- [html] disable scrollbars, #110
- [js] robustness against identical timestamps, #109
- [js] improved window resize handling,
#111
- new public api
py_trees.canvas.on_window_resizeandpy_trees.timeline.on_window_resize
- new public api
0.4.0 (2019-08-13)
0.3.1 (2019-08-07)
0.2.0 (2019-08-01)
0.1.0 (2019-07-25)
Wiki Tutorials
Source Tutorials
Package Dependencies
System Dependencies
Dependant Packages
| Name | Repo | Deps |
|---|---|---|
| py_trees_ros_viewer | github-splintered-reality-py_trees_ros_viewer |