
|
create3_lidar_slam package from create3_examples repocreate3_coverage create3_examples_msgs create3_examples_py create3_lidar_slam create3_republisher create3_teleop |
ROS Distro
|
Package Summary
| Version | 0.0.5 |
| License | BSD |
| Build type | AMENT_CMAKE |
| Use | RECOMMENDED |
Repository Summary
| Checkout URI | https://github.com/iRobotEducation/create3_examples.git |
| VCS Type | git |
| VCS Version | humble |
| Last Updated | 2024-08-20 |
| Dev Status | DEVELOPED |
| Released | RELEASED |
| Contributing |
Help Wanted (-)
Good First Issues (-) Pull Requests to Review (-) |
Package Description
Maintainers
- Alberto Soragna
- Justin Kearns
- Steven Shamlian
Authors
iRobot® Create® 3 LIDAR SLAM demo
This example sets up LIDAR SLAM with a Create® 3 robot and Slamtec RPLIDAR spinning laser rangefinder.
Parts List
- Raspberry Pi® 4[^1]
- USB-C® to USB-C® cable[^2]
- Slamtec RPLidar A1M8
- USB Micro B to USB A cable
- 4x M2.5 x 8 flat head machine screw
- 4x M2.5 x 6 self-tapping screw
- 10x M3 x 10 self-tapping screw
Setup
Hardware Setup
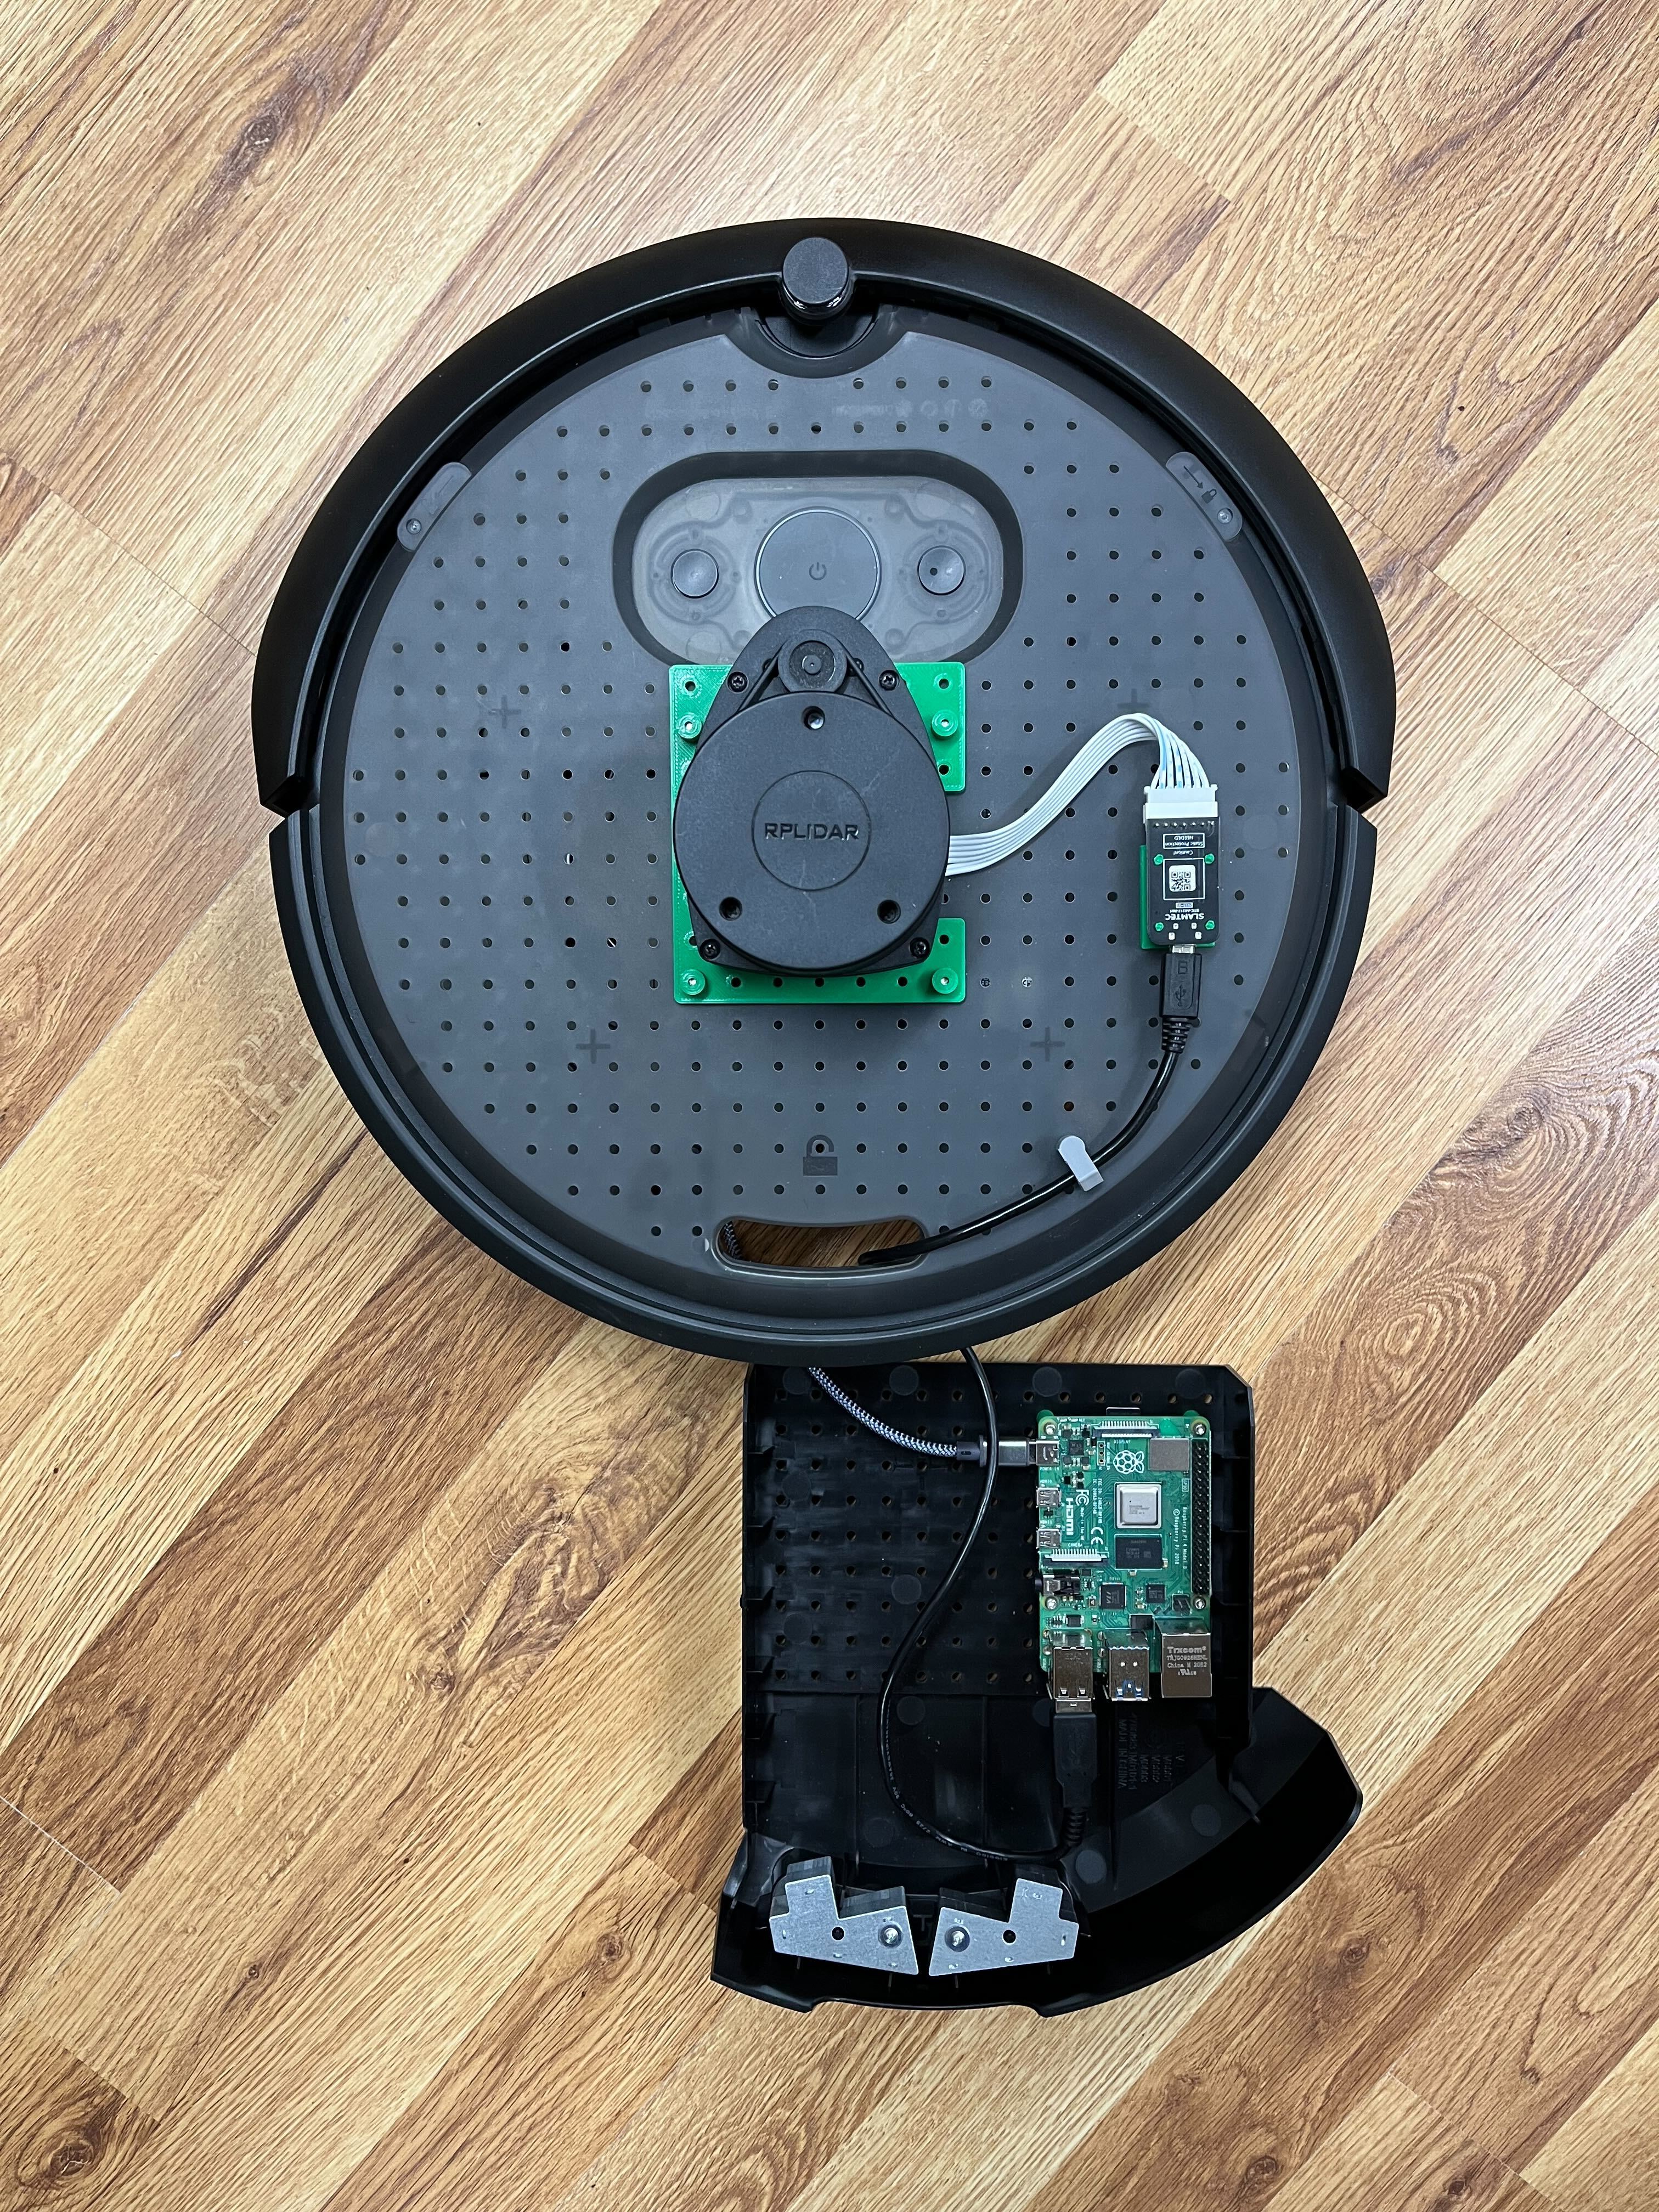
The files in this example assume the RPLIDAR is mounted 12 mm behind the center of rotation on the top of the Create 3 robot, in the arrangement shown below.
The SLAM solver relies on a proper tf tree; if you wish to mount the sensor in another location, you will need to modify the parameters in the static transform publisher launched from launch/sensors_launch.py.
Note that all STLs of brackets referenced in this example are found in our create3_docs repository.
-
Affix a LIDAR to your robot. STLs are available to mount an RPLidar A1M8 as well as its USB adapter. The LIDAR can be attached to the mounting plate using qty. 4 of M2.5 x 8 screws. The USB adapter can be attached to its mounting plate by heat staking (we used a soldering iron with an old tip in a well-ventilated space). Both mounting plates can be attached to the Create® 3 faceplate with M3 x 10 self-tapping screws.
-
Affix a single board computer (abbreviated as SBC for this guide) to your robot. In this example, we use a Raspberry Pi® 4, but other devices should work. STLs are available to mount a Raspberry Pi® to the Create® 3 robot. The Raspberry Pi® can be attached to the mounting plate using qty. 4 of M2.5 x 6 self-tapping screws. The mounting plate can be attached to the Create® 3 cargo bay with M3 x 10 self-tapping screws.
-
Connect the LIDAR to the SBC with a USB Micro B to USB A cable. Thread the cable through the passthrough in the top of the robot.
-
Connect the SBC to the Create® 3 adapter board with a USB-C® to USB-C® cable.
SBC Setup
On the SBC, clone and build the create3_examples repository.
Source the setup shell scripts in EVERY terminal you open:
source ~/create3_examples_ws/install/local_setup.sh
Run the sensors launch script, which includes the LIDAR driver and transform from the laser scan to the robot:
ros2 launch create3_lidar_slam sensors_launch.py
If your robot is using a namespace, you should add namespace:='ROBOTNAMESPACE' to the previous command, where ROBOTNAMESPACE is the namespace of your robot
In a separate terminal run slam toolbox:
ros2 launch create3_lidar_slam slam_toolbox_launch.py
If your robot is using a namespace, you should add namespace:='ROBOTNAMESPACE' to the previous command, where ROBOTNAMESPACE is the namespace of your robot.
There may be some warnings and errors on startup, but the following message will be printed once everything is ready:
[async_slam_toolbox_node-1] Registering sensor: [Custom Described Lidar]
In a third terminal, drive the robot around:
ros2 run teleop_twist_keyboard teleop_twist_keyboard
If your robot is using a namespace, you should add --ros-args -r __ns:=/ROBOTNAMESPACE to the previous command, where ROBOTNAMESPACE is the namespace of your robot.
Computer Setup
Clone and build the create3_examples repository. Then source the setup shell scripts.
source ~/create3_examples_ws/install/local_setup.sh
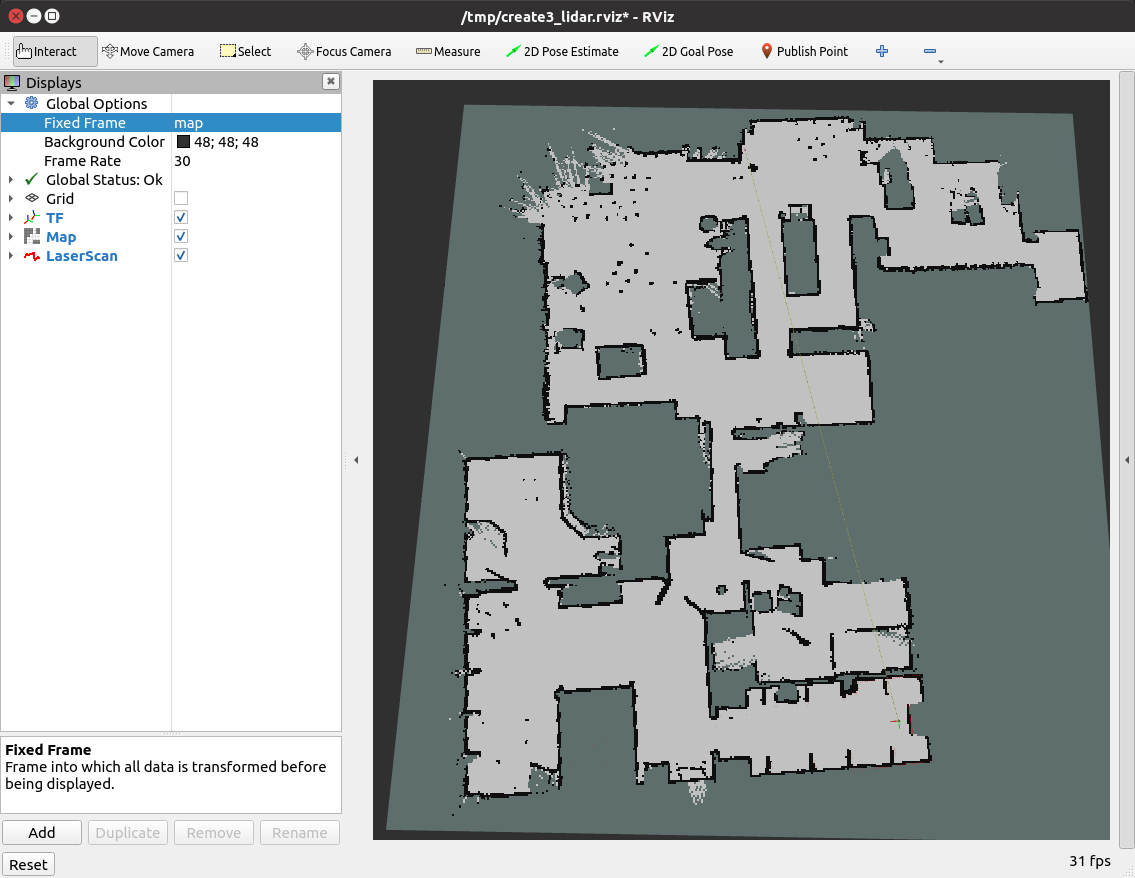
Run the rviz launch script, which launches rviz2 with the appropriate configuration:
ros2 launch create3_lidar_slam rviz_launch.py
If your robot is using a namespace, you should add namespace:='ROBOTNAMESPACE' to the previous command, where ROBOTNAMESPACE is the namespace of your robot.
The rviz2 configuration this command imports will configure rviz2 to subscribe to the laser, the occupancy map, and display the base_footprint tf frame that the laser is building off of from the map frame.
File truncated at 100 lines see the full file
Changelog for package create3_lidar_slam
0.0.5 (2024-06-27)
0.0.4 (2024-06-27)
0.0.3 (2024-06-27)
0.0.2 (2024-06-05)
- Merge pull request #51 from iRobotEducation/shamlian/fix-50 Remove name for rplidar_node in LIDAR SLAM example.
- Remove name for rplidar_node The node is named by the configuration; it should not be renamed here.
- Merge pull request #48 from brianabouchard/humble-mapping-namespace Add namespace functionality to Humble mapping example
- Remove rviz2 install instructions
- confirmed rviz2 installs when ros-humble-desktop is installed and create docs site provides desktop installation command for humble.
- Changed package name to create3_lidar_slam
- Contributors: Briana Bouchard, Steven Shamlian
Package Dependencies
System Dependencies
Dependant Packages
Launch files
Messages
Services
Plugins
Recent questions tagged create3_lidar_slam at Robotics Stack Exchange
|
|
create3_lidar_slam package from create3_examples repocreate3_coverage create3_examples_msgs create3_examples_py create3_lidar_slam create3_republisher create3_teleop |
ROS Distro
|
Package Summary
| Version | 1.0.0 |
| License | BSD |
| Build type | AMENT_CMAKE |
| Use | RECOMMENDED |
Repository Summary
| Checkout URI | https://github.com/iRobotEducation/create3_examples.git |
| VCS Type | git |
| VCS Version | jazzy |
| Last Updated | 2024-09-28 |
| Dev Status | DEVELOPED |
| Released | RELEASED |
| Contributing |
Help Wanted (-)
Good First Issues (-) Pull Requests to Review (-) |
Package Description
Maintainers
- Alberto Soragna
- Justin Kearns
- Steven Shamlian
Authors
iRobot® Create® 3 LIDAR SLAM demo
This example sets up LIDAR SLAM with a Create® 3 robot and Slamtec RPLIDAR spinning laser rangefinder.
Parts List
- Raspberry Pi® 4[^1]
- USB-C® to USB-C® cable[^2]
- Slamtec RPLidar A1M8
- USB Micro B to USB A cable
- 4x M2.5 x 8 flat head machine screw
- 4x M2.5 x 6 self-tapping screw
- 10x M3 x 10 self-tapping screw
Setup
Hardware Setup
The files in this example assume the RPLIDAR is mounted 12 mm behind the center of rotation on the top of the Create 3 robot, in the arrangement shown below.
The SLAM solver relies on a proper tf tree; if you wish to mount the sensor in another location, you will need to modify the parameters in the static transform publisher launched from launch/sensors_launch.py.
Note that all STLs of brackets referenced in this example are found in our create3_docs repository.
-
Affix a LIDAR to your robot. STLs are available to mount an RPLidar A1M8 as well as its USB adapter. The LIDAR can be attached to the mounting plate using qty. 4 of M2.5 x 8 screws. The USB adapter can be attached to its mounting plate by heat staking (we used a soldering iron with an old tip in a well-ventilated space). Both mounting plates can be attached to the Create® 3 faceplate with M3 x 10 self-tapping screws.
-
Affix a single board computer (abbreviated as SBC for this guide) to your robot. In this example, we use a Raspberry Pi® 4, but other devices should work. STLs are available to mount a Raspberry Pi® to the Create® 3 robot. The Raspberry Pi® can be attached to the mounting plate using qty. 4 of M2.5 x 6 self-tapping screws. The mounting plate can be attached to the Create® 3 cargo bay with M3 x 10 self-tapping screws.
-
Connect the LIDAR to the SBC with a USB Micro B to USB A cable. Thread the cable through the passthrough in the top of the robot.
-
Connect the SBC to the Create® 3 adapter board with a USB-C® to USB-C® cable.
SBC Setup
On the SBC, clone and build the create3_examples repository.
Source the setup shell scripts in EVERY terminal you open:
source ~/create3_examples_ws/install/local_setup.sh
Run the sensors launch script, which includes the LIDAR driver and transform from the laser scan to the robot:
ros2 launch create3_lidar_slam sensors_launch.py
If your robot is using a namespace, you should add namespace:='ROBOTNAMESPACE' to the previous command, where ROBOTNAMESPACE is the namespace of your robot
In a separate terminal run slam toolbox:
ros2 launch create3_lidar_slam slam_toolbox_launch.py
If your robot is using a namespace, you should add namespace:='ROBOTNAMESPACE' to the previous command, where ROBOTNAMESPACE is the namespace of your robot.
There may be some warnings and errors on startup, but the following message will be printed once everything is ready:
[async_slam_toolbox_node-1] Registering sensor: [Custom Described Lidar]
In a third terminal, drive the robot around:
ros2 run teleop_twist_keyboard teleop_twist_keyboard
If your robot is using a namespace, you should add --ros-args -r __ns:=/ROBOTNAMESPACE to the previous command, where ROBOTNAMESPACE is the namespace of your robot.
Computer Setup
Clone and build the create3_examples repository. Then source the setup shell scripts.
source ~/create3_examples_ws/install/local_setup.sh
Run the rviz launch script, which launches rviz2 with the appropriate configuration:
ros2 launch create3_lidar_slam rviz_launch.py
If your robot is using a namespace, you should add namespace:='ROBOTNAMESPACE' to the previous command, where ROBOTNAMESPACE is the namespace of your robot.
The rviz2 configuration this command imports will configure rviz2 to subscribe to the laser, the occupancy map, and display the base_footprint tf frame that the laser is building off of from the map frame.
File truncated at 100 lines see the full file
Changelog for package create3_lidar_slam
1.0.0 (2024-09-28)
0.0.5 (2024-06-27)
0.0.4 (2024-06-27)
0.0.3 (2024-06-27)
0.0.2 (2024-06-05)
- Merge pull request #51 from iRobotEducation/shamlian/fix-50 Remove name for rplidar_node in LIDAR SLAM example.
- Remove name for rplidar_node The node is named by the configuration; it should not be renamed here.
- Merge pull request #48 from brianabouchard/humble-mapping-namespace Add namespace functionality to Humble mapping example
- Remove rviz2 install instructions
- confirmed rviz2 installs when ros-humble-desktop is installed and create docs site provides desktop installation command for humble.
- Changed package name to create3_lidar_slam
- Contributors: Briana Bouchard, Steven Shamlian
Package Dependencies
System Dependencies
Dependant Packages
Launch files
Messages
Services
Plugins
Recent questions tagged create3_lidar_slam at Robotics Stack Exchange
|
|
create3_lidar_slam package from create3_examples repocreate3_coverage create3_examples_msgs create3_examples_py create3_lidar_slam create3_republisher create3_teleop |
ROS Distro
|
Package Summary
| Version | 0.0.5 |
| License | BSD |
| Build type | AMENT_CMAKE |
| Use | RECOMMENDED |
Repository Summary
| Checkout URI | https://github.com/iRobotEducation/create3_examples.git |
| VCS Type | git |
| VCS Version | humble |
| Last Updated | 2024-08-20 |
| Dev Status | DEVELOPED |
| Released | RELEASED |
| Contributing |
Help Wanted (-)
Good First Issues (-) Pull Requests to Review (-) |
Package Description
Maintainers
- Alberto Soragna
- Justin Kearns
- Steven Shamlian
Authors
iRobot® Create® 3 LIDAR SLAM demo
This example sets up LIDAR SLAM with a Create® 3 robot and Slamtec RPLIDAR spinning laser rangefinder.
Parts List
- Raspberry Pi® 4[^1]
- USB-C® to USB-C® cable[^2]
- Slamtec RPLidar A1M8
- USB Micro B to USB A cable
- 4x M2.5 x 8 flat head machine screw
- 4x M2.5 x 6 self-tapping screw
- 10x M3 x 10 self-tapping screw
Setup
Hardware Setup
The files in this example assume the RPLIDAR is mounted 12 mm behind the center of rotation on the top of the Create 3 robot, in the arrangement shown below.
The SLAM solver relies on a proper tf tree; if you wish to mount the sensor in another location, you will need to modify the parameters in the static transform publisher launched from launch/sensors_launch.py.
Note that all STLs of brackets referenced in this example are found in our create3_docs repository.
-
Affix a LIDAR to your robot. STLs are available to mount an RPLidar A1M8 as well as its USB adapter. The LIDAR can be attached to the mounting plate using qty. 4 of M2.5 x 8 screws. The USB adapter can be attached to its mounting plate by heat staking (we used a soldering iron with an old tip in a well-ventilated space). Both mounting plates can be attached to the Create® 3 faceplate with M3 x 10 self-tapping screws.
-
Affix a single board computer (abbreviated as SBC for this guide) to your robot. In this example, we use a Raspberry Pi® 4, but other devices should work. STLs are available to mount a Raspberry Pi® to the Create® 3 robot. The Raspberry Pi® can be attached to the mounting plate using qty. 4 of M2.5 x 6 self-tapping screws. The mounting plate can be attached to the Create® 3 cargo bay with M3 x 10 self-tapping screws.
-
Connect the LIDAR to the SBC with a USB Micro B to USB A cable. Thread the cable through the passthrough in the top of the robot.
-
Connect the SBC to the Create® 3 adapter board with a USB-C® to USB-C® cable.
SBC Setup
On the SBC, clone and build the create3_examples repository.
Source the setup shell scripts in EVERY terminal you open:
source ~/create3_examples_ws/install/local_setup.sh
Run the sensors launch script, which includes the LIDAR driver and transform from the laser scan to the robot:
ros2 launch create3_lidar_slam sensors_launch.py
If your robot is using a namespace, you should add namespace:='ROBOTNAMESPACE' to the previous command, where ROBOTNAMESPACE is the namespace of your robot
In a separate terminal run slam toolbox:
ros2 launch create3_lidar_slam slam_toolbox_launch.py
If your robot is using a namespace, you should add namespace:='ROBOTNAMESPACE' to the previous command, where ROBOTNAMESPACE is the namespace of your robot.
There may be some warnings and errors on startup, but the following message will be printed once everything is ready:
[async_slam_toolbox_node-1] Registering sensor: [Custom Described Lidar]
In a third terminal, drive the robot around:
ros2 run teleop_twist_keyboard teleop_twist_keyboard
If your robot is using a namespace, you should add --ros-args -r __ns:=/ROBOTNAMESPACE to the previous command, where ROBOTNAMESPACE is the namespace of your robot.
Computer Setup
Clone and build the create3_examples repository. Then source the setup shell scripts.
source ~/create3_examples_ws/install/local_setup.sh
Run the rviz launch script, which launches rviz2 with the appropriate configuration:
ros2 launch create3_lidar_slam rviz_launch.py
If your robot is using a namespace, you should add namespace:='ROBOTNAMESPACE' to the previous command, where ROBOTNAMESPACE is the namespace of your robot.
The rviz2 configuration this command imports will configure rviz2 to subscribe to the laser, the occupancy map, and display the base_footprint tf frame that the laser is building off of from the map frame.
File truncated at 100 lines see the full file
Changelog for package create3_lidar_slam
0.0.5 (2024-06-27)
0.0.4 (2024-06-27)
0.0.3 (2024-06-27)
0.0.2 (2024-06-05)
- Merge pull request #51 from iRobotEducation/shamlian/fix-50 Remove name for rplidar_node in LIDAR SLAM example.
- Remove name for rplidar_node The node is named by the configuration; it should not be renamed here.
- Merge pull request #48 from brianabouchard/humble-mapping-namespace Add namespace functionality to Humble mapping example
- Remove rviz2 install instructions
- confirmed rviz2 installs when ros-humble-desktop is installed and create docs site provides desktop installation command for humble.
- Changed package name to create3_lidar_slam
- Contributors: Briana Bouchard, Steven Shamlian