 ROS Index
|
diffbot repositorydiffbot_base diffbot_bringup diffbot_control diffbot_description diffbot_gazebo diffbot_mbf diffbot_msgs diffbot_navigation diffbot_robot diffbot_slam |
ROS Distro
|
Repository Summary
| Checkout URI | https://github.com/ros-mobile-robots/diffbot.git |
| VCS Type | git |
| VCS Version | noetic-devel |
| Last Updated | 2026-10-30 |
| Dev Status | DEVELOPED |
| Released | RELEASED |
| Contributing |
Help Wanted (-)
Good First Issues (-) Pull Requests to Review (-) |
Packages
| Name | Version |
|---|---|
| diffbot_base | 1.1.0 |
| diffbot_bringup | 1.1.0 |
| diffbot_control | 1.1.0 |
| diffbot_description | 1.1.0 |
| diffbot_gazebo | 1.1.0 |
| diffbot_mbf | 1.1.0 |
| diffbot_msgs | 1.1.0 |
| diffbot_navigation | 1.1.0 |
| diffbot_robot | 1.1.0 |
| diffbot_slam | 1.1.0 |
README
DiffBot


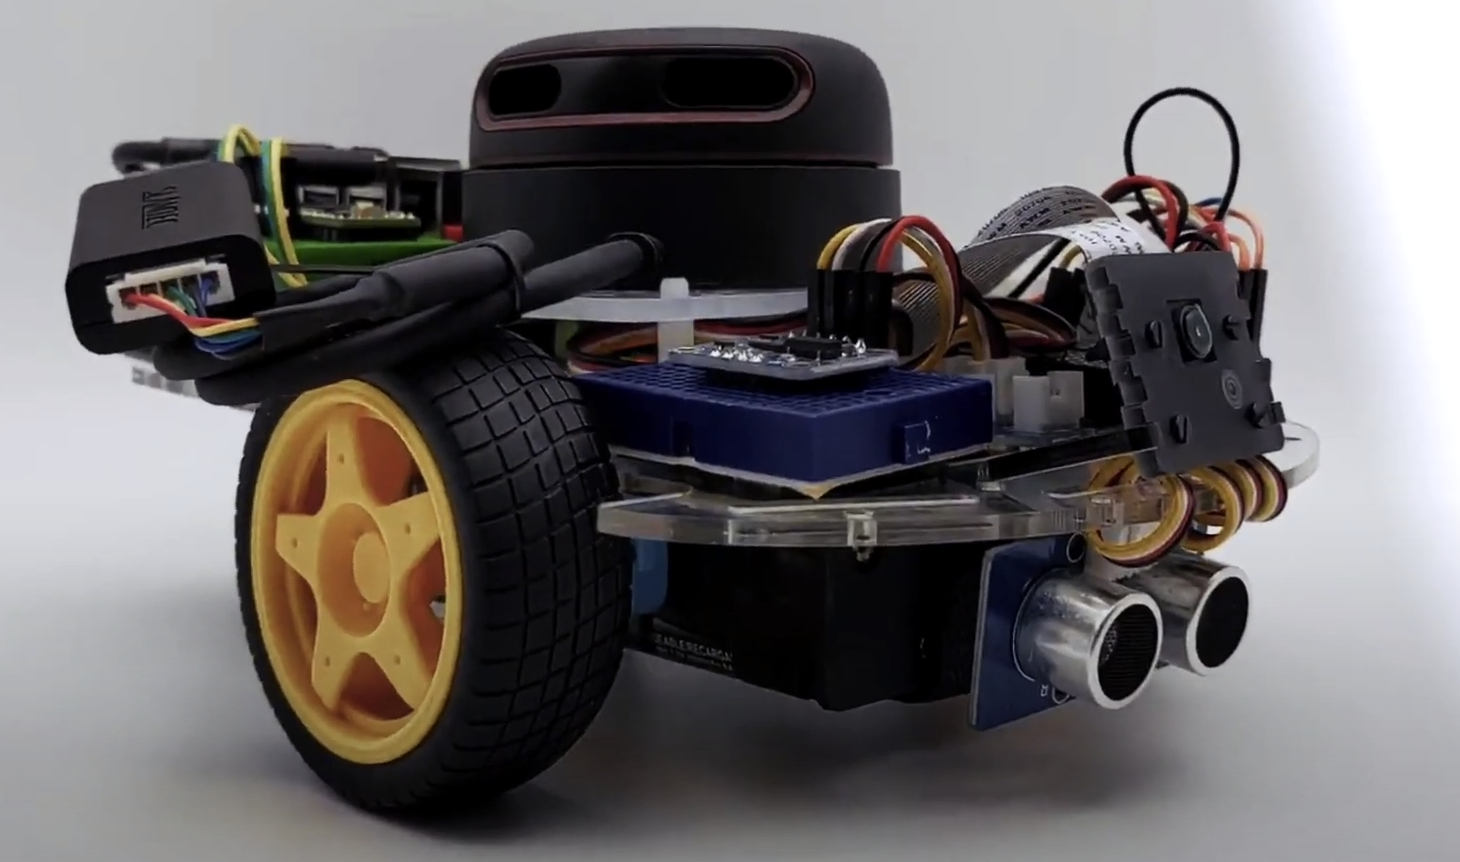
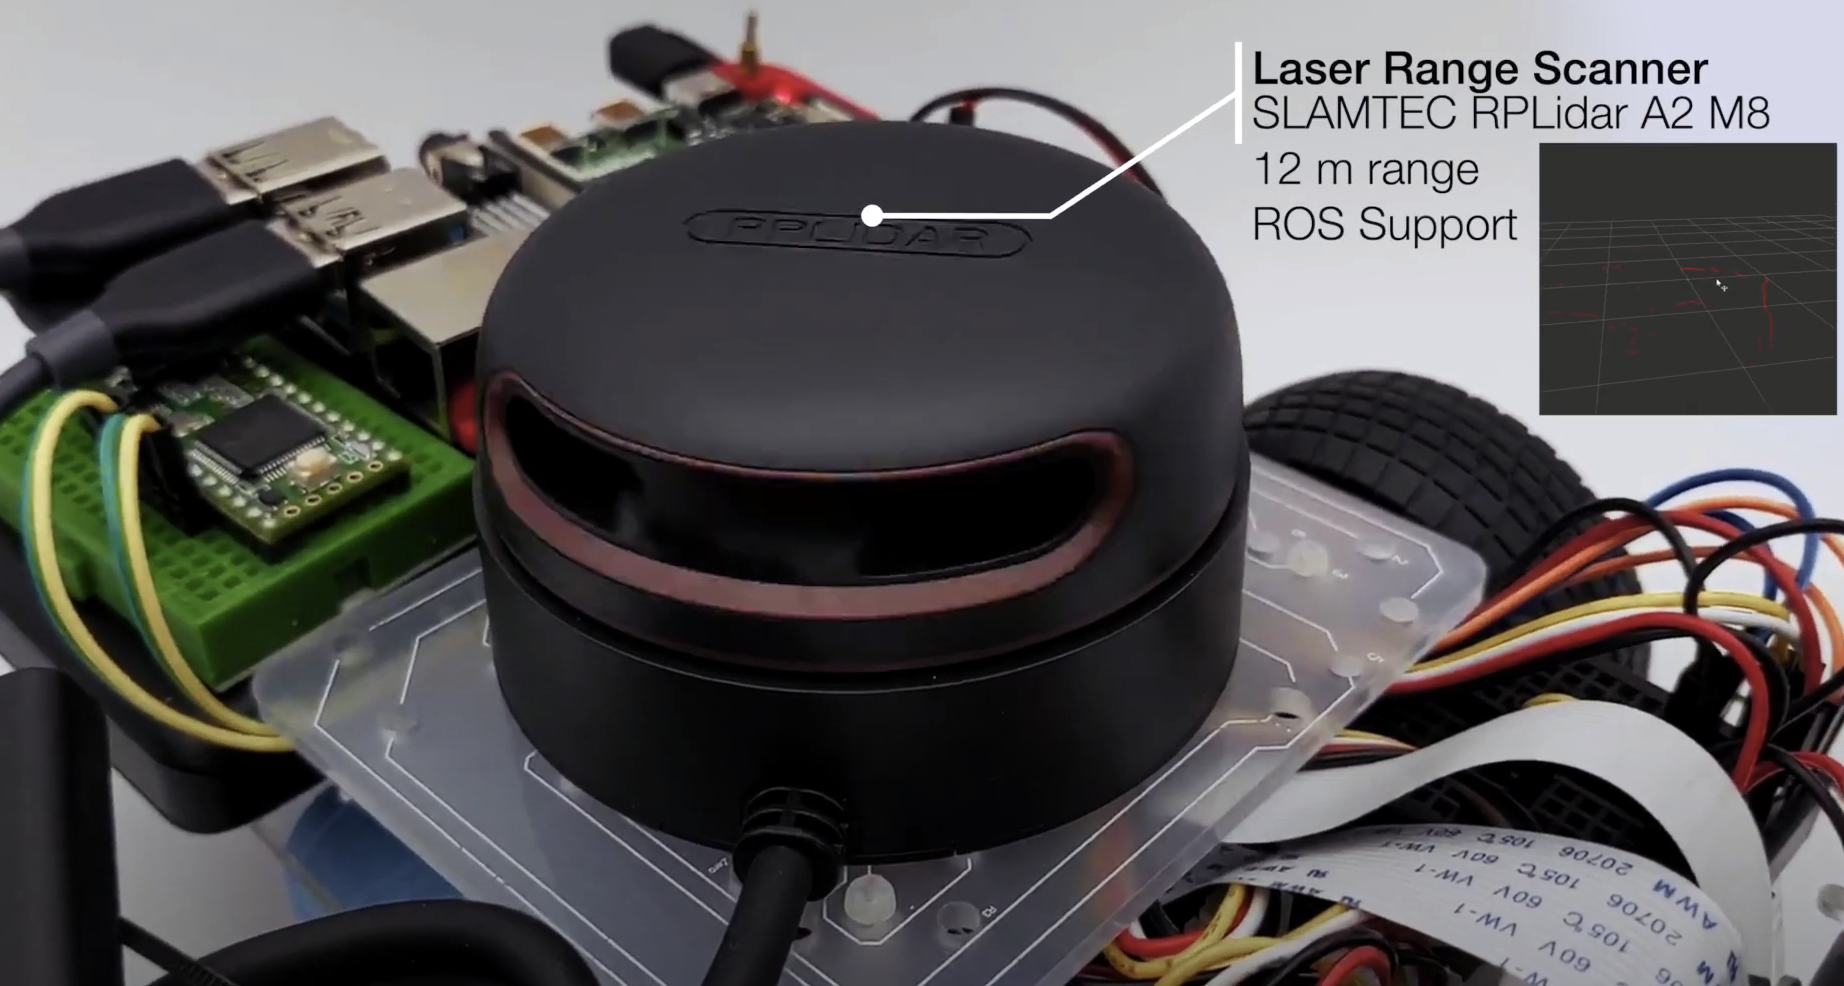
DiffBot is an autonomous differential drive robot with two wheels. Its main processing unit is a Raspberry Pi 4 B running Ubuntu Mate 20.04 and the ROS 1 (ROS Noetic) middleware. This respository contains ROS driver packages, ROS Control Hardware Interface for the real robot and configurations for simulating DiffBot. The formatted documentation can be found at: https://ros-mobile-robots.com.
| DiffBot | Lidar SLAMTEC RPLidar A2 |
|---|---|
 |
 |
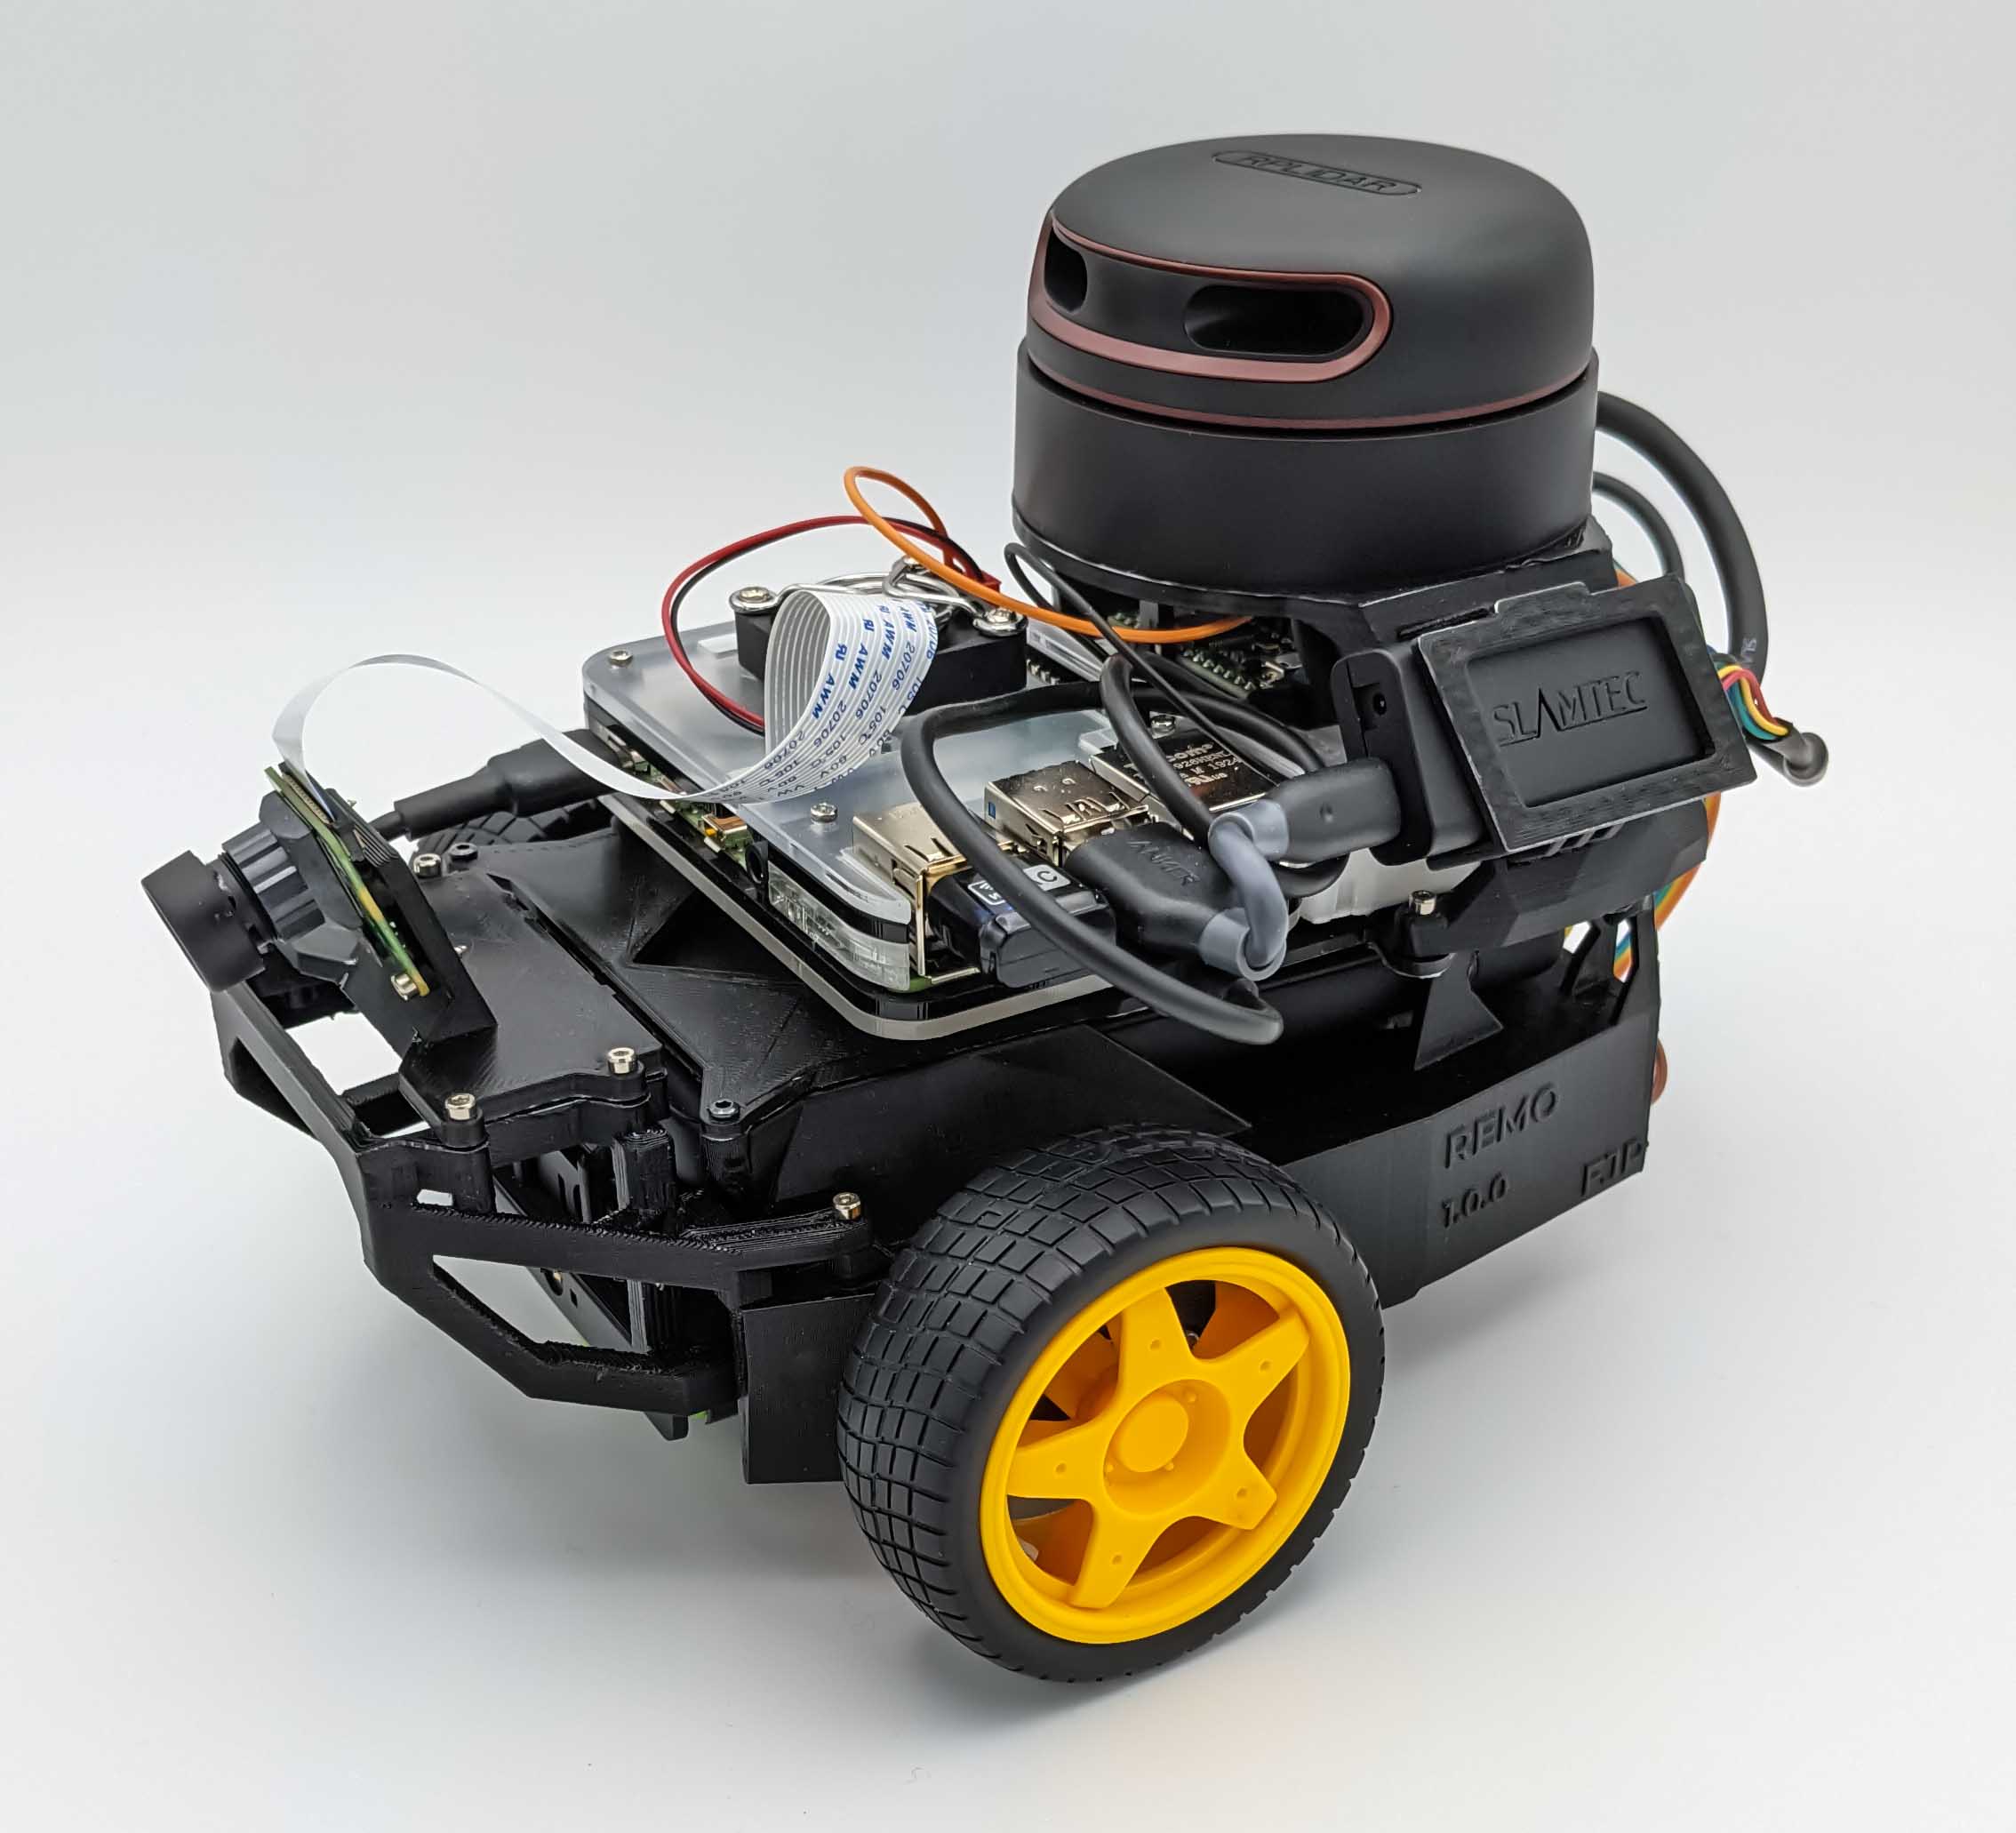
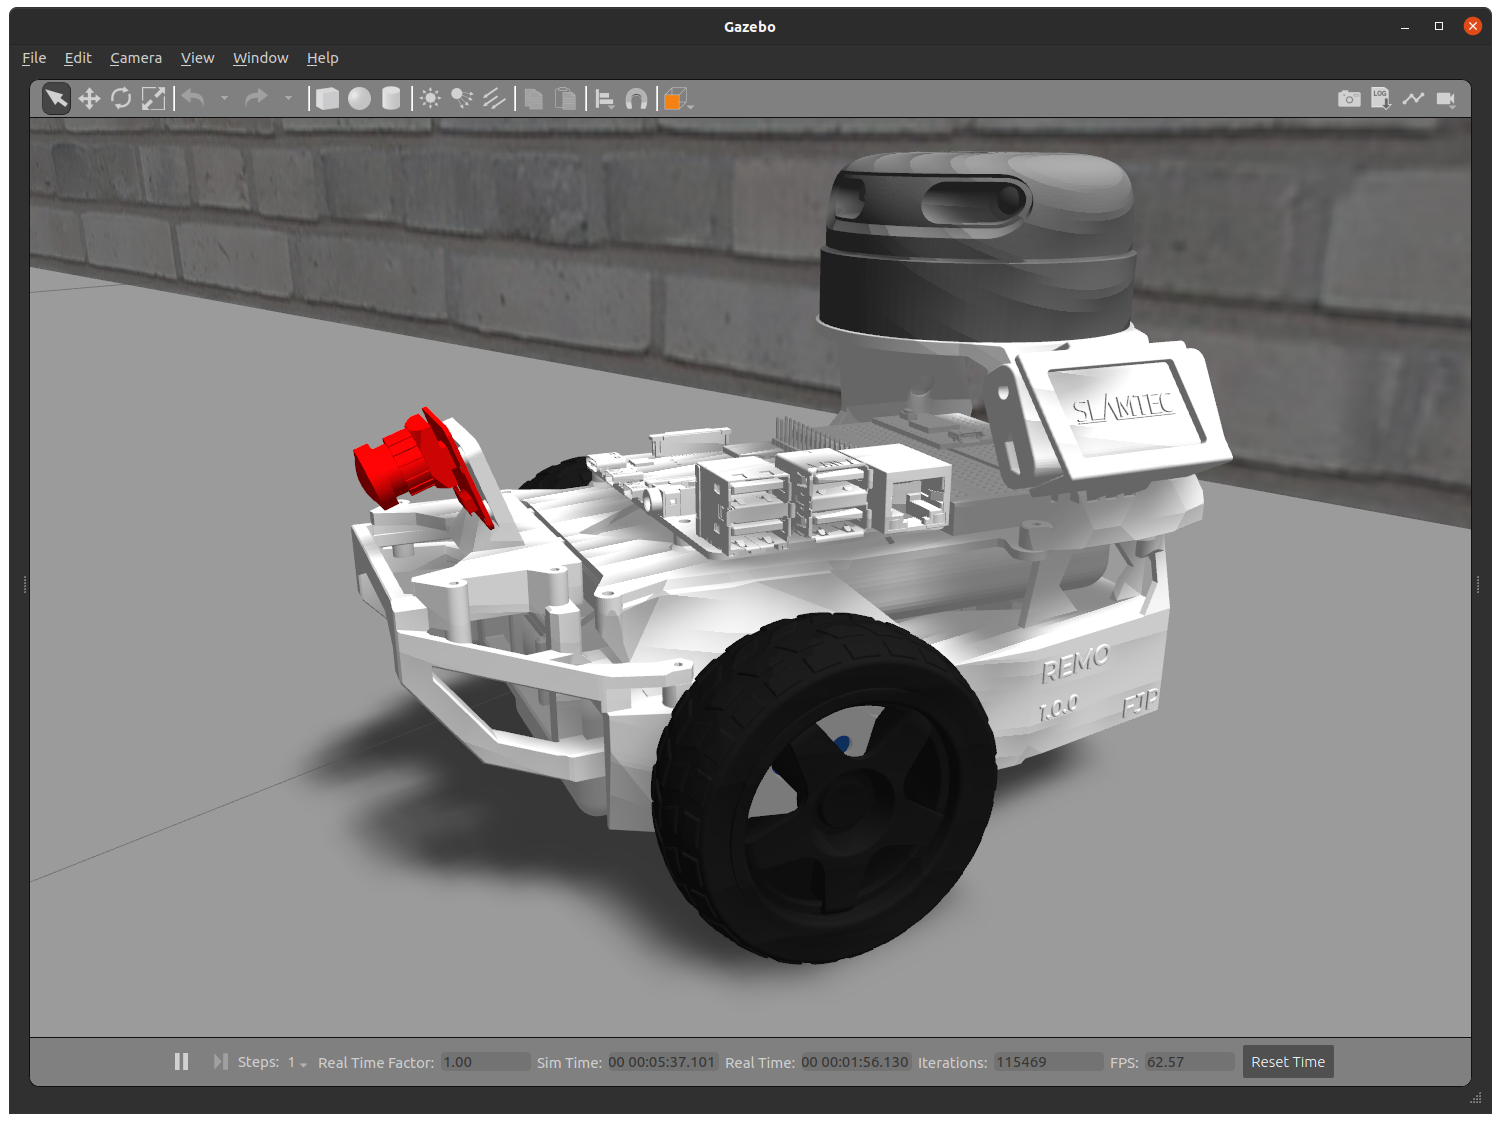
If you are looking for a 3D printable modular base, see the remo_description repository. You can use it directly with the software of this diffbot repository.
| Remo | Gazebo Simulation | RViz |
|---|---|---|
 |
 |
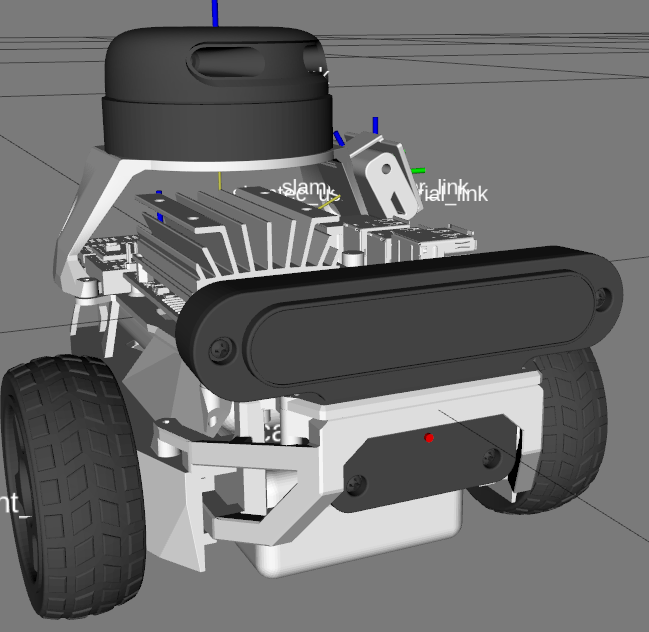 |
It provides mounts for different camera modules, such as Raspi Cam v2, OAK-1, OAK-D and you can even design your own if you like. There is also support for different single board computers (Raspberry Pi and Nvidia Jetson Nano) through two changable decks. You are agin free to create your own.
Demonstration
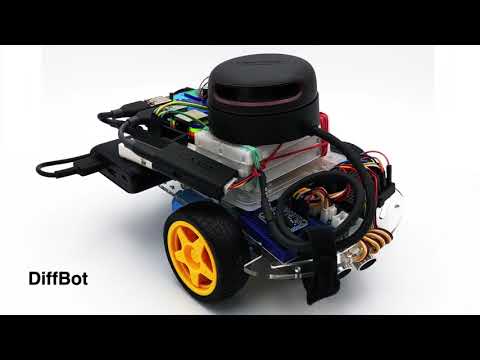
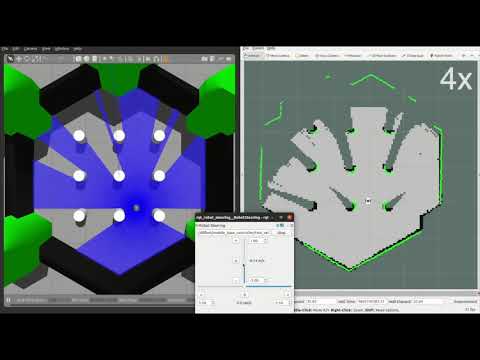
SLAM and Navigation
| Real robot | Gazebo Simulation |
|---|---|
 |
 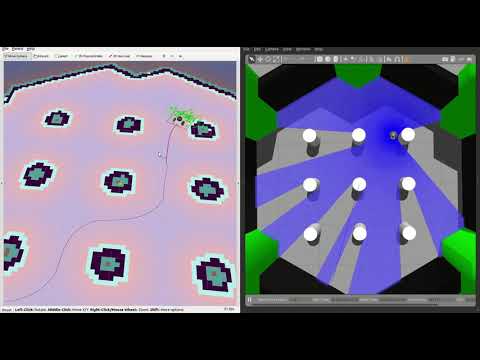
|
:package: Package Overview
-
diffbot_base: ROS Control hardware interface includingcontroller_managercontrol loop for the real robot. It talks to the Teensy microcontroller, whose firmware is indiffbot_firmware. -
diffbot_bringup: Launch files to bring up the hardware drivers (camera, lidar, imu, ultrasonic, …) for the real DiffBot robot. -
diffbot_control: Configurations for thediff_drive_controllerof ROS Control used in Gazebo simulation and the real robot. -
diffbot_description: URDF description of DiffBot including its sensors. -
diffbot_gazebo: Simulation specific launch and configuration files for DiffBot. -
diffbot_msgs: Message definitions specific to DiffBot, for example the message for encoder data. -
diffbot_navigation: Navigation based onmove_basepackage; launch and configuration files. -
diffbot_slam: Simultaneous localization and mapping using different implementations (e.g., gmapping) to create a map of the environment
Installation
The packages are written for and tested with ROS 1 Noetic on Ubuntu 20.04 Focal Fossa. For the real robot Ubuntu Mate 20.04 for arm64 is installed on the Raspberry Pi 4 B with 4GB. The communication between the mobile robot and the work pc is done by configuring the ROS Network, see also the documentation.
Development Container
The quickest way to a working setup on a development PC is the dev container in .devcontainer/noetic: a Docker image with ROS Noetic, Gazebo 11 and everything the DiffBot packages need. It works on Linux and on Windows with WSL 2, and CI builds the same image.
The full guide is on the documentation site: Use the Dev Container (setup on Linux and Windows, usage, updating, troubleshooting) and How the Dev Container Works.
- VS Code: install the Dev Containers extension, open your clone of this repository and choose Reopen in Container.
- Command line: with the Dev Container CLI:
  devcontainer up --workspace-folder . --config .devcontainer/noetic/devcontainer.json
  devcontainer exec --workspace-folder . --config .devcontainer/noetic/devcontainer.json bash
Creating the container clones rplidar_ros and remo_description, installs missing dependencies with rosdep and builds the workspace in ~/catkin_ws. Your clone of this repository is mounted at ~/catkin_ws/src/diffbot, so edits on the host show up in the container. The container uses the host network to reach the robot.
RViz and Gazebo open on the host’s display. On Windows, WSLg needs no setup. On a native Linux desktop (X11 or Wayland with Xwayland), install xauth on the host (sudo apt install xauth): before the container starts, host-x11.sh copies your display’s X11 cookie to .devcontainer/noetic/.x11/ (ignored by Git), where the container reads it. So xhost + isn’t needed.
Plain Docker works too. The image’s user has UID 1000; with another UID, use the dev container, which adapts it.
docker build -f .devcontainer/noetic/Dockerfile -t diffbot:noetic .
bash .devcontainer/noetic/host-x11.sh
docker run -it --rm --net=host -v /tmp/.X11-unix:/tmp/.X11-unix -e DISPLAY \
  -e XAUTHORITY=/home/ros/catkin_ws/src/diffbot/.devcontainer/noetic/.x11/xauth \
  -v "$PWD":/home/ros/catkin_ws/src/diffbot diffbot:noetic \
  bash -c "bash src/diffbot/.devcontainer/noetic/setup.sh && bash"
To set up a workspace without Docker, for example on the robot’s Raspberry Pi, follow the steps below.
Dependencies
The required Ubuntu packages are listed in software package sections found in the documentation. Other ROS catkin packages such as rplidar_ros need to be cloned into the catkin workspace.
For an automated and simplified dependency installation process install the vcstool, which is used in the next steps.
sudo apt install python3-vcstool
:hammer: How to Build
To build the packages in this repository including the Remo robot follow these steps:
-
cdinto an existing ROS Noetic catkin workspace or create a new one:
mkdir -p catkin_ws/src
- Clone this repository in the
srcfolder of your ROS Noetic catkin workspace:
cd catkin_ws/src
```console
File truncated at 100 lines see the full file
CONTRIBUTING
Contributing to DiffBot
DiffBot and Remo are two differential drive robots for ROS 1 Noetic. This repository has their ROS packages, the Teensy firmware and the dev container. Remo’s robot model is in remo_description, and the documentation is at ros-mobile-robots.com, from ros-mobile-robots.github.io.
Ask questions and get help with your build in Discussions, where the answers stay easy to find. Report bugs and request features as an issue in the repository they affect: diffbot, remo_description for Remo’s model, or ros-mobile-robots.github.io for the documentation. For a larger change, open an issue first, so the approach can be agreed before you write the code. This branch is ROS 1 Noetic; a move to ROS 2 is future work, so please discuss it in an issue first.
The documentation’s Contributing section explains the repositories, the roadmap, the dev container and the automated checks in more detail.
Set up
The quickest working setup is the dev container in .devcontainer/noetic: open your clone in VS Code and choose Reopen in Container. It has ROS Noetic, Gazebo 11 and everything the packages need, clones remo_description, at the version pinned in diffbot_dev.repos, and rplidar_ros, and builds the workspace in ~/catkin_ws. CI builds the same image. Without the container, follow the installation steps in the README.
When the pin moves to a new version, an existing workspace keeps its old checkout of remo_description, because the setup doesn’t replace repositories that are already there. Check out the new version yourself, then build again. If git status shows changes of your own, commit them on a branch first: the checkout would either stop on them or carry them over to the new version.
cd ~/catkin_ws/src/remo_description
git status                                          # no changes of your own?
git fetch --tags
git checkout 2.0.0                                  # the version in diffbot_dev.repos
Build and test
In ~/catkin_ws:
catkin build                                        # build the workspace
source devel/setup.bash
catkin build --catkin-make-args run_tests           # build and run all tests
catkin_test_results build                           # summary: 10 tests, 0 errors, 0 failures
rostest diffbot_gazebo sim_drive_diffbot.test       # one robot's simulation test
The simulation test drives DiffBot and Remo in Gazebo and checks where they went. Run it for any change to the robot models, the controllers or the simulation.
The Teensy firmware builds with PlatformIO, which isn’t in the dev container. The firmware has a container of its own, .docker/firmware, with PlatformIO 6.2.0 and a compiler, so Docker is all you need. Our script .docker/firmware/run.sh runs a command in that container, here PlatformIO’s pio. When you change the firmware, build both boards, as CI does, because the change has to work on both. From the root folder of your diffbot clone on the PC:
.docker/firmware/run.sh pio run -e teensy31
.docker/firmware/run.sh pio run -e teensy40
The script builds the image first. Later image builds took about 2 seconds on our test PC, because Docker reuses the cached image layers whose inputs haven’t changed. They only show their output when they fail. The script runs the container as your user (id -u and id -g), so the files it writes belong to you. To use other IDs, set LOCAL_UID and LOCAL_GID, for example LOCAL_UID=1001 LOCAL_GID=1001 .docker/firmware/run.sh pio run -e teensy40. The first firmware build downloads the Teensy toolchain, which needs the internet and took about a minute on our test PC. The firmware files land in diffbot_firmware/.pio/build/<board>/, for example firmware.hex, which PJRC’s Teensy Loader can flash. Don’t build in the container and on the PC at the same time: both write to that .pio folder. CI builds the same way.
Or install PlatformIO on your PC, outside the dev container, with its installer script or in a virtual environment. Many Linux distributions don’t allow pip install into the system Python. Then build from your diffbot clone on the PC:
python3 -m venv ~/.venvs/platformio && ~/.venvs/platformio/bin/pip install platformio   # once
cd diffbot_firmware
~/.venvs/platformio/bin/pio run -e teensy31 && ~/.venvs/platformio/bin/pio run -e teensy40
CI runs on every pull request: industrial_ci builds and tests the workspace for Noetic, the firmware is built for both boards, and the dev container image is built.
Pull requests
-
One feature or fix per pull request, on a branch named
feat/…,fix/…,docs/…orchore/…. Keep unrelated changes for another PR. -
Pull requests are squash-merged. The PR title becomes the commit’s subject, so write it as
Area: what changed, for exampleSimulation test: narrower turn checks. Aim for 65 characters or fewer; GitHub adds the PR number. The whole description becomes the commit message, so start it with what changes and why. -
Describe how you tested it: what you ran, on which robot or in simulation, and what you saw. Link the issue with
Closes #N. - Comments explain why the code is the way it is, not what changed or how it used to be. The history belongs in the commit and the PR.
-
Every feature also gets documentation on ros-mobile-robots.com, a new or updated page: open a pull request in ros-mobile-robots.github.io and link it under
## Documentationin the description, asros-mobile-robots/ros-mobile-robots.github.io#N. If a page on ros-mobile-robots.com already explains the change, link that page instead. If nothing user-visible changes, writeNone. The PR description check fails until that section has one of the three. It runs again when you edit the description: look at that new run, because re-running the old one still sees the old text. - Follow REP 103 for units and coordinate frames.
-
Python follows PEP 8 with the settings of ROS 2’s
ament_flake8, with PEP 257 docstrings and type hints. AGENTS.md lists the commands that check it.
AI-assisted contributions
You’re welcome to use AI tools. Whatever produced the code, you’re its author and responsible for it:
- Understand every change and be able to explain it in review, in your own words.
- Build and test it as described above, and report what you actually ran. Don’t claim tests that didn’t run.
- Check that the APIs, parameters, files and links you use exist. Pull requests with invented ones are closed.
- Keep the PR description and your review replies short and specific: what changed, why, and how it was tested.
You don’t need to say whether you used AI. Please don’t add attribution lines for AI tools to commits or pull requests, such as Co-Authored-By: for a tool or “Generated with …”.
License
By contributing, you agree that your contributions are licensed under this repository’s BSD 3-Clause License.
|
|
diffbot repositorydiffbot_base diffbot_bringup diffbot_control diffbot_description diffbot_gazebo diffbot_mbf diffbot_msgs diffbot_navigation diffbot_robot diffbot_slam |
ROS Distro
|
Repository Summary
| Checkout URI | https://github.com/ros-mobile-robots/diffbot.git |
| VCS Type | git |
| VCS Version | noetic-devel |
| Last Updated | 2026-10-30 |
| Dev Status | DEVELOPED |
| Released | RELEASED |
| Contributing |
Help Wanted (-)
Good First Issues (-) Pull Requests to Review (-) |
Packages
| Name | Version |
|---|---|
| diffbot_base | 1.1.0 |
| diffbot_bringup | 1.1.0 |
| diffbot_control | 1.1.0 |
| diffbot_description | 1.1.0 |
| diffbot_gazebo | 1.1.0 |
| diffbot_mbf | 1.1.0 |
| diffbot_msgs | 1.1.0 |
| diffbot_navigation | 1.1.0 |
| diffbot_robot | 1.1.0 |
| diffbot_slam | 1.1.0 |
README
DiffBot
DiffBot is an autonomous differential drive robot with two wheels. Its main processing unit is a Raspberry Pi 4 B running Ubuntu Mate 20.04 and the ROS 1 (ROS Noetic) middleware. This respository contains ROS driver packages, ROS Control Hardware Interface for the real robot and configurations for simulating DiffBot. The formatted documentation can be found at: https://ros-mobile-robots.com.
| DiffBot | Lidar SLAMTEC RPLidar A2 |
|---|---|
|
|
If you are looking for a 3D printable modular base, see the remo_description repository. You can use it directly with the software of this diffbot repository.
| Remo | Gazebo Simulation | RViz |
|---|---|---|
|
|
|
It provides mounts for different camera modules, such as Raspi Cam v2, OAK-1, OAK-D and you can even design your own if you like. There is also support for different single board computers (Raspberry Pi and Nvidia Jetson Nano) through two changable decks. You are agin free to create your own.
Demonstration
SLAM and Navigation
| Real robot | Gazebo Simulation |
|---|---|
|
|
:package: Package Overview
-
diffbot_base: ROS Control hardware interface includingcontroller_managercontrol loop for the real robot. It talks to the Teensy microcontroller, whose firmware is indiffbot_firmware. -
diffbot_bringup: Launch files to bring up the hardware drivers (camera, lidar, imu, ultrasonic, …) for the real DiffBot robot. -
diffbot_control: Configurations for thediff_drive_controllerof ROS Control used in Gazebo simulation and the real robot. -
diffbot_description: URDF description of DiffBot including its sensors. -
diffbot_gazebo: Simulation specific launch and configuration files for DiffBot. -
diffbot_msgs: Message definitions specific to DiffBot, for example the message for encoder data. -
diffbot_navigation: Navigation based onmove_basepackage; launch and configuration files. -
diffbot_slam: Simultaneous localization and mapping using different implementations (e.g., gmapping) to create a map of the environment
Installation
The packages are written for and tested with ROS 1 Noetic on Ubuntu 20.04 Focal Fossa. For the real robot Ubuntu Mate 20.04 for arm64 is installed on the Raspberry Pi 4 B with 4GB. The communication between the mobile robot and the work pc is done by configuring the ROS Network, see also the documentation.
Development Container
The quickest way to a working setup on a development PC is the dev container in .devcontainer/noetic: a Docker image with ROS Noetic, Gazebo 11 and everything the DiffBot packages need. It works on Linux and on Windows with WSL 2, and CI builds the same image.
The full guide is on the documentation site: Use the Dev Container (setup on Linux and Windows, usage, updating, troubleshooting) and How the Dev Container Works.
- VS Code: install the Dev Containers extension, open your clone of this repository and choose Reopen in Container.
- Command line: with the Dev Container CLI:
  devcontainer up --workspace-folder . --config .devcontainer/noetic/devcontainer.json
  devcontainer exec --workspace-folder . --config .devcontainer/noetic/devcontainer.json bash
Creating the container clones rplidar_ros and remo_description, installs missing dependencies with rosdep and builds the workspace in ~/catkin_ws. Your clone of this repository is mounted at ~/catkin_ws/src/diffbot, so edits on the host show up in the container. The container uses the host network to reach the robot.
RViz and Gazebo open on the host’s display. On Windows, WSLg needs no setup. On a native Linux desktop (X11 or Wayland with Xwayland), install xauth on the host (sudo apt install xauth): before the container starts, host-x11.sh copies your display’s X11 cookie to .devcontainer/noetic/.x11/ (ignored by Git), where the container reads it. So xhost + isn’t needed.
Plain Docker works too. The image’s user has UID 1000; with another UID, use the dev container, which adapts it.
docker build -f .devcontainer/noetic/Dockerfile -t diffbot:noetic .
bash .devcontainer/noetic/host-x11.sh
docker run -it --rm --net=host -v /tmp/.X11-unix:/tmp/.X11-unix -e DISPLAY \
  -e XAUTHORITY=/home/ros/catkin_ws/src/diffbot/.devcontainer/noetic/.x11/xauth \
  -v "$PWD":/home/ros/catkin_ws/src/diffbot diffbot:noetic \
  bash -c "bash src/diffbot/.devcontainer/noetic/setup.sh && bash"
To set up a workspace without Docker, for example on the robot’s Raspberry Pi, follow the steps below.
Dependencies
The required Ubuntu packages are listed in software package sections found in the documentation. Other ROS catkin packages such as rplidar_ros need to be cloned into the catkin workspace.
For an automated and simplified dependency installation process install the vcstool, which is used in the next steps.
sudo apt install python3-vcstool
:hammer: How to Build
To build the packages in this repository including the Remo robot follow these steps:
-
cdinto an existing ROS Noetic catkin workspace or create a new one:
mkdir -p catkin_ws/src
- Clone this repository in the
srcfolder of your ROS Noetic catkin workspace:
cd catkin_ws/src
```console
File truncated at 100 lines see the full file
CONTRIBUTING
Contributing to DiffBot
DiffBot and Remo are two differential drive robots for ROS 1 Noetic. This repository has their ROS packages, the Teensy firmware and the dev container. Remo’s robot model is in remo_description, and the documentation is at ros-mobile-robots.com, from ros-mobile-robots.github.io.
Ask questions and get help with your build in Discussions, where the answers stay easy to find. Report bugs and request features as an issue in the repository they affect: diffbot, remo_description for Remo’s model, or ros-mobile-robots.github.io for the documentation. For a larger change, open an issue first, so the approach can be agreed before you write the code. This branch is ROS 1 Noetic; a move to ROS 2 is future work, so please discuss it in an issue first.
The documentation’s Contributing section explains the repositories, the roadmap, the dev container and the automated checks in more detail.
Set up
The quickest working setup is the dev container in .devcontainer/noetic: open your clone in VS Code and choose Reopen in Container. It has ROS Noetic, Gazebo 11 and everything the packages need, clones remo_description, at the version pinned in diffbot_dev.repos, and rplidar_ros, and builds the workspace in ~/catkin_ws. CI builds the same image. Without the container, follow the installation steps in the README.
When the pin moves to a new version, an existing workspace keeps its old checkout of remo_description, because the setup doesn’t replace repositories that are already there. Check out the new version yourself, then build again. If git status shows changes of your own, commit them on a branch first: the checkout would either stop on them or carry them over to the new version.
cd ~/catkin_ws/src/remo_description
git status                                          # no changes of your own?
git fetch --tags
git checkout 2.0.0                                  # the version in diffbot_dev.repos
Build and test
In ~/catkin_ws:
catkin build                                        # build the workspace
source devel/setup.bash
catkin build --catkin-make-args run_tests           # build and run all tests
catkin_test_results build                           # summary: 10 tests, 0 errors, 0 failures
rostest diffbot_gazebo sim_drive_diffbot.test       # one robot's simulation test
The simulation test drives DiffBot and Remo in Gazebo and checks where they went. Run it for any change to the robot models, the controllers or the simulation.
The Teensy firmware builds with PlatformIO, which isn’t in the dev container. The firmware has a container of its own, .docker/firmware, with PlatformIO 6.2.0 and a compiler, so Docker is all you need. Our script .docker/firmware/run.sh runs a command in that container, here PlatformIO’s pio. When you change the firmware, build both boards, as CI does, because the change has to work on both. From the root folder of your diffbot clone on the PC:
.docker/firmware/run.sh pio run -e teensy31
.docker/firmware/run.sh pio run -e teensy40
The script builds the image first. Later image builds took about 2 seconds on our test PC, because Docker reuses the cached image layers whose inputs haven’t changed. They only show their output when they fail. The script runs the container as your user (id -u and id -g), so the files it writes belong to you. To use other IDs, set LOCAL_UID and LOCAL_GID, for example LOCAL_UID=1001 LOCAL_GID=1001 .docker/firmware/run.sh pio run -e teensy40. The first firmware build downloads the Teensy toolchain, which needs the internet and took about a minute on our test PC. The firmware files land in diffbot_firmware/.pio/build/<board>/, for example firmware.hex, which PJRC’s Teensy Loader can flash. Don’t build in the container and on the PC at the same time: both write to that .pio folder. CI builds the same way.
Or install PlatformIO on your PC, outside the dev container, with its installer script or in a virtual environment. Many Linux distributions don’t allow pip install into the system Python. Then build from your diffbot clone on the PC:
python3 -m venv ~/.venvs/platformio && ~/.venvs/platformio/bin/pip install platformio   # once
cd diffbot_firmware
~/.venvs/platformio/bin/pio run -e teensy31 && ~/.venvs/platformio/bin/pio run -e teensy40
CI runs on every pull request: industrial_ci builds and tests the workspace for Noetic, the firmware is built for both boards, and the dev container image is built.
Pull requests
-
One feature or fix per pull request, on a branch named
feat/…,fix/…,docs/…orchore/…. Keep unrelated changes for another PR. -
Pull requests are squash-merged. The PR title becomes the commit’s subject, so write it as
Area: what changed, for exampleSimulation test: narrower turn checks. Aim for 65 characters or fewer; GitHub adds the PR number. The whole description becomes the commit message, so start it with what changes and why. -
Describe how you tested it: what you ran, on which robot or in simulation, and what you saw. Link the issue with
Closes #N. - Comments explain why the code is the way it is, not what changed or how it used to be. The history belongs in the commit and the PR.
-
Every feature also gets documentation on ros-mobile-robots.com, a new or updated page: open a pull request in ros-mobile-robots.github.io and link it under
## Documentationin the description, asros-mobile-robots/ros-mobile-robots.github.io#N. If a page on ros-mobile-robots.com already explains the change, link that page instead. If nothing user-visible changes, writeNone. The PR description check fails until that section has one of the three. It runs again when you edit the description: look at that new run, because re-running the old one still sees the old text. - Follow REP 103 for units and coordinate frames.
-
Python follows PEP 8 with the settings of ROS 2’s
ament_flake8, with PEP 257 docstrings and type hints. AGENTS.md lists the commands that check it.
AI-assisted contributions
You’re welcome to use AI tools. Whatever produced the code, you’re its author and responsible for it:
- Understand every change and be able to explain it in review, in your own words.
- Build and test it as described above, and report what you actually ran. Don’t claim tests that didn’t run.
- Check that the APIs, parameters, files and links you use exist. Pull requests with invented ones are closed.
- Keep the PR description and your review replies short and specific: what changed, why, and how it was tested.
You don’t need to say whether you used AI. Please don’t add attribution lines for AI tools to commits or pull requests, such as Co-Authored-By: for a tool or “Generated with …”.
License
By contributing, you agree that your contributions are licensed under this repository’s BSD 3-Clause License.
|
|
diffbot repositorydiffbot_base diffbot_bringup diffbot_control diffbot_description diffbot_gazebo diffbot_mbf diffbot_msgs diffbot_navigation diffbot_robot diffbot_slam |
ROS Distro
|
Repository Summary
| Checkout URI | https://github.com/ros-mobile-robots/diffbot.git |
| VCS Type | git |
| VCS Version | noetic-devel |
| Last Updated | 2026-10-30 |
| Dev Status | DEVELOPED |
| Released | RELEASED |
| Contributing |
Help Wanted (-)
Good First Issues (-) Pull Requests to Review (-) |
Packages
| Name | Version |
|---|---|
| diffbot_base | 1.1.0 |
| diffbot_bringup | 1.1.0 |
| diffbot_control | 1.1.0 |
| diffbot_description | 1.1.0 |
| diffbot_gazebo | 1.1.0 |
| diffbot_mbf | 1.1.0 |
| diffbot_msgs | 1.1.0 |
| diffbot_navigation | 1.1.0 |
| diffbot_robot | 1.1.0 |
| diffbot_slam | 1.1.0 |
README
DiffBot
DiffBot is an autonomous differential drive robot with two wheels. Its main processing unit is a Raspberry Pi 4 B running Ubuntu Mate 20.04 and the ROS 1 (ROS Noetic) middleware. This respository contains ROS driver packages, ROS Control Hardware Interface for the real robot and configurations for simulating DiffBot. The formatted documentation can be found at: https://ros-mobile-robots.com.
| DiffBot | Lidar SLAMTEC RPLidar A2 |
|---|---|
|
|
If you are looking for a 3D printable modular base, see the remo_description repository. You can use it directly with the software of this diffbot repository.
| Remo | Gazebo Simulation | RViz |
|---|---|---|
|
|
|
It provides mounts for different camera modules, such as Raspi Cam v2, OAK-1, OAK-D and you can even design your own if you like. There is also support for different single board computers (Raspberry Pi and Nvidia Jetson Nano) through two changable decks. You are agin free to create your own.
Demonstration
SLAM and Navigation
| Real robot | Gazebo Simulation |
|---|---|
|
|
:package: Package Overview
-
diffbot_base: ROS Control hardware interface includingcontroller_managercontrol loop for the real robot. It talks to the Teensy microcontroller, whose firmware is indiffbot_firmware. -
diffbot_bringup: Launch files to bring up the hardware drivers (camera, lidar, imu, ultrasonic, …) for the real DiffBot robot. -
diffbot_control: Configurations for thediff_drive_controllerof ROS Control used in Gazebo simulation and the real robot. -
diffbot_description: URDF description of DiffBot including its sensors. -
diffbot_gazebo: Simulation specific launch and configuration files for DiffBot. -
diffbot_msgs: Message definitions specific to DiffBot, for example the message for encoder data. -
diffbot_navigation: Navigation based onmove_basepackage; launch and configuration files. -
diffbot_slam: Simultaneous localization and mapping using different implementations (e.g., gmapping) to create a map of the environment
Installation
The packages are written for and tested with ROS 1 Noetic on Ubuntu 20.04 Focal Fossa. For the real robot Ubuntu Mate 20.04 for arm64 is installed on the Raspberry Pi 4 B with 4GB. The communication between the mobile robot and the work pc is done by configuring the ROS Network, see also the documentation.
Development Container
The quickest way to a working setup on a development PC is the dev container in .devcontainer/noetic: a Docker image with ROS Noetic, Gazebo 11 and everything the DiffBot packages need. It works on Linux and on Windows with WSL 2, and CI builds the same image.
The full guide is on the documentation site: Use the Dev Container (setup on Linux and Windows, usage, updating, troubleshooting) and How the Dev Container Works.
- VS Code: install the Dev Containers extension, open your clone of this repository and choose Reopen in Container.
- Command line: with the Dev Container CLI:
  devcontainer up --workspace-folder . --config .devcontainer/noetic/devcontainer.json
  devcontainer exec --workspace-folder . --config .devcontainer/noetic/devcontainer.json bash
Creating the container clones rplidar_ros and remo_description, installs missing dependencies with rosdep and builds the workspace in ~/catkin_ws. Your clone of this repository is mounted at ~/catkin_ws/src/diffbot, so edits on the host show up in the container. The container uses the host network to reach the robot.
RViz and Gazebo open on the host’s display. On Windows, WSLg needs no setup. On a native Linux desktop (X11 or Wayland with Xwayland), install xauth on the host (sudo apt install xauth): before the container starts, host-x11.sh copies your display’s X11 cookie to .devcontainer/noetic/.x11/ (ignored by Git), where the container reads it. So xhost + isn’t needed.
Plain Docker works too. The image’s user has UID 1000; with another UID, use the dev container, which adapts it.
docker build -f .devcontainer/noetic/Dockerfile -t diffbot:noetic .
bash .devcontainer/noetic/host-x11.sh
docker run -it --rm --net=host -v /tmp/.X11-unix:/tmp/.X11-unix -e DISPLAY \
  -e XAUTHORITY=/home/ros/catkin_ws/src/diffbot/.devcontainer/noetic/.x11/xauth \
  -v "$PWD":/home/ros/catkin_ws/src/diffbot diffbot:noetic \
  bash -c "bash src/diffbot/.devcontainer/noetic/setup.sh && bash"
To set up a workspace without Docker, for example on the robot’s Raspberry Pi, follow the steps below.
Dependencies
The required Ubuntu packages are listed in software package sections found in the documentation. Other ROS catkin packages such as rplidar_ros need to be cloned into the catkin workspace.
For an automated and simplified dependency installation process install the vcstool, which is used in the next steps.
sudo apt install python3-vcstool
:hammer: How to Build
To build the packages in this repository including the Remo robot follow these steps:
-
cdinto an existing ROS Noetic catkin workspace or create a new one:
mkdir -p catkin_ws/src
- Clone this repository in the
srcfolder of your ROS Noetic catkin workspace:
cd catkin_ws/src
```console
File truncated at 100 lines see the full file
CONTRIBUTING
Contributing to DiffBot
DiffBot and Remo are two differential drive robots for ROS 1 Noetic. This repository has their ROS packages, the Teensy firmware and the dev container. Remo’s robot model is in remo_description, and the documentation is at ros-mobile-robots.com, from ros-mobile-robots.github.io.
Ask questions and get help with your build in Discussions, where the answers stay easy to find. Report bugs and request features as an issue in the repository they affect: diffbot, remo_description for Remo’s model, or ros-mobile-robots.github.io for the documentation. For a larger change, open an issue first, so the approach can be agreed before you write the code. This branch is ROS 1 Noetic; a move to ROS 2 is future work, so please discuss it in an issue first.
The documentation’s Contributing section explains the repositories, the roadmap, the dev container and the automated checks in more detail.
Set up
The quickest working setup is the dev container in .devcontainer/noetic: open your clone in VS Code and choose Reopen in Container. It has ROS Noetic, Gazebo 11 and everything the packages need, clones remo_description, at the version pinned in diffbot_dev.repos, and rplidar_ros, and builds the workspace in ~/catkin_ws. CI builds the same image. Without the container, follow the installation steps in the README.
When the pin moves to a new version, an existing workspace keeps its old checkout of remo_description, because the setup doesn’t replace repositories that are already there. Check out the new version yourself, then build again. If git status shows changes of your own, commit them on a branch first: the checkout would either stop on them or carry them over to the new version.
cd ~/catkin_ws/src/remo_description
git status                                          # no changes of your own?
git fetch --tags
git checkout 2.0.0                                  # the version in diffbot_dev.repos
Build and test
In ~/catkin_ws:
catkin build                                        # build the workspace
source devel/setup.bash
catkin build --catkin-make-args run_tests           # build and run all tests
catkin_test_results build                           # summary: 10 tests, 0 errors, 0 failures
rostest diffbot_gazebo sim_drive_diffbot.test       # one robot's simulation test
The simulation test drives DiffBot and Remo in Gazebo and checks where they went. Run it for any change to the robot models, the controllers or the simulation.
The Teensy firmware builds with PlatformIO, which isn’t in the dev container. The firmware has a container of its own, .docker/firmware, with PlatformIO 6.2.0 and a compiler, so Docker is all you need. Our script .docker/firmware/run.sh runs a command in that container, here PlatformIO’s pio. When you change the firmware, build both boards, as CI does, because the change has to work on both. From the root folder of your diffbot clone on the PC:
.docker/firmware/run.sh pio run -e teensy31
.docker/firmware/run.sh pio run -e teensy40
The script builds the image first. Later image builds took about 2 seconds on our test PC, because Docker reuses the cached image layers whose inputs haven’t changed. They only show their output when they fail. The script runs the container as your user (id -u and id -g), so the files it writes belong to you. To use other IDs, set LOCAL_UID and LOCAL_GID, for example LOCAL_UID=1001 LOCAL_GID=1001 .docker/firmware/run.sh pio run -e teensy40. The first firmware build downloads the Teensy toolchain, which needs the internet and took about a minute on our test PC. The firmware files land in diffbot_firmware/.pio/build/<board>/, for example firmware.hex, which PJRC’s Teensy Loader can flash. Don’t build in the container and on the PC at the same time: both write to that .pio folder. CI builds the same way.
Or install PlatformIO on your PC, outside the dev container, with its installer script or in a virtual environment. Many Linux distributions don’t allow pip install into the system Python. Then build from your diffbot clone on the PC:
python3 -m venv ~/.venvs/platformio && ~/.venvs/platformio/bin/pip install platformio   # once
cd diffbot_firmware
~/.venvs/platformio/bin/pio run -e teensy31 && ~/.venvs/platformio/bin/pio run -e teensy40
CI runs on every pull request: industrial_ci builds and tests the workspace for Noetic, the firmware is built for both boards, and the dev container image is built.
Pull requests
-
One feature or fix per pull request, on a branch named
feat/…,fix/…,docs/…orchore/…. Keep unrelated changes for another PR. -
Pull requests are squash-merged. The PR title becomes the commit’s subject, so write it as
Area: what changed, for exampleSimulation test: narrower turn checks. Aim for 65 characters or fewer; GitHub adds the PR number. The whole description becomes the commit message, so start it with what changes and why. -
Describe how you tested it: what you ran, on which robot or in simulation, and what you saw. Link the issue with
Closes #N. - Comments explain why the code is the way it is, not what changed or how it used to be. The history belongs in the commit and the PR.
-
Every feature also gets documentation on ros-mobile-robots.com, a new or updated page: open a pull request in ros-mobile-robots.github.io and link it under
## Documentationin the description, asros-mobile-robots/ros-mobile-robots.github.io#N. If a page on ros-mobile-robots.com already explains the change, link that page instead. If nothing user-visible changes, writeNone. The PR description check fails until that section has one of the three. It runs again when you edit the description: look at that new run, because re-running the old one still sees the old text. - Follow REP 103 for units and coordinate frames.
-
Python follows PEP 8 with the settings of ROS 2’s
ament_flake8, with PEP 257 docstrings and type hints. AGENTS.md lists the commands that check it.
AI-assisted contributions
You’re welcome to use AI tools. Whatever produced the code, you’re its author and responsible for it:
- Understand every change and be able to explain it in review, in your own words.
- Build and test it as described above, and report what you actually ran. Don’t claim tests that didn’t run.
- Check that the APIs, parameters, files and links you use exist. Pull requests with invented ones are closed.
- Keep the PR description and your review replies short and specific: what changed, why, and how it was tested.
You don’t need to say whether you used AI. Please don’t add attribution lines for AI tools to commits or pull requests, such as Co-Authored-By: for a tool or “Generated with …”.
License
By contributing, you agree that your contributions are licensed under this repository’s BSD 3-Clause License.
|
|
diffbot repositorydiffbot_base diffbot_bringup diffbot_control diffbot_description diffbot_gazebo diffbot_mbf diffbot_msgs diffbot_navigation diffbot_robot diffbot_slam |
ROS Distro
|
Repository Summary
| Checkout URI | https://github.com/ros-mobile-robots/diffbot.git |
| VCS Type | git |
| VCS Version | noetic-devel |
| Last Updated | 2026-10-30 |
| Dev Status | DEVELOPED |
| Released | RELEASED |
| Contributing |
Help Wanted (-)
Good First Issues (-) Pull Requests to Review (-) |
Packages
| Name | Version |
|---|---|
| diffbot_base | 1.1.0 |
| diffbot_bringup | 1.1.0 |
| diffbot_control | 1.1.0 |
| diffbot_description | 1.1.0 |
| diffbot_gazebo | 1.1.0 |
| diffbot_mbf | 1.1.0 |
| diffbot_msgs | 1.1.0 |
| diffbot_navigation | 1.1.0 |
| diffbot_robot | 1.1.0 |
| diffbot_slam | 1.1.0 |
README
DiffBot
DiffBot is an autonomous differential drive robot with two wheels. Its main processing unit is a Raspberry Pi 4 B running Ubuntu Mate 20.04 and the ROS 1 (ROS Noetic) middleware. This respository contains ROS driver packages, ROS Control Hardware Interface for the real robot and configurations for simulating DiffBot. The formatted documentation can be found at: https://ros-mobile-robots.com.
| DiffBot | Lidar SLAMTEC RPLidar A2 |
|---|---|
|
|
If you are looking for a 3D printable modular base, see the remo_description repository. You can use it directly with the software of this diffbot repository.
| Remo | Gazebo Simulation | RViz |
|---|---|---|
|
|
|
It provides mounts for different camera modules, such as Raspi Cam v2, OAK-1, OAK-D and you can even design your own if you like. There is also support for different single board computers (Raspberry Pi and Nvidia Jetson Nano) through two changable decks. You are agin free to create your own.
Demonstration
SLAM and Navigation
| Real robot | Gazebo Simulation |
|---|---|
|
|
:package: Package Overview
-
diffbot_base: ROS Control hardware interface includingcontroller_managercontrol loop for the real robot. It talks to the Teensy microcontroller, whose firmware is indiffbot_firmware. -
diffbot_bringup: Launch files to bring up the hardware drivers (camera, lidar, imu, ultrasonic, …) for the real DiffBot robot. -
diffbot_control: Configurations for thediff_drive_controllerof ROS Control used in Gazebo simulation and the real robot. -
diffbot_description: URDF description of DiffBot including its sensors. -
diffbot_gazebo: Simulation specific launch and configuration files for DiffBot. -
diffbot_msgs: Message definitions specific to DiffBot, for example the message for encoder data. -
diffbot_navigation: Navigation based onmove_basepackage; launch and configuration files. -
diffbot_slam: Simultaneous localization and mapping using different implementations (e.g., gmapping) to create a map of the environment
Installation
The packages are written for and tested with ROS 1 Noetic on Ubuntu 20.04 Focal Fossa. For the real robot Ubuntu Mate 20.04 for arm64 is installed on the Raspberry Pi 4 B with 4GB. The communication between the mobile robot and the work pc is done by configuring the ROS Network, see also the documentation.
Development Container
The quickest way to a working setup on a development PC is the dev container in .devcontainer/noetic: a Docker image with ROS Noetic, Gazebo 11 and everything the DiffBot packages need. It works on Linux and on Windows with WSL 2, and CI builds the same image.
The full guide is on the documentation site: Use the Dev Container (setup on Linux and Windows, usage, updating, troubleshooting) and How the Dev Container Works.
- VS Code: install the Dev Containers extension, open your clone of this repository and choose Reopen in Container.
- Command line: with the Dev Container CLI:
  devcontainer up --workspace-folder . --config .devcontainer/noetic/devcontainer.json
  devcontainer exec --workspace-folder . --config .devcontainer/noetic/devcontainer.json bash
Creating the container clones rplidar_ros and remo_description, installs missing dependencies with rosdep and builds the workspace in ~/catkin_ws. Your clone of this repository is mounted at ~/catkin_ws/src/diffbot, so edits on the host show up in the container. The container uses the host network to reach the robot.
RViz and Gazebo open on the host’s display. On Windows, WSLg needs no setup. On a native Linux desktop (X11 or Wayland with Xwayland), install xauth on the host (sudo apt install xauth): before the container starts, host-x11.sh copies your display’s X11 cookie to .devcontainer/noetic/.x11/ (ignored by Git), where the container reads it. So xhost + isn’t needed.
Plain Docker works too. The image’s user has UID 1000; with another UID, use the dev container, which adapts it.
docker build -f .devcontainer/noetic/Dockerfile -t diffbot:noetic .
bash .devcontainer/noetic/host-x11.sh
docker run -it --rm --net=host -v /tmp/.X11-unix:/tmp/.X11-unix -e DISPLAY \
  -e XAUTHORITY=/home/ros/catkin_ws/src/diffbot/.devcontainer/noetic/.x11/xauth \
  -v "$PWD":/home/ros/catkin_ws/src/diffbot diffbot:noetic \
  bash -c "bash src/diffbot/.devcontainer/noetic/setup.sh && bash"
To set up a workspace without Docker, for example on the robot’s Raspberry Pi, follow the steps below.
Dependencies
The required Ubuntu packages are listed in software package sections found in the documentation. Other ROS catkin packages such as rplidar_ros need to be cloned into the catkin workspace.
For an automated and simplified dependency installation process install the vcstool, which is used in the next steps.
sudo apt install python3-vcstool
:hammer: How to Build
To build the packages in this repository including the Remo robot follow these steps:
-
cdinto an existing ROS Noetic catkin workspace or create a new one:
mkdir -p catkin_ws/src
- Clone this repository in the
srcfolder of your ROS Noetic catkin workspace:
cd catkin_ws/src
```console
File truncated at 100 lines see the full file
CONTRIBUTING
Contributing to DiffBot
DiffBot and Remo are two differential drive robots for ROS 1 Noetic. This repository has their ROS packages, the Teensy firmware and the dev container. Remo’s robot model is in remo_description, and the documentation is at ros-mobile-robots.com, from ros-mobile-robots.github.io.
Ask questions and get help with your build in Discussions, where the answers stay easy to find. Report bugs and request features as an issue in the repository they affect: diffbot, remo_description for Remo’s model, or ros-mobile-robots.github.io for the documentation. For a larger change, open an issue first, so the approach can be agreed before you write the code. This branch is ROS 1 Noetic; a move to ROS 2 is future work, so please discuss it in an issue first.
The documentation’s Contributing section explains the repositories, the roadmap, the dev container and the automated checks in more detail.
Set up
The quickest working setup is the dev container in .devcontainer/noetic: open your clone in VS Code and choose Reopen in Container. It has ROS Noetic, Gazebo 11 and everything the packages need, clones remo_description, at the version pinned in diffbot_dev.repos, and rplidar_ros, and builds the workspace in ~/catkin_ws. CI builds the same image. Without the container, follow the installation steps in the README.
When the pin moves to a new version, an existing workspace keeps its old checkout of remo_description, because the setup doesn’t replace repositories that are already there. Check out the new version yourself, then build again. If git status shows changes of your own, commit them on a branch first: the checkout would either stop on them or carry them over to the new version.
cd ~/catkin_ws/src/remo_description
git status                                          # no changes of your own?
git fetch --tags
git checkout 2.0.0                                  # the version in diffbot_dev.repos
Build and test
In ~/catkin_ws:
catkin build                                        # build the workspace
source devel/setup.bash
catkin build --catkin-make-args run_tests           # build and run all tests
catkin_test_results build                           # summary: 10 tests, 0 errors, 0 failures
rostest diffbot_gazebo sim_drive_diffbot.test       # one robot's simulation test
The simulation test drives DiffBot and Remo in Gazebo and checks where they went. Run it for any change to the robot models, the controllers or the simulation.
The Teensy firmware builds with PlatformIO, which isn’t in the dev container. The firmware has a container of its own, .docker/firmware, with PlatformIO 6.2.0 and a compiler, so Docker is all you need. Our script .docker/firmware/run.sh runs a command in that container, here PlatformIO’s pio. When you change the firmware, build both boards, as CI does, because the change has to work on both. From the root folder of your diffbot clone on the PC:
.docker/firmware/run.sh pio run -e teensy31
.docker/firmware/run.sh pio run -e teensy40
The script builds the image first. Later image builds took about 2 seconds on our test PC, because Docker reuses the cached image layers whose inputs haven’t changed. They only show their output when they fail. The script runs the container as your user (id -u and id -g), so the files it writes belong to you. To use other IDs, set LOCAL_UID and LOCAL_GID, for example LOCAL_UID=1001 LOCAL_GID=1001 .docker/firmware/run.sh pio run -e teensy40. The first firmware build downloads the Teensy toolchain, which needs the internet and took about a minute on our test PC. The firmware files land in diffbot_firmware/.pio/build/<board>/, for example firmware.hex, which PJRC’s Teensy Loader can flash. Don’t build in the container and on the PC at the same time: both write to that .pio folder. CI builds the same way.
Or install PlatformIO on your PC, outside the dev container, with its installer script or in a virtual environment. Many Linux distributions don’t allow pip install into the system Python. Then build from your diffbot clone on the PC:
python3 -m venv ~/.venvs/platformio && ~/.venvs/platformio/bin/pip install platformio   # once
cd diffbot_firmware
~/.venvs/platformio/bin/pio run -e teensy31 && ~/.venvs/platformio/bin/pio run -e teensy40
CI runs on every pull request: industrial_ci builds and tests the workspace for Noetic, the firmware is built for both boards, and the dev container image is built.
Pull requests
-
One feature or fix per pull request, on a branch named
feat/…,fix/…,docs/…orchore/…. Keep unrelated changes for another PR. -
Pull requests are squash-merged. The PR title becomes the commit’s subject, so write it as
Area: what changed, for exampleSimulation test: narrower turn checks. Aim for 65 characters or fewer; GitHub adds the PR number. The whole description becomes the commit message, so start it with what changes and why. -
Describe how you tested it: what you ran, on which robot or in simulation, and what you saw. Link the issue with
Closes #N. - Comments explain why the code is the way it is, not what changed or how it used to be. The history belongs in the commit and the PR.
-
Every feature also gets documentation on ros-mobile-robots.com, a new or updated page: open a pull request in ros-mobile-robots.github.io and link it under
## Documentationin the description, asros-mobile-robots/ros-mobile-robots.github.io#N. If a page on ros-mobile-robots.com already explains the change, link that page instead. If nothing user-visible changes, writeNone. The PR description check fails until that section has one of the three. It runs again when you edit the description: look at that new run, because re-running the old one still sees the old text. - Follow REP 103 for units and coordinate frames.
-
Python follows PEP 8 with the settings of ROS 2’s
ament_flake8, with PEP 257 docstrings and type hints. AGENTS.md lists the commands that check it.
AI-assisted contributions
You’re welcome to use AI tools. Whatever produced the code, you’re its author and responsible for it:
- Understand every change and be able to explain it in review, in your own words.
- Build and test it as described above, and report what you actually ran. Don’t claim tests that didn’t run.
- Check that the APIs, parameters, files and links you use exist. Pull requests with invented ones are closed.
- Keep the PR description and your review replies short and specific: what changed, why, and how it was tested.
You don’t need to say whether you used AI. Please don’t add attribution lines for AI tools to commits or pull requests, such as Co-Authored-By: for a tool or “Generated with …”.
License
By contributing, you agree that your contributions are licensed under this repository’s BSD 3-Clause License.
|
|
diffbot repositorydiffbot_base diffbot_bringup diffbot_control diffbot_description diffbot_gazebo diffbot_mbf diffbot_msgs diffbot_navigation diffbot_robot diffbot_slam |
ROS Distro
|
Repository Summary
| Checkout URI | https://github.com/ros-mobile-robots/diffbot.git |
| VCS Type | git |
| VCS Version | noetic-devel |
| Last Updated | 2026-10-30 |
| Dev Status | DEVELOPED |
| Released | RELEASED |
| Contributing |
Help Wanted (-)
Good First Issues (-) Pull Requests to Review (-) |
Packages
| Name | Version |
|---|---|
| diffbot_base | 1.1.0 |
| diffbot_bringup | 1.1.0 |
| diffbot_control | 1.1.0 |
| diffbot_description | 1.1.0 |
| diffbot_gazebo | 1.1.0 |
| diffbot_mbf | 1.1.0 |
| diffbot_msgs | 1.1.0 |
| diffbot_navigation | 1.1.0 |
| diffbot_robot | 1.1.0 |
| diffbot_slam | 1.1.0 |
README
DiffBot
DiffBot is an autonomous differential drive robot with two wheels. Its main processing unit is a Raspberry Pi 4 B running Ubuntu Mate 20.04 and the ROS 1 (ROS Noetic) middleware. This respository contains ROS driver packages, ROS Control Hardware Interface for the real robot and configurations for simulating DiffBot. The formatted documentation can be found at: https://ros-mobile-robots.com.
| DiffBot | Lidar SLAMTEC RPLidar A2 |
|---|---|
|
|
If you are looking for a 3D printable modular base, see the remo_description repository. You can use it directly with the software of this diffbot repository.
| Remo | Gazebo Simulation | RViz |
|---|---|---|
|
|
|
It provides mounts for different camera modules, such as Raspi Cam v2, OAK-1, OAK-D and you can even design your own if you like. There is also support for different single board computers (Raspberry Pi and Nvidia Jetson Nano) through two changable decks. You are agin free to create your own.
Demonstration
SLAM and Navigation
| Real robot | Gazebo Simulation |
|---|---|
|
|
:package: Package Overview
-
diffbot_base: ROS Control hardware interface includingcontroller_managercontrol loop for the real robot. It talks to the Teensy microcontroller, whose firmware is indiffbot_firmware. -
diffbot_bringup: Launch files to bring up the hardware drivers (camera, lidar, imu, ultrasonic, …) for the real DiffBot robot. -
diffbot_control: Configurations for thediff_drive_controllerof ROS Control used in Gazebo simulation and the real robot. -
diffbot_description: URDF description of DiffBot including its sensors. -
diffbot_gazebo: Simulation specific launch and configuration files for DiffBot. -
diffbot_msgs: Message definitions specific to DiffBot, for example the message for encoder data. -
diffbot_navigation: Navigation based onmove_basepackage; launch and configuration files. -
diffbot_slam: Simultaneous localization and mapping using different implementations (e.g., gmapping) to create a map of the environment
Installation
The packages are written for and tested with ROS 1 Noetic on Ubuntu 20.04 Focal Fossa. For the real robot Ubuntu Mate 20.04 for arm64 is installed on the Raspberry Pi 4 B with 4GB. The communication between the mobile robot and the work pc is done by configuring the ROS Network, see also the documentation.
Development Container
The quickest way to a working setup on a development PC is the dev container in .devcontainer/noetic: a Docker image with ROS Noetic, Gazebo 11 and everything the DiffBot packages need. It works on Linux and on Windows with WSL 2, and CI builds the same image.
The full guide is on the documentation site: Use the Dev Container (setup on Linux and Windows, usage, updating, troubleshooting) and How the Dev Container Works.
- VS Code: install the Dev Containers extension, open your clone of this repository and choose Reopen in Container.
- Command line: with the Dev Container CLI:
  devcontainer up --workspace-folder . --config .devcontainer/noetic/devcontainer.json
  devcontainer exec --workspace-folder . --config .devcontainer/noetic/devcontainer.json bash
Creating the container clones rplidar_ros and remo_description, installs missing dependencies with rosdep and builds the workspace in ~/catkin_ws. Your clone of this repository is mounted at ~/catkin_ws/src/diffbot, so edits on the host show up in the container. The container uses the host network to reach the robot.
RViz and Gazebo open on the host’s display. On Windows, WSLg needs no setup. On a native Linux desktop (X11 or Wayland with Xwayland), install xauth on the host (sudo apt install xauth): before the container starts, host-x11.sh copies your display’s X11 cookie to .devcontainer/noetic/.x11/ (ignored by Git), where the container reads it. So xhost + isn’t needed.
Plain Docker works too. The image’s user has UID 1000; with another UID, use the dev container, which adapts it.
docker build -f .devcontainer/noetic/Dockerfile -t diffbot:noetic .
bash .devcontainer/noetic/host-x11.sh
docker run -it --rm --net=host -v /tmp/.X11-unix:/tmp/.X11-unix -e DISPLAY \
  -e XAUTHORITY=/home/ros/catkin_ws/src/diffbot/.devcontainer/noetic/.x11/xauth \
  -v "$PWD":/home/ros/catkin_ws/src/diffbot diffbot:noetic \
  bash -c "bash src/diffbot/.devcontainer/noetic/setup.sh && bash"
To set up a workspace without Docker, for example on the robot’s Raspberry Pi, follow the steps below.
Dependencies
The required Ubuntu packages are listed in software package sections found in the documentation. Other ROS catkin packages such as rplidar_ros need to be cloned into the catkin workspace.
For an automated and simplified dependency installation process install the vcstool, which is used in the next steps.
sudo apt install python3-vcstool
:hammer: How to Build
To build the packages in this repository including the Remo robot follow these steps:
-
cdinto an existing ROS Noetic catkin workspace or create a new one:
mkdir -p catkin_ws/src
- Clone this repository in the
srcfolder of your ROS Noetic catkin workspace:
cd catkin_ws/src
```console
File truncated at 100 lines see the full file
CONTRIBUTING
Contributing to DiffBot
DiffBot and Remo are two differential drive robots for ROS 1 Noetic. This repository has their ROS packages, the Teensy firmware and the dev container. Remo’s robot model is in remo_description, and the documentation is at ros-mobile-robots.com, from ros-mobile-robots.github.io.
Ask questions and get help with your build in Discussions, where the answers stay easy to find. Report bugs and request features as an issue in the repository they affect: diffbot, remo_description for Remo’s model, or ros-mobile-robots.github.io for the documentation. For a larger change, open an issue first, so the approach can be agreed before you write the code. This branch is ROS 1 Noetic; a move to ROS 2 is future work, so please discuss it in an issue first.
The documentation’s Contributing section explains the repositories, the roadmap, the dev container and the automated checks in more detail.
Set up
The quickest working setup is the dev container in .devcontainer/noetic: open your clone in VS Code and choose Reopen in Container. It has ROS Noetic, Gazebo 11 and everything the packages need, clones remo_description, at the version pinned in diffbot_dev.repos, and rplidar_ros, and builds the workspace in ~/catkin_ws. CI builds the same image. Without the container, follow the installation steps in the README.
When the pin moves to a new version, an existing workspace keeps its old checkout of remo_description, because the setup doesn’t replace repositories that are already there. Check out the new version yourself, then build again. If git status shows changes of your own, commit them on a branch first: the checkout would either stop on them or carry them over to the new version.
cd ~/catkin_ws/src/remo_description
git status                                          # no changes of your own?
git fetch --tags
git checkout 2.0.0                                  # the version in diffbot_dev.repos
Build and test
In ~/catkin_ws:
catkin build                                        # build the workspace
source devel/setup.bash
catkin build --catkin-make-args run_tests           # build and run all tests
catkin_test_results build                           # summary: 10 tests, 0 errors, 0 failures
rostest diffbot_gazebo sim_drive_diffbot.test       # one robot's simulation test
The simulation test drives DiffBot and Remo in Gazebo and checks where they went. Run it for any change to the robot models, the controllers or the simulation.
The Teensy firmware builds with PlatformIO, which isn’t in the dev container. The firmware has a container of its own, .docker/firmware, with PlatformIO 6.2.0 and a compiler, so Docker is all you need. Our script .docker/firmware/run.sh runs a command in that container, here PlatformIO’s pio. When you change the firmware, build both boards, as CI does, because the change has to work on both. From the root folder of your diffbot clone on the PC:
.docker/firmware/run.sh pio run -e teensy31
.docker/firmware/run.sh pio run -e teensy40
The script builds the image first. Later image builds took about 2 seconds on our test PC, because Docker reuses the cached image layers whose inputs haven’t changed. They only show their output when they fail. The script runs the container as your user (id -u and id -g), so the files it writes belong to you. To use other IDs, set LOCAL_UID and LOCAL_GID, for example LOCAL_UID=1001 LOCAL_GID=1001 .docker/firmware/run.sh pio run -e teensy40. The first firmware build downloads the Teensy toolchain, which needs the internet and took about a minute on our test PC. The firmware files land in diffbot_firmware/.pio/build/<board>/, for example firmware.hex, which PJRC’s Teensy Loader can flash. Don’t build in the container and on the PC at the same time: both write to that .pio folder. CI builds the same way.
Or install PlatformIO on your PC, outside the dev container, with its installer script or in a virtual environment. Many Linux distributions don’t allow pip install into the system Python. Then build from your diffbot clone on the PC:
python3 -m venv ~/.venvs/platformio && ~/.venvs/platformio/bin/pip install platformio   # once
cd diffbot_firmware
~/.venvs/platformio/bin/pio run -e teensy31 && ~/.venvs/platformio/bin/pio run -e teensy40
CI runs on every pull request: industrial_ci builds and tests the workspace for Noetic, the firmware is built for both boards, and the dev container image is built.
Pull requests
-
One feature or fix per pull request, on a branch named
feat/…,fix/…,docs/…orchore/…. Keep unrelated changes for another PR. -
Pull requests are squash-merged. The PR title becomes the commit’s subject, so write it as
Area: what changed, for exampleSimulation test: narrower turn checks. Aim for 65 characters or fewer; GitHub adds the PR number. The whole description becomes the commit message, so start it with what changes and why. -
Describe how you tested it: what you ran, on which robot or in simulation, and what you saw. Link the issue with
Closes #N. - Comments explain why the code is the way it is, not what changed or how it used to be. The history belongs in the commit and the PR.
-
Every feature also gets documentation on ros-mobile-robots.com, a new or updated page: open a pull request in ros-mobile-robots.github.io and link it under
## Documentationin the description, asros-mobile-robots/ros-mobile-robots.github.io#N. If a page on ros-mobile-robots.com already explains the change, link that page instead. If nothing user-visible changes, writeNone. The PR description check fails until that section has one of the three. It runs again when you edit the description: look at that new run, because re-running the old one still sees the old text. - Follow REP 103 for units and coordinate frames.
-
Python follows PEP 8 with the settings of ROS 2’s
ament_flake8, with PEP 257 docstrings and type hints. AGENTS.md lists the commands that check it.
AI-assisted contributions
You’re welcome to use AI tools. Whatever produced the code, you’re its author and responsible for it:
- Understand every change and be able to explain it in review, in your own words.
- Build and test it as described above, and report what you actually ran. Don’t claim tests that didn’t run.
- Check that the APIs, parameters, files and links you use exist. Pull requests with invented ones are closed.
- Keep the PR description and your review replies short and specific: what changed, why, and how it was tested.
You don’t need to say whether you used AI. Please don’t add attribution lines for AI tools to commits or pull requests, such as Co-Authored-By: for a tool or “Generated with …”.
License
By contributing, you agree that your contributions are licensed under this repository’s BSD 3-Clause License.
|
|
diffbot repositorydiffbot_base diffbot_bringup diffbot_control diffbot_description diffbot_gazebo diffbot_mbf diffbot_msgs diffbot_navigation diffbot_robot diffbot_slam |
ROS Distro
|
Repository Summary
| Checkout URI | https://github.com/ros-mobile-robots/diffbot.git |
| VCS Type | git |
| VCS Version | noetic-devel |
| Last Updated | 2026-10-30 |
| Dev Status | DEVELOPED |
| Released | RELEASED |
| Contributing |
Help Wanted (-)
Good First Issues (-) Pull Requests to Review (-) |
Packages
| Name | Version |
|---|---|
| diffbot_base | 1.1.0 |
| diffbot_bringup | 1.1.0 |
| diffbot_control | 1.1.0 |
| diffbot_description | 1.1.0 |
| diffbot_gazebo | 1.1.0 |
| diffbot_mbf | 1.1.0 |
| diffbot_msgs | 1.1.0 |
| diffbot_navigation | 1.1.0 |
| diffbot_robot | 1.1.0 |
| diffbot_slam | 1.1.0 |
README
DiffBot
DiffBot is an autonomous differential drive robot with two wheels. Its main processing unit is a Raspberry Pi 4 B running Ubuntu Mate 20.04 and the ROS 1 (ROS Noetic) middleware. This respository contains ROS driver packages, ROS Control Hardware Interface for the real robot and configurations for simulating DiffBot. The formatted documentation can be found at: https://ros-mobile-robots.com.
| DiffBot | Lidar SLAMTEC RPLidar A2 |
|---|---|
|
|
If you are looking for a 3D printable modular base, see the remo_description repository. You can use it directly with the software of this diffbot repository.
| Remo | Gazebo Simulation | RViz |
|---|---|---|
|
|
|
It provides mounts for different camera modules, such as Raspi Cam v2, OAK-1, OAK-D and you can even design your own if you like. There is also support for different single board computers (Raspberry Pi and Nvidia Jetson Nano) through two changable decks. You are agin free to create your own.
Demonstration
SLAM and Navigation
| Real robot | Gazebo Simulation |
|---|---|
|
|
:package: Package Overview
-
diffbot_base: ROS Control hardware interface includingcontroller_managercontrol loop for the real robot. It talks to the Teensy microcontroller, whose firmware is indiffbot_firmware. -
diffbot_bringup: Launch files to bring up the hardware drivers (camera, lidar, imu, ultrasonic, …) for the real DiffBot robot. -
diffbot_control: Configurations for thediff_drive_controllerof ROS Control used in Gazebo simulation and the real robot. -
diffbot_description: URDF description of DiffBot including its sensors. -
diffbot_gazebo: Simulation specific launch and configuration files for DiffBot. -
diffbot_msgs: Message definitions specific to DiffBot, for example the message for encoder data. -
diffbot_navigation: Navigation based onmove_basepackage; launch and configuration files. -
diffbot_slam: Simultaneous localization and mapping using different implementations (e.g., gmapping) to create a map of the environment
Installation
The packages are written for and tested with ROS 1 Noetic on Ubuntu 20.04 Focal Fossa. For the real robot Ubuntu Mate 20.04 for arm64 is installed on the Raspberry Pi 4 B with 4GB. The communication between the mobile robot and the work pc is done by configuring the ROS Network, see also the documentation.
Development Container
The quickest way to a working setup on a development PC is the dev container in .devcontainer/noetic: a Docker image with ROS Noetic, Gazebo 11 and everything the DiffBot packages need. It works on Linux and on Windows with WSL 2, and CI builds the same image.
The full guide is on the documentation site: Use the Dev Container (setup on Linux and Windows, usage, updating, troubleshooting) and How the Dev Container Works.
- VS Code: install the Dev Containers extension, open your clone of this repository and choose Reopen in Container.
- Command line: with the Dev Container CLI:
  devcontainer up --workspace-folder . --config .devcontainer/noetic/devcontainer.json
  devcontainer exec --workspace-folder . --config .devcontainer/noetic/devcontainer.json bash
Creating the container clones rplidar_ros and remo_description, installs missing dependencies with rosdep and builds the workspace in ~/catkin_ws. Your clone of this repository is mounted at ~/catkin_ws/src/diffbot, so edits on the host show up in the container. The container uses the host network to reach the robot.
RViz and Gazebo open on the host’s display. On Windows, WSLg needs no setup. On a native Linux desktop (X11 or Wayland with Xwayland), install xauth on the host (sudo apt install xauth): before the container starts, host-x11.sh copies your display’s X11 cookie to .devcontainer/noetic/.x11/ (ignored by Git), where the container reads it. So xhost + isn’t needed.
Plain Docker works too. The image’s user has UID 1000; with another UID, use the dev container, which adapts it.
docker build -f .devcontainer/noetic/Dockerfile -t diffbot:noetic .
bash .devcontainer/noetic/host-x11.sh
docker run -it --rm --net=host -v /tmp/.X11-unix:/tmp/.X11-unix -e DISPLAY \
  -e XAUTHORITY=/home/ros/catkin_ws/src/diffbot/.devcontainer/noetic/.x11/xauth \
  -v "$PWD":/home/ros/catkin_ws/src/diffbot diffbot:noetic \
  bash -c "bash src/diffbot/.devcontainer/noetic/setup.sh && bash"
To set up a workspace without Docker, for example on the robot’s Raspberry Pi, follow the steps below.
Dependencies
The required Ubuntu packages are listed in software package sections found in the documentation. Other ROS catkin packages such as rplidar_ros need to be cloned into the catkin workspace.
For an automated and simplified dependency installation process install the vcstool, which is used in the next steps.
sudo apt install python3-vcstool
:hammer: How to Build
To build the packages in this repository including the Remo robot follow these steps:
-
cdinto an existing ROS Noetic catkin workspace or create a new one:
mkdir -p catkin_ws/src
- Clone this repository in the
srcfolder of your ROS Noetic catkin workspace:
cd catkin_ws/src
```console
File truncated at 100 lines see the full file
CONTRIBUTING
Contributing to DiffBot
DiffBot and Remo are two differential drive robots for ROS 1 Noetic. This repository has their ROS packages, the Teensy firmware and the dev container. Remo’s robot model is in remo_description, and the documentation is at ros-mobile-robots.com, from ros-mobile-robots.github.io.
Ask questions and get help with your build in Discussions, where the answers stay easy to find. Report bugs and request features as an issue in the repository they affect: diffbot, remo_description for Remo’s model, or ros-mobile-robots.github.io for the documentation. For a larger change, open an issue first, so the approach can be agreed before you write the code. This branch is ROS 1 Noetic; a move to ROS 2 is future work, so please discuss it in an issue first.
The documentation’s Contributing section explains the repositories, the roadmap, the dev container and the automated checks in more detail.
Set up
The quickest working setup is the dev container in .devcontainer/noetic: open your clone in VS Code and choose Reopen in Container. It has ROS Noetic, Gazebo 11 and everything the packages need, clones remo_description, at the version pinned in diffbot_dev.repos, and rplidar_ros, and builds the workspace in ~/catkin_ws. CI builds the same image. Without the container, follow the installation steps in the README.
When the pin moves to a new version, an existing workspace keeps its old checkout of remo_description, because the setup doesn’t replace repositories that are already there. Check out the new version yourself, then build again. If git status shows changes of your own, commit them on a branch first: the checkout would either stop on them or carry them over to the new version.
cd ~/catkin_ws/src/remo_description
git status                                          # no changes of your own?
git fetch --tags
git checkout 2.0.0                                  # the version in diffbot_dev.repos
Build and test
In ~/catkin_ws:
catkin build                                        # build the workspace
source devel/setup.bash
catkin build --catkin-make-args run_tests           # build and run all tests
catkin_test_results build                           # summary: 10 tests, 0 errors, 0 failures
rostest diffbot_gazebo sim_drive_diffbot.test       # one robot's simulation test
The simulation test drives DiffBot and Remo in Gazebo and checks where they went. Run it for any change to the robot models, the controllers or the simulation.
The Teensy firmware builds with PlatformIO, which isn’t in the dev container. The firmware has a container of its own, .docker/firmware, with PlatformIO 6.2.0 and a compiler, so Docker is all you need. Our script .docker/firmware/run.sh runs a command in that container, here PlatformIO’s pio. When you change the firmware, build both boards, as CI does, because the change has to work on both. From the root folder of your diffbot clone on the PC:
.docker/firmware/run.sh pio run -e teensy31
.docker/firmware/run.sh pio run -e teensy40
The script builds the image first. Later image builds took about 2 seconds on our test PC, because Docker reuses the cached image layers whose inputs haven’t changed. They only show their output when they fail. The script runs the container as your user (id -u and id -g), so the files it writes belong to you. To use other IDs, set LOCAL_UID and LOCAL_GID, for example LOCAL_UID=1001 LOCAL_GID=1001 .docker/firmware/run.sh pio run -e teensy40. The first firmware build downloads the Teensy toolchain, which needs the internet and took about a minute on our test PC. The firmware files land in diffbot_firmware/.pio/build/<board>/, for example firmware.hex, which PJRC’s Teensy Loader can flash. Don’t build in the container and on the PC at the same time: both write to that .pio folder. CI builds the same way.
Or install PlatformIO on your PC, outside the dev container, with its installer script or in a virtual environment. Many Linux distributions don’t allow pip install into the system Python. Then build from your diffbot clone on the PC:
python3 -m venv ~/.venvs/platformio && ~/.venvs/platformio/bin/pip install platformio   # once
cd diffbot_firmware
~/.venvs/platformio/bin/pio run -e teensy31 && ~/.venvs/platformio/bin/pio run -e teensy40
CI runs on every pull request: industrial_ci builds and tests the workspace for Noetic, the firmware is built for both boards, and the dev container image is built.
Pull requests
-
One feature or fix per pull request, on a branch named
feat/…,fix/…,docs/…orchore/…. Keep unrelated changes for another PR. -
Pull requests are squash-merged. The PR title becomes the commit’s subject, so write it as
Area: what changed, for exampleSimulation test: narrower turn checks. Aim for 65 characters or fewer; GitHub adds the PR number. The whole description becomes the commit message, so start it with what changes and why. -
Describe how you tested it: what you ran, on which robot or in simulation, and what you saw. Link the issue with
Closes #N. - Comments explain why the code is the way it is, not what changed or how it used to be. The history belongs in the commit and the PR.
-
Every feature also gets documentation on ros-mobile-robots.com, a new or updated page: open a pull request in ros-mobile-robots.github.io and link it under
## Documentationin the description, asros-mobile-robots/ros-mobile-robots.github.io#N. If a page on ros-mobile-robots.com already explains the change, link that page instead. If nothing user-visible changes, writeNone. The PR description check fails until that section has one of the three. It runs again when you edit the description: look at that new run, because re-running the old one still sees the old text. - Follow REP 103 for units and coordinate frames.
-
Python follows PEP 8 with the settings of ROS 2’s
ament_flake8, with PEP 257 docstrings and type hints. AGENTS.md lists the commands that check it.
AI-assisted contributions
You’re welcome to use AI tools. Whatever produced the code, you’re its author and responsible for it:
- Understand every change and be able to explain it in review, in your own words.
- Build and test it as described above, and report what you actually ran. Don’t claim tests that didn’t run.
- Check that the APIs, parameters, files and links you use exist. Pull requests with invented ones are closed.
- Keep the PR description and your review replies short and specific: what changed, why, and how it was tested.
You don’t need to say whether you used AI. Please don’t add attribution lines for AI tools to commits or pull requests, such as Co-Authored-By: for a tool or “Generated with …”.
License
By contributing, you agree that your contributions are licensed under this repository’s BSD 3-Clause License.
|
|
diffbot repositorydiffbot_base diffbot_bringup diffbot_control diffbot_description diffbot_gazebo diffbot_mbf diffbot_msgs diffbot_navigation diffbot_robot diffbot_slam |
ROS Distro
|
Repository Summary
| Checkout URI | https://github.com/ros-mobile-robots/diffbot.git |
| VCS Type | git |
| VCS Version | noetic-devel |
| Last Updated | 2026-10-30 |
| Dev Status | DEVELOPED |
| Released | RELEASED |
| Contributing |
Help Wanted (-)
Good First Issues (-) Pull Requests to Review (-) |
Packages
| Name | Version |
|---|---|
| diffbot_base | 1.1.0 |
| diffbot_bringup | 1.1.0 |
| diffbot_control | 1.1.0 |
| diffbot_description | 1.1.0 |
| diffbot_gazebo | 1.1.0 |
| diffbot_mbf | 1.1.0 |
| diffbot_msgs | 1.1.0 |
| diffbot_navigation | 1.1.0 |
| diffbot_robot | 1.1.0 |
| diffbot_slam | 1.1.0 |
README
DiffBot
DiffBot is an autonomous differential drive robot with two wheels. Its main processing unit is a Raspberry Pi 4 B running Ubuntu Mate 20.04 and the ROS 1 (ROS Noetic) middleware. This respository contains ROS driver packages, ROS Control Hardware Interface for the real robot and configurations for simulating DiffBot. The formatted documentation can be found at: https://ros-mobile-robots.com.
| DiffBot | Lidar SLAMTEC RPLidar A2 |
|---|---|
|
|
If you are looking for a 3D printable modular base, see the remo_description repository. You can use it directly with the software of this diffbot repository.
| Remo | Gazebo Simulation | RViz |
|---|---|---|
|
|
|
It provides mounts for different camera modules, such as Raspi Cam v2, OAK-1, OAK-D and you can even design your own if you like. There is also support for different single board computers (Raspberry Pi and Nvidia Jetson Nano) through two changable decks. You are agin free to create your own.
Demonstration
SLAM and Navigation
| Real robot | Gazebo Simulation |
|---|---|
|
|
:package: Package Overview
-
diffbot_base: ROS Control hardware interface includingcontroller_managercontrol loop for the real robot. It talks to the Teensy microcontroller, whose firmware is indiffbot_firmware. -
diffbot_bringup: Launch files to bring up the hardware drivers (camera, lidar, imu, ultrasonic, …) for the real DiffBot robot. -
diffbot_control: Configurations for thediff_drive_controllerof ROS Control used in Gazebo simulation and the real robot. -
diffbot_description: URDF description of DiffBot including its sensors. -
diffbot_gazebo: Simulation specific launch and configuration files for DiffBot. -
diffbot_msgs: Message definitions specific to DiffBot, for example the message for encoder data. -
diffbot_navigation: Navigation based onmove_basepackage; launch and configuration files. -
diffbot_slam: Simultaneous localization and mapping using different implementations (e.g., gmapping) to create a map of the environment
Installation
The packages are written for and tested with ROS 1 Noetic on Ubuntu 20.04 Focal Fossa. For the real robot Ubuntu Mate 20.04 for arm64 is installed on the Raspberry Pi 4 B with 4GB. The communication between the mobile robot and the work pc is done by configuring the ROS Network, see also the documentation.
Development Container
The quickest way to a working setup on a development PC is the dev container in .devcontainer/noetic: a Docker image with ROS Noetic, Gazebo 11 and everything the DiffBot packages need. It works on Linux and on Windows with WSL 2, and CI builds the same image.
The full guide is on the documentation site: Use the Dev Container (setup on Linux and Windows, usage, updating, troubleshooting) and How the Dev Container Works.
- VS Code: install the Dev Containers extension, open your clone of this repository and choose Reopen in Container.
- Command line: with the Dev Container CLI:
  devcontainer up --workspace-folder . --config .devcontainer/noetic/devcontainer.json
  devcontainer exec --workspace-folder . --config .devcontainer/noetic/devcontainer.json bash
Creating the container clones rplidar_ros and remo_description, installs missing dependencies with rosdep and builds the workspace in ~/catkin_ws. Your clone of this repository is mounted at ~/catkin_ws/src/diffbot, so edits on the host show up in the container. The container uses the host network to reach the robot.
RViz and Gazebo open on the host’s display. On Windows, WSLg needs no setup. On a native Linux desktop (X11 or Wayland with Xwayland), install xauth on the host (sudo apt install xauth): before the container starts, host-x11.sh copies your display’s X11 cookie to .devcontainer/noetic/.x11/ (ignored by Git), where the container reads it. So xhost + isn’t needed.
Plain Docker works too. The image’s user has UID 1000; with another UID, use the dev container, which adapts it.
docker build -f .devcontainer/noetic/Dockerfile -t diffbot:noetic .
bash .devcontainer/noetic/host-x11.sh
docker run -it --rm --net=host -v /tmp/.X11-unix:/tmp/.X11-unix -e DISPLAY \
  -e XAUTHORITY=/home/ros/catkin_ws/src/diffbot/.devcontainer/noetic/.x11/xauth \
  -v "$PWD":/home/ros/catkin_ws/src/diffbot diffbot:noetic \
  bash -c "bash src/diffbot/.devcontainer/noetic/setup.sh && bash"
To set up a workspace without Docker, for example on the robot’s Raspberry Pi, follow the steps below.
Dependencies
The required Ubuntu packages are listed in software package sections found in the documentation. Other ROS catkin packages such as rplidar_ros need to be cloned into the catkin workspace.
For an automated and simplified dependency installation process install the vcstool, which is used in the next steps.
sudo apt install python3-vcstool
:hammer: How to Build
To build the packages in this repository including the Remo robot follow these steps:
-
cdinto an existing ROS Noetic catkin workspace or create a new one:
mkdir -p catkin_ws/src
- Clone this repository in the
srcfolder of your ROS Noetic catkin workspace:
cd catkin_ws/src
```console
File truncated at 100 lines see the full file
CONTRIBUTING
Contributing to DiffBot
DiffBot and Remo are two differential drive robots for ROS 1 Noetic. This repository has their ROS packages, the Teensy firmware and the dev container. Remo’s robot model is in remo_description, and the documentation is at ros-mobile-robots.com, from ros-mobile-robots.github.io.
Ask questions and get help with your build in Discussions, where the answers stay easy to find. Report bugs and request features as an issue in the repository they affect: diffbot, remo_description for Remo’s model, or ros-mobile-robots.github.io for the documentation. For a larger change, open an issue first, so the approach can be agreed before you write the code. This branch is ROS 1 Noetic; a move to ROS 2 is future work, so please discuss it in an issue first.
The documentation’s Contributing section explains the repositories, the roadmap, the dev container and the automated checks in more detail.
Set up
The quickest working setup is the dev container in .devcontainer/noetic: open your clone in VS Code and choose Reopen in Container. It has ROS Noetic, Gazebo 11 and everything the packages need, clones remo_description, at the version pinned in diffbot_dev.repos, and rplidar_ros, and builds the workspace in ~/catkin_ws. CI builds the same image. Without the container, follow the installation steps in the README.
When the pin moves to a new version, an existing workspace keeps its old checkout of remo_description, because the setup doesn’t replace repositories that are already there. Check out the new version yourself, then build again. If git status shows changes of your own, commit them on a branch first: the checkout would either stop on them or carry them over to the new version.
cd ~/catkin_ws/src/remo_description
git status                                          # no changes of your own?
git fetch --tags
git checkout 2.0.0                                  # the version in diffbot_dev.repos
Build and test
In ~/catkin_ws:
catkin build                                        # build the workspace
source devel/setup.bash
catkin build --catkin-make-args run_tests           # build and run all tests
catkin_test_results build                           # summary: 10 tests, 0 errors, 0 failures
rostest diffbot_gazebo sim_drive_diffbot.test       # one robot's simulation test
The simulation test drives DiffBot and Remo in Gazebo and checks where they went. Run it for any change to the robot models, the controllers or the simulation.
The Teensy firmware builds with PlatformIO, which isn’t in the dev container. The firmware has a container of its own, .docker/firmware, with PlatformIO 6.2.0 and a compiler, so Docker is all you need. Our script .docker/firmware/run.sh runs a command in that container, here PlatformIO’s pio. When you change the firmware, build both boards, as CI does, because the change has to work on both. From the root folder of your diffbot clone on the PC:
.docker/firmware/run.sh pio run -e teensy31
.docker/firmware/run.sh pio run -e teensy40
The script builds the image first. Later image builds took about 2 seconds on our test PC, because Docker reuses the cached image layers whose inputs haven’t changed. They only show their output when they fail. The script runs the container as your user (id -u and id -g), so the files it writes belong to you. To use other IDs, set LOCAL_UID and LOCAL_GID, for example LOCAL_UID=1001 LOCAL_GID=1001 .docker/firmware/run.sh pio run -e teensy40. The first firmware build downloads the Teensy toolchain, which needs the internet and took about a minute on our test PC. The firmware files land in diffbot_firmware/.pio/build/<board>/, for example firmware.hex, which PJRC’s Teensy Loader can flash. Don’t build in the container and on the PC at the same time: both write to that .pio folder. CI builds the same way.
Or install PlatformIO on your PC, outside the dev container, with its installer script or in a virtual environment. Many Linux distributions don’t allow pip install into the system Python. Then build from your diffbot clone on the PC:
python3 -m venv ~/.venvs/platformio && ~/.venvs/platformio/bin/pip install platformio   # once
cd diffbot_firmware
~/.venvs/platformio/bin/pio run -e teensy31 && ~/.venvs/platformio/bin/pio run -e teensy40
CI runs on every pull request: industrial_ci builds and tests the workspace for Noetic, the firmware is built for both boards, and the dev container image is built.
Pull requests
-
One feature or fix per pull request, on a branch named
feat/…,fix/…,docs/…orchore/…. Keep unrelated changes for another PR. -
Pull requests are squash-merged. The PR title becomes the commit’s subject, so write it as
Area: what changed, for exampleSimulation test: narrower turn checks. Aim for 65 characters or fewer; GitHub adds the PR number. The whole description becomes the commit message, so start it with what changes and why. -
Describe how you tested it: what you ran, on which robot or in simulation, and what you saw. Link the issue with
Closes #N. - Comments explain why the code is the way it is, not what changed or how it used to be. The history belongs in the commit and the PR.
-
Every feature also gets documentation on ros-mobile-robots.com, a new or updated page: open a pull request in ros-mobile-robots.github.io and link it under
## Documentationin the description, asros-mobile-robots/ros-mobile-robots.github.io#N. If a page on ros-mobile-robots.com already explains the change, link that page instead. If nothing user-visible changes, writeNone. The PR description check fails until that section has one of the three. It runs again when you edit the description: look at that new run, because re-running the old one still sees the old text. - Follow REP 103 for units and coordinate frames.
-
Python follows PEP 8 with the settings of ROS 2’s
ament_flake8, with PEP 257 docstrings and type hints. AGENTS.md lists the commands that check it.
AI-assisted contributions
You’re welcome to use AI tools. Whatever produced the code, you’re its author and responsible for it:
- Understand every change and be able to explain it in review, in your own words.
- Build and test it as described above, and report what you actually ran. Don’t claim tests that didn’t run.
- Check that the APIs, parameters, files and links you use exist. Pull requests with invented ones are closed.
- Keep the PR description and your review replies short and specific: what changed, why, and how it was tested.
You don’t need to say whether you used AI. Please don’t add attribution lines for AI tools to commits or pull requests, such as Co-Authored-By: for a tool or “Generated with …”.
License
By contributing, you agree that your contributions are licensed under this repository’s BSD 3-Clause License.
|
|
diffbot repositorydiffbot_base diffbot_bringup diffbot_control diffbot_description diffbot_gazebo diffbot_mbf diffbot_msgs diffbot_navigation diffbot_robot diffbot_slam |
ROS Distro
|
Repository Summary
| Checkout URI | https://github.com/ros-mobile-robots/diffbot.git |
| VCS Type | git |
| VCS Version | noetic-devel |
| Last Updated | 2026-10-30 |
| Dev Status | DEVELOPED |
| Released | RELEASED |
| Contributing |
Help Wanted (-)
Good First Issues (-) Pull Requests to Review (-) |
Packages
| Name | Version |
|---|---|
| diffbot_base | 1.1.0 |
| diffbot_bringup | 1.1.0 |
| diffbot_control | 1.1.0 |
| diffbot_description | 1.1.0 |
| diffbot_gazebo | 1.1.0 |
| diffbot_mbf | 1.1.0 |
| diffbot_msgs | 1.1.0 |
| diffbot_navigation | 1.1.0 |
| diffbot_robot | 1.1.0 |
| diffbot_slam | 1.1.0 |
README
DiffBot
DiffBot is an autonomous differential drive robot with two wheels. Its main processing unit is a Raspberry Pi 4 B running Ubuntu Mate 20.04 and the ROS 1 (ROS Noetic) middleware. This respository contains ROS driver packages, ROS Control Hardware Interface for the real robot and configurations for simulating DiffBot. The formatted documentation can be found at: https://ros-mobile-robots.com.
| DiffBot | Lidar SLAMTEC RPLidar A2 |
|---|---|
|
|
If you are looking for a 3D printable modular base, see the remo_description repository. You can use it directly with the software of this diffbot repository.
| Remo | Gazebo Simulation | RViz |
|---|---|---|
|
|
|
It provides mounts for different camera modules, such as Raspi Cam v2, OAK-1, OAK-D and you can even design your own if you like. There is also support for different single board computers (Raspberry Pi and Nvidia Jetson Nano) through two changable decks. You are agin free to create your own.
Demonstration
SLAM and Navigation
| Real robot | Gazebo Simulation |
|---|---|
|
|
:package: Package Overview
-
diffbot_base: ROS Control hardware interface includingcontroller_managercontrol loop for the real robot. It talks to the Teensy microcontroller, whose firmware is indiffbot_firmware. -
diffbot_bringup: Launch files to bring up the hardware drivers (camera, lidar, imu, ultrasonic, …) for the real DiffBot robot. -
diffbot_control: Configurations for thediff_drive_controllerof ROS Control used in Gazebo simulation and the real robot. -
diffbot_description: URDF description of DiffBot including its sensors. -
diffbot_gazebo: Simulation specific launch and configuration files for DiffBot. -
diffbot_msgs: Message definitions specific to DiffBot, for example the message for encoder data. -
diffbot_navigation: Navigation based onmove_basepackage; launch and configuration files. -
diffbot_slam: Simultaneous localization and mapping using different implementations (e.g., gmapping) to create a map of the environment
Installation
The packages are written for and tested with ROS 1 Noetic on Ubuntu 20.04 Focal Fossa. For the real robot Ubuntu Mate 20.04 for arm64 is installed on the Raspberry Pi 4 B with 4GB. The communication between the mobile robot and the work pc is done by configuring the ROS Network, see also the documentation.
Development Container
The quickest way to a working setup on a development PC is the dev container in .devcontainer/noetic: a Docker image with ROS Noetic, Gazebo 11 and everything the DiffBot packages need. It works on Linux and on Windows with WSL 2, and CI builds the same image.
The full guide is on the documentation site: Use the Dev Container (setup on Linux and Windows, usage, updating, troubleshooting) and How the Dev Container Works.
- VS Code: install the Dev Containers extension, open your clone of this repository and choose Reopen in Container.
- Command line: with the Dev Container CLI:
  devcontainer up --workspace-folder . --config .devcontainer/noetic/devcontainer.json
  devcontainer exec --workspace-folder . --config .devcontainer/noetic/devcontainer.json bash
Creating the container clones rplidar_ros and remo_description, installs missing dependencies with rosdep and builds the workspace in ~/catkin_ws. Your clone of this repository is mounted at ~/catkin_ws/src/diffbot, so edits on the host show up in the container. The container uses the host network to reach the robot.
RViz and Gazebo open on the host’s display. On Windows, WSLg needs no setup. On a native Linux desktop (X11 or Wayland with Xwayland), install xauth on the host (sudo apt install xauth): before the container starts, host-x11.sh copies your display’s X11 cookie to .devcontainer/noetic/.x11/ (ignored by Git), where the container reads it. So xhost + isn’t needed.
Plain Docker works too. The image’s user has UID 1000; with another UID, use the dev container, which adapts it.
docker build -f .devcontainer/noetic/Dockerfile -t diffbot:noetic .
bash .devcontainer/noetic/host-x11.sh
docker run -it --rm --net=host -v /tmp/.X11-unix:/tmp/.X11-unix -e DISPLAY \
  -e XAUTHORITY=/home/ros/catkin_ws/src/diffbot/.devcontainer/noetic/.x11/xauth \
  -v "$PWD":/home/ros/catkin_ws/src/diffbot diffbot:noetic \
  bash -c "bash src/diffbot/.devcontainer/noetic/setup.sh && bash"
To set up a workspace without Docker, for example on the robot’s Raspberry Pi, follow the steps below.
Dependencies
The required Ubuntu packages are listed in software package sections found in the documentation. Other ROS catkin packages such as rplidar_ros need to be cloned into the catkin workspace.
For an automated and simplified dependency installation process install the vcstool, which is used in the next steps.
sudo apt install python3-vcstool
:hammer: How to Build
To build the packages in this repository including the Remo robot follow these steps:
-
cdinto an existing ROS Noetic catkin workspace or create a new one:
mkdir -p catkin_ws/src
- Clone this repository in the
srcfolder of your ROS Noetic catkin workspace:
cd catkin_ws/src
```console
File truncated at 100 lines see the full file
CONTRIBUTING
Contributing to DiffBot
DiffBot and Remo are two differential drive robots for ROS 1 Noetic. This repository has their ROS packages, the Teensy firmware and the dev container. Remo’s robot model is in remo_description, and the documentation is at ros-mobile-robots.com, from ros-mobile-robots.github.io.
Ask questions and get help with your build in Discussions, where the answers stay easy to find. Report bugs and request features as an issue in the repository they affect: diffbot, remo_description for Remo’s model, or ros-mobile-robots.github.io for the documentation. For a larger change, open an issue first, so the approach can be agreed before you write the code. This branch is ROS 1 Noetic; a move to ROS 2 is future work, so please discuss it in an issue first.
The documentation’s Contributing section explains the repositories, the roadmap, the dev container and the automated checks in more detail.
Set up
The quickest working setup is the dev container in .devcontainer/noetic: open your clone in VS Code and choose Reopen in Container. It has ROS Noetic, Gazebo 11 and everything the packages need, clones remo_description, at the version pinned in diffbot_dev.repos, and rplidar_ros, and builds the workspace in ~/catkin_ws. CI builds the same image. Without the container, follow the installation steps in the README.
When the pin moves to a new version, an existing workspace keeps its old checkout of remo_description, because the setup doesn’t replace repositories that are already there. Check out the new version yourself, then build again. If git status shows changes of your own, commit them on a branch first: the checkout would either stop on them or carry them over to the new version.
cd ~/catkin_ws/src/remo_description
git status                                          # no changes of your own?
git fetch --tags
git checkout 2.0.0                                  # the version in diffbot_dev.repos
Build and test
In ~/catkin_ws:
catkin build                                        # build the workspace
source devel/setup.bash
catkin build --catkin-make-args run_tests           # build and run all tests
catkin_test_results build                           # summary: 10 tests, 0 errors, 0 failures
rostest diffbot_gazebo sim_drive_diffbot.test       # one robot's simulation test
The simulation test drives DiffBot and Remo in Gazebo and checks where they went. Run it for any change to the robot models, the controllers or the simulation.
The Teensy firmware builds with PlatformIO, which isn’t in the dev container. The firmware has a container of its own, .docker/firmware, with PlatformIO 6.2.0 and a compiler, so Docker is all you need. Our script .docker/firmware/run.sh runs a command in that container, here PlatformIO’s pio. When you change the firmware, build both boards, as CI does, because the change has to work on both. From the root folder of your diffbot clone on the PC:
.docker/firmware/run.sh pio run -e teensy31
.docker/firmware/run.sh pio run -e teensy40
The script builds the image first. Later image builds took about 2 seconds on our test PC, because Docker reuses the cached image layers whose inputs haven’t changed. They only show their output when they fail. The script runs the container as your user (id -u and id -g), so the files it writes belong to you. To use other IDs, set LOCAL_UID and LOCAL_GID, for example LOCAL_UID=1001 LOCAL_GID=1001 .docker/firmware/run.sh pio run -e teensy40. The first firmware build downloads the Teensy toolchain, which needs the internet and took about a minute on our test PC. The firmware files land in diffbot_firmware/.pio/build/<board>/, for example firmware.hex, which PJRC’s Teensy Loader can flash. Don’t build in the container and on the PC at the same time: both write to that .pio folder. CI builds the same way.
Or install PlatformIO on your PC, outside the dev container, with its installer script or in a virtual environment. Many Linux distributions don’t allow pip install into the system Python. Then build from your diffbot clone on the PC:
python3 -m venv ~/.venvs/platformio && ~/.venvs/platformio/bin/pip install platformio   # once
cd diffbot_firmware
~/.venvs/platformio/bin/pio run -e teensy31 && ~/.venvs/platformio/bin/pio run -e teensy40
CI runs on every pull request: industrial_ci builds and tests the workspace for Noetic, the firmware is built for both boards, and the dev container image is built.
Pull requests
-
One feature or fix per pull request, on a branch named
feat/…,fix/…,docs/…orchore/…. Keep unrelated changes for another PR. -
Pull requests are squash-merged. The PR title becomes the commit’s subject, so write it as
Area: what changed, for exampleSimulation test: narrower turn checks. Aim for 65 characters or fewer; GitHub adds the PR number. The whole description becomes the commit message, so start it with what changes and why. -
Describe how you tested it: what you ran, on which robot or in simulation, and what you saw. Link the issue with
Closes #N. - Comments explain why the code is the way it is, not what changed or how it used to be. The history belongs in the commit and the PR.
-
Every feature also gets documentation on ros-mobile-robots.com, a new or updated page: open a pull request in ros-mobile-robots.github.io and link it under
## Documentationin the description, asros-mobile-robots/ros-mobile-robots.github.io#N. If a page on ros-mobile-robots.com already explains the change, link that page instead. If nothing user-visible changes, writeNone. The PR description check fails until that section has one of the three. It runs again when you edit the description: look at that new run, because re-running the old one still sees the old text. - Follow REP 103 for units and coordinate frames.
-
Python follows PEP 8 with the settings of ROS 2’s
ament_flake8, with PEP 257 docstrings and type hints. AGENTS.md lists the commands that check it.
AI-assisted contributions
You’re welcome to use AI tools. Whatever produced the code, you’re its author and responsible for it:
- Understand every change and be able to explain it in review, in your own words.
- Build and test it as described above, and report what you actually ran. Don’t claim tests that didn’t run.
- Check that the APIs, parameters, files and links you use exist. Pull requests with invented ones are closed.
- Keep the PR description and your review replies short and specific: what changed, why, and how it was tested.
You don’t need to say whether you used AI. Please don’t add attribution lines for AI tools to commits or pull requests, such as Co-Authored-By: for a tool or “Generated with …”.
License
By contributing, you agree that your contributions are licensed under this repository’s BSD 3-Clause License.
|
|
diffbot repositorydiffbot_base diffbot_bringup diffbot_control diffbot_description diffbot_gazebo diffbot_mbf diffbot_msgs diffbot_navigation diffbot_robot diffbot_slam |
ROS Distro
|
Repository Summary
| Checkout URI | https://github.com/ros-mobile-robots/diffbot.git |
| VCS Type | git |
| VCS Version | noetic-devel |
| Last Updated | 2026-10-30 |
| Dev Status | DEVELOPED |
| Released | RELEASED |
| Contributing |
Help Wanted (-)
Good First Issues (-) Pull Requests to Review (-) |
Packages
| Name | Version |
|---|---|
| diffbot_base | 1.1.0 |
| diffbot_bringup | 1.1.0 |
| diffbot_control | 1.1.0 |
| diffbot_description | 1.1.0 |
| diffbot_gazebo | 1.1.0 |
| diffbot_mbf | 1.1.0 |
| diffbot_msgs | 1.1.0 |
| diffbot_navigation | 1.1.0 |
| diffbot_robot | 1.1.0 |
| diffbot_slam | 1.1.0 |
README
DiffBot
DiffBot is an autonomous differential drive robot with two wheels. Its main processing unit is a Raspberry Pi 4 B running Ubuntu Mate 20.04 and the ROS 1 (ROS Noetic) middleware. This respository contains ROS driver packages, ROS Control Hardware Interface for the real robot and configurations for simulating DiffBot. The formatted documentation can be found at: https://ros-mobile-robots.com.
| DiffBot | Lidar SLAMTEC RPLidar A2 |
|---|---|
|
|
If you are looking for a 3D printable modular base, see the remo_description repository. You can use it directly with the software of this diffbot repository.
| Remo | Gazebo Simulation | RViz |
|---|---|---|
|
|
|
It provides mounts for different camera modules, such as Raspi Cam v2, OAK-1, OAK-D and you can even design your own if you like. There is also support for different single board computers (Raspberry Pi and Nvidia Jetson Nano) through two changable decks. You are agin free to create your own.
Demonstration
SLAM and Navigation
| Real robot | Gazebo Simulation |
|---|---|
|
|
:package: Package Overview
-
diffbot_base: ROS Control hardware interface includingcontroller_managercontrol loop for the real robot. It talks to the Teensy microcontroller, whose firmware is indiffbot_firmware. -
diffbot_bringup: Launch files to bring up the hardware drivers (camera, lidar, imu, ultrasonic, …) for the real DiffBot robot. -
diffbot_control: Configurations for thediff_drive_controllerof ROS Control used in Gazebo simulation and the real robot. -
diffbot_description: URDF description of DiffBot including its sensors. -
diffbot_gazebo: Simulation specific launch and configuration files for DiffBot. -
diffbot_msgs: Message definitions specific to DiffBot, for example the message for encoder data. -
diffbot_navigation: Navigation based onmove_basepackage; launch and configuration files. -
diffbot_slam: Simultaneous localization and mapping using different implementations (e.g., gmapping) to create a map of the environment
Installation
The packages are written for and tested with ROS 1 Noetic on Ubuntu 20.04 Focal Fossa. For the real robot Ubuntu Mate 20.04 for arm64 is installed on the Raspberry Pi 4 B with 4GB. The communication between the mobile robot and the work pc is done by configuring the ROS Network, see also the documentation.
Development Container
The quickest way to a working setup on a development PC is the dev container in .devcontainer/noetic: a Docker image with ROS Noetic, Gazebo 11 and everything the DiffBot packages need. It works on Linux and on Windows with WSL 2, and CI builds the same image.
The full guide is on the documentation site: Use the Dev Container (setup on Linux and Windows, usage, updating, troubleshooting) and How the Dev Container Works.
- VS Code: install the Dev Containers extension, open your clone of this repository and choose Reopen in Container.
- Command line: with the Dev Container CLI:
  devcontainer up --workspace-folder . --config .devcontainer/noetic/devcontainer.json
  devcontainer exec --workspace-folder . --config .devcontainer/noetic/devcontainer.json bash
Creating the container clones rplidar_ros and remo_description, installs missing dependencies with rosdep and builds the workspace in ~/catkin_ws. Your clone of this repository is mounted at ~/catkin_ws/src/diffbot, so edits on the host show up in the container. The container uses the host network to reach the robot.
RViz and Gazebo open on the host’s display. On Windows, WSLg needs no setup. On a native Linux desktop (X11 or Wayland with Xwayland), install xauth on the host (sudo apt install xauth): before the container starts, host-x11.sh copies your display’s X11 cookie to .devcontainer/noetic/.x11/ (ignored by Git), where the container reads it. So xhost + isn’t needed.
Plain Docker works too. The image’s user has UID 1000; with another UID, use the dev container, which adapts it.
docker build -f .devcontainer/noetic/Dockerfile -t diffbot:noetic .
bash .devcontainer/noetic/host-x11.sh
docker run -it --rm --net=host -v /tmp/.X11-unix:/tmp/.X11-unix -e DISPLAY \
  -e XAUTHORITY=/home/ros/catkin_ws/src/diffbot/.devcontainer/noetic/.x11/xauth \
  -v "$PWD":/home/ros/catkin_ws/src/diffbot diffbot:noetic \
  bash -c "bash src/diffbot/.devcontainer/noetic/setup.sh && bash"
To set up a workspace without Docker, for example on the robot’s Raspberry Pi, follow the steps below.
Dependencies
The required Ubuntu packages are listed in software package sections found in the documentation. Other ROS catkin packages such as rplidar_ros need to be cloned into the catkin workspace.
For an automated and simplified dependency installation process install the vcstool, which is used in the next steps.
sudo apt install python3-vcstool
:hammer: How to Build
To build the packages in this repository including the Remo robot follow these steps:
-
cdinto an existing ROS Noetic catkin workspace or create a new one:
mkdir -p catkin_ws/src
- Clone this repository in the
srcfolder of your ROS Noetic catkin workspace:
cd catkin_ws/src
```console
File truncated at 100 lines see the full file
CONTRIBUTING
Contributing to DiffBot
DiffBot and Remo are two differential drive robots for ROS 1 Noetic. This repository has their ROS packages, the Teensy firmware and the dev container. Remo’s robot model is in remo_description, and the documentation is at ros-mobile-robots.com, from ros-mobile-robots.github.io.
Ask questions and get help with your build in Discussions, where the answers stay easy to find. Report bugs and request features as an issue in the repository they affect: diffbot, remo_description for Remo’s model, or ros-mobile-robots.github.io for the documentation. For a larger change, open an issue first, so the approach can be agreed before you write the code. This branch is ROS 1 Noetic; a move to ROS 2 is future work, so please discuss it in an issue first.
The documentation’s Contributing section explains the repositories, the roadmap, the dev container and the automated checks in more detail.
Set up
The quickest working setup is the dev container in .devcontainer/noetic: open your clone in VS Code and choose Reopen in Container. It has ROS Noetic, Gazebo 11 and everything the packages need, clones remo_description, at the version pinned in diffbot_dev.repos, and rplidar_ros, and builds the workspace in ~/catkin_ws. CI builds the same image. Without the container, follow the installation steps in the README.
When the pin moves to a new version, an existing workspace keeps its old checkout of remo_description, because the setup doesn’t replace repositories that are already there. Check out the new version yourself, then build again. If git status shows changes of your own, commit them on a branch first: the checkout would either stop on them or carry them over to the new version.
cd ~/catkin_ws/src/remo_description
git status                                          # no changes of your own?
git fetch --tags
git checkout 2.0.0                                  # the version in diffbot_dev.repos
Build and test
In ~/catkin_ws:
catkin build                                        # build the workspace
source devel/setup.bash
catkin build --catkin-make-args run_tests           # build and run all tests
catkin_test_results build                           # summary: 10 tests, 0 errors, 0 failures
rostest diffbot_gazebo sim_drive_diffbot.test       # one robot's simulation test
The simulation test drives DiffBot and Remo in Gazebo and checks where they went. Run it for any change to the robot models, the controllers or the simulation.
The Teensy firmware builds with PlatformIO, which isn’t in the dev container. The firmware has a container of its own, .docker/firmware, with PlatformIO 6.2.0 and a compiler, so Docker is all you need. Our script .docker/firmware/run.sh runs a command in that container, here PlatformIO’s pio. When you change the firmware, build both boards, as CI does, because the change has to work on both. From the root folder of your diffbot clone on the PC:
.docker/firmware/run.sh pio run -e teensy31
.docker/firmware/run.sh pio run -e teensy40
The script builds the image first. Later image builds took about 2 seconds on our test PC, because Docker reuses the cached image layers whose inputs haven’t changed. They only show their output when they fail. The script runs the container as your user (id -u and id -g), so the files it writes belong to you. To use other IDs, set LOCAL_UID and LOCAL_GID, for example LOCAL_UID=1001 LOCAL_GID=1001 .docker/firmware/run.sh pio run -e teensy40. The first firmware build downloads the Teensy toolchain, which needs the internet and took about a minute on our test PC. The firmware files land in diffbot_firmware/.pio/build/<board>/, for example firmware.hex, which PJRC’s Teensy Loader can flash. Don’t build in the container and on the PC at the same time: both write to that .pio folder. CI builds the same way.
Or install PlatformIO on your PC, outside the dev container, with its installer script or in a virtual environment. Many Linux distributions don’t allow pip install into the system Python. Then build from your diffbot clone on the PC:
python3 -m venv ~/.venvs/platformio && ~/.venvs/platformio/bin/pip install platformio   # once
cd diffbot_firmware
~/.venvs/platformio/bin/pio run -e teensy31 && ~/.venvs/platformio/bin/pio run -e teensy40
CI runs on every pull request: industrial_ci builds and tests the workspace for Noetic, the firmware is built for both boards, and the dev container image is built.
Pull requests
-
One feature or fix per pull request, on a branch named
feat/…,fix/…,docs/…orchore/…. Keep unrelated changes for another PR. -
Pull requests are squash-merged. The PR title becomes the commit’s subject, so write it as
Area: what changed, for exampleSimulation test: narrower turn checks. Aim for 65 characters or fewer; GitHub adds the PR number. The whole description becomes the commit message, so start it with what changes and why. -
Describe how you tested it: what you ran, on which robot or in simulation, and what you saw. Link the issue with
Closes #N. - Comments explain why the code is the way it is, not what changed or how it used to be. The history belongs in the commit and the PR.
-
Every feature also gets documentation on ros-mobile-robots.com, a new or updated page: open a pull request in ros-mobile-robots.github.io and link it under
## Documentationin the description, asros-mobile-robots/ros-mobile-robots.github.io#N. If a page on ros-mobile-robots.com already explains the change, link that page instead. If nothing user-visible changes, writeNone. The PR description check fails until that section has one of the three. It runs again when you edit the description: look at that new run, because re-running the old one still sees the old text. - Follow REP 103 for units and coordinate frames.
-
Python follows PEP 8 with the settings of ROS 2’s
ament_flake8, with PEP 257 docstrings and type hints. AGENTS.md lists the commands that check it.
AI-assisted contributions
You’re welcome to use AI tools. Whatever produced the code, you’re its author and responsible for it:
- Understand every change and be able to explain it in review, in your own words.
- Build and test it as described above, and report what you actually ran. Don’t claim tests that didn’t run.
- Check that the APIs, parameters, files and links you use exist. Pull requests with invented ones are closed.
- Keep the PR description and your review replies short and specific: what changed, why, and how it was tested.
You don’t need to say whether you used AI. Please don’t add attribution lines for AI tools to commits or pull requests, such as Co-Authored-By: for a tool or “Generated with …”.
License
By contributing, you agree that your contributions are licensed under this repository’s BSD 3-Clause License.
|
|
diffbot repositorydiffbot_base diffbot_bringup diffbot_control diffbot_description diffbot_gazebo diffbot_mbf diffbot_msgs diffbot_navigation diffbot_robot diffbot_slam |
ROS Distro
|
Repository Summary
| Checkout URI | https://github.com/ros-mobile-robots/diffbot.git |
| VCS Type | git |
| VCS Version | noetic-devel |
| Last Updated | 2026-10-30 |
| Dev Status | DEVELOPED |
| Released | RELEASED |
| Contributing |
Help Wanted (-)
Good First Issues (-) Pull Requests to Review (-) |
Packages
| Name | Version |
|---|---|
| diffbot_base | 1.1.0 |
| diffbot_bringup | 1.1.0 |
| diffbot_control | 1.1.0 |
| diffbot_description | 1.1.0 |
| diffbot_gazebo | 1.1.0 |
| diffbot_mbf | 1.1.0 |
| diffbot_msgs | 1.1.0 |
| diffbot_navigation | 1.1.0 |
| diffbot_robot | 1.1.0 |
| diffbot_slam | 1.1.0 |
README
DiffBot
DiffBot is an autonomous differential drive robot with two wheels. Its main processing unit is a Raspberry Pi 4 B running Ubuntu Mate 20.04 and the ROS 1 (ROS Noetic) middleware. This respository contains ROS driver packages, ROS Control Hardware Interface for the real robot and configurations for simulating DiffBot. The formatted documentation can be found at: https://ros-mobile-robots.com.
| DiffBot | Lidar SLAMTEC RPLidar A2 |
|---|---|
|
|
If you are looking for a 3D printable modular base, see the remo_description repository. You can use it directly with the software of this diffbot repository.
| Remo | Gazebo Simulation | RViz |
|---|---|---|
|
|
|
It provides mounts for different camera modules, such as Raspi Cam v2, OAK-1, OAK-D and you can even design your own if you like. There is also support for different single board computers (Raspberry Pi and Nvidia Jetson Nano) through two changable decks. You are agin free to create your own.
Demonstration
SLAM and Navigation
| Real robot | Gazebo Simulation |
|---|---|
|
|
:package: Package Overview
-
diffbot_base: ROS Control hardware interface includingcontroller_managercontrol loop for the real robot. It talks to the Teensy microcontroller, whose firmware is indiffbot_firmware. -
diffbot_bringup: Launch files to bring up the hardware drivers (camera, lidar, imu, ultrasonic, …) for the real DiffBot robot. -
diffbot_control: Configurations for thediff_drive_controllerof ROS Control used in Gazebo simulation and the real robot. -
diffbot_description: URDF description of DiffBot including its sensors. -
diffbot_gazebo: Simulation specific launch and configuration files for DiffBot. -
diffbot_msgs: Message definitions specific to DiffBot, for example the message for encoder data. -
diffbot_navigation: Navigation based onmove_basepackage; launch and configuration files. -
diffbot_slam: Simultaneous localization and mapping using different implementations (e.g., gmapping) to create a map of the environment
Installation
The packages are written for and tested with ROS 1 Noetic on Ubuntu 20.04 Focal Fossa. For the real robot Ubuntu Mate 20.04 for arm64 is installed on the Raspberry Pi 4 B with 4GB. The communication between the mobile robot and the work pc is done by configuring the ROS Network, see also the documentation.
Development Container
The quickest way to a working setup on a development PC is the dev container in .devcontainer/noetic: a Docker image with ROS Noetic, Gazebo 11 and everything the DiffBot packages need. It works on Linux and on Windows with WSL 2, and CI builds the same image.
The full guide is on the documentation site: Use the Dev Container (setup on Linux and Windows, usage, updating, troubleshooting) and How the Dev Container Works.
- VS Code: install the Dev Containers extension, open your clone of this repository and choose Reopen in Container.
- Command line: with the Dev Container CLI:
  devcontainer up --workspace-folder . --config .devcontainer/noetic/devcontainer.json
  devcontainer exec --workspace-folder . --config .devcontainer/noetic/devcontainer.json bash
Creating the container clones rplidar_ros and remo_description, installs missing dependencies with rosdep and builds the workspace in ~/catkin_ws. Your clone of this repository is mounted at ~/catkin_ws/src/diffbot, so edits on the host show up in the container. The container uses the host network to reach the robot.
RViz and Gazebo open on the host’s display. On Windows, WSLg needs no setup. On a native Linux desktop (X11 or Wayland with Xwayland), install xauth on the host (sudo apt install xauth): before the container starts, host-x11.sh copies your display’s X11 cookie to .devcontainer/noetic/.x11/ (ignored by Git), where the container reads it. So xhost + isn’t needed.
Plain Docker works too. The image’s user has UID 1000; with another UID, use the dev container, which adapts it.
docker build -f .devcontainer/noetic/Dockerfile -t diffbot:noetic .
bash .devcontainer/noetic/host-x11.sh
docker run -it --rm --net=host -v /tmp/.X11-unix:/tmp/.X11-unix -e DISPLAY \
  -e XAUTHORITY=/home/ros/catkin_ws/src/diffbot/.devcontainer/noetic/.x11/xauth \
  -v "$PWD":/home/ros/catkin_ws/src/diffbot diffbot:noetic \
  bash -c "bash src/diffbot/.devcontainer/noetic/setup.sh && bash"
To set up a workspace without Docker, for example on the robot’s Raspberry Pi, follow the steps below.
Dependencies
The required Ubuntu packages are listed in software package sections found in the documentation. Other ROS catkin packages such as rplidar_ros need to be cloned into the catkin workspace.
For an automated and simplified dependency installation process install the vcstool, which is used in the next steps.
sudo apt install python3-vcstool
:hammer: How to Build
To build the packages in this repository including the Remo robot follow these steps:
-
cdinto an existing ROS Noetic catkin workspace or create a new one:
mkdir -p catkin_ws/src
- Clone this repository in the
srcfolder of your ROS Noetic catkin workspace:
cd catkin_ws/src
```console
File truncated at 100 lines see the full file
CONTRIBUTING
Contributing to DiffBot
DiffBot and Remo are two differential drive robots for ROS 1 Noetic. This repository has their ROS packages, the Teensy firmware and the dev container. Remo’s robot model is in remo_description, and the documentation is at ros-mobile-robots.com, from ros-mobile-robots.github.io.
Ask questions and get help with your build in Discussions, where the answers stay easy to find. Report bugs and request features as an issue in the repository they affect: diffbot, remo_description for Remo’s model, or ros-mobile-robots.github.io for the documentation. For a larger change, open an issue first, so the approach can be agreed before you write the code. This branch is ROS 1 Noetic; a move to ROS 2 is future work, so please discuss it in an issue first.
The documentation’s Contributing section explains the repositories, the roadmap, the dev container and the automated checks in more detail.
Set up
The quickest working setup is the dev container in .devcontainer/noetic: open your clone in VS Code and choose Reopen in Container. It has ROS Noetic, Gazebo 11 and everything the packages need, clones remo_description, at the version pinned in diffbot_dev.repos, and rplidar_ros, and builds the workspace in ~/catkin_ws. CI builds the same image. Without the container, follow the installation steps in the README.
When the pin moves to a new version, an existing workspace keeps its old checkout of remo_description, because the setup doesn’t replace repositories that are already there. Check out the new version yourself, then build again. If git status shows changes of your own, commit them on a branch first: the checkout would either stop on them or carry them over to the new version.
cd ~/catkin_ws/src/remo_description
git status                                          # no changes of your own?
git fetch --tags
git checkout 2.0.0                                  # the version in diffbot_dev.repos
Build and test
In ~/catkin_ws:
catkin build                                        # build the workspace
source devel/setup.bash
catkin build --catkin-make-args run_tests           # build and run all tests
catkin_test_results build                           # summary: 10 tests, 0 errors, 0 failures
rostest diffbot_gazebo sim_drive_diffbot.test       # one robot's simulation test
The simulation test drives DiffBot and Remo in Gazebo and checks where they went. Run it for any change to the robot models, the controllers or the simulation.
The Teensy firmware builds with PlatformIO, which isn’t in the dev container. The firmware has a container of its own, .docker/firmware, with PlatformIO 6.2.0 and a compiler, so Docker is all you need. Our script .docker/firmware/run.sh runs a command in that container, here PlatformIO’s pio. When you change the firmware, build both boards, as CI does, because the change has to work on both. From the root folder of your diffbot clone on the PC:
.docker/firmware/run.sh pio run -e teensy31
.docker/firmware/run.sh pio run -e teensy40
The script builds the image first. Later image builds took about 2 seconds on our test PC, because Docker reuses the cached image layers whose inputs haven’t changed. They only show their output when they fail. The script runs the container as your user (id -u and id -g), so the files it writes belong to you. To use other IDs, set LOCAL_UID and LOCAL_GID, for example LOCAL_UID=1001 LOCAL_GID=1001 .docker/firmware/run.sh pio run -e teensy40. The first firmware build downloads the Teensy toolchain, which needs the internet and took about a minute on our test PC. The firmware files land in diffbot_firmware/.pio/build/<board>/, for example firmware.hex, which PJRC’s Teensy Loader can flash. Don’t build in the container and on the PC at the same time: both write to that .pio folder. CI builds the same way.
Or install PlatformIO on your PC, outside the dev container, with its installer script or in a virtual environment. Many Linux distributions don’t allow pip install into the system Python. Then build from your diffbot clone on the PC:
python3 -m venv ~/.venvs/platformio && ~/.venvs/platformio/bin/pip install platformio   # once
cd diffbot_firmware
~/.venvs/platformio/bin/pio run -e teensy31 && ~/.venvs/platformio/bin/pio run -e teensy40
CI runs on every pull request: industrial_ci builds and tests the workspace for Noetic, the firmware is built for both boards, and the dev container image is built.
Pull requests
-
One feature or fix per pull request, on a branch named
feat/…,fix/…,docs/…orchore/…. Keep unrelated changes for another PR. -
Pull requests are squash-merged. The PR title becomes the commit’s subject, so write it as
Area: what changed, for exampleSimulation test: narrower turn checks. Aim for 65 characters or fewer; GitHub adds the PR number. The whole description becomes the commit message, so start it with what changes and why. -
Describe how you tested it: what you ran, on which robot or in simulation, and what you saw. Link the issue with
Closes #N. - Comments explain why the code is the way it is, not what changed or how it used to be. The history belongs in the commit and the PR.
-
Every feature also gets documentation on ros-mobile-robots.com, a new or updated page: open a pull request in ros-mobile-robots.github.io and link it under
## Documentationin the description, asros-mobile-robots/ros-mobile-robots.github.io#N. If a page on ros-mobile-robots.com already explains the change, link that page instead. If nothing user-visible changes, writeNone. The PR description check fails until that section has one of the three. It runs again when you edit the description: look at that new run, because re-running the old one still sees the old text. - Follow REP 103 for units and coordinate frames.
-
Python follows PEP 8 with the settings of ROS 2’s
ament_flake8, with PEP 257 docstrings and type hints. AGENTS.md lists the commands that check it.
AI-assisted contributions
You’re welcome to use AI tools. Whatever produced the code, you’re its author and responsible for it:
- Understand every change and be able to explain it in review, in your own words.
- Build and test it as described above, and report what you actually ran. Don’t claim tests that didn’t run.
- Check that the APIs, parameters, files and links you use exist. Pull requests with invented ones are closed.
- Keep the PR description and your review replies short and specific: what changed, why, and how it was tested.
You don’t need to say whether you used AI. Please don’t add attribution lines for AI tools to commits or pull requests, such as Co-Authored-By: for a tool or “Generated with …”.
License
By contributing, you agree that your contributions are licensed under this repository’s BSD 3-Clause License.
|
|
diffbot repositorydiffbot_base diffbot_bringup diffbot_control diffbot_description diffbot_gazebo diffbot_mbf diffbot_msgs diffbot_navigation diffbot_robot diffbot_slam |
ROS Distro
|
Repository Summary
| Checkout URI | https://github.com/ros-mobile-robots/diffbot.git |
| VCS Type | git |
| VCS Version | noetic-devel |
| Last Updated | 2026-10-30 |
| Dev Status | DEVELOPED |
| Released | RELEASED |
| Contributing |
Help Wanted (-)
Good First Issues (-) Pull Requests to Review (-) |
Packages
| Name | Version |
|---|---|
| diffbot_base | 1.1.0 |
| diffbot_bringup | 1.1.0 |
| diffbot_control | 1.1.0 |
| diffbot_description | 1.1.0 |
| diffbot_gazebo | 1.1.0 |
| diffbot_mbf | 1.1.0 |
| diffbot_msgs | 1.1.0 |
| diffbot_navigation | 1.1.0 |
| diffbot_robot | 1.1.0 |
| diffbot_slam | 1.1.0 |
README
DiffBot
DiffBot is an autonomous differential drive robot with two wheels. Its main processing unit is a Raspberry Pi 4 B running Ubuntu Mate 20.04 and the ROS 1 (ROS Noetic) middleware. This respository contains ROS driver packages, ROS Control Hardware Interface for the real robot and configurations for simulating DiffBot. The formatted documentation can be found at: https://ros-mobile-robots.com.
| DiffBot | Lidar SLAMTEC RPLidar A2 |
|---|---|
|
|
If you are looking for a 3D printable modular base, see the remo_description repository. You can use it directly with the software of this diffbot repository.
| Remo | Gazebo Simulation | RViz |
|---|---|---|
|
|
|
It provides mounts for different camera modules, such as Raspi Cam v2, OAK-1, OAK-D and you can even design your own if you like. There is also support for different single board computers (Raspberry Pi and Nvidia Jetson Nano) through two changable decks. You are agin free to create your own.
Demonstration
SLAM and Navigation
| Real robot | Gazebo Simulation |
|---|---|
|
|
:package: Package Overview
-
diffbot_base: ROS Control hardware interface includingcontroller_managercontrol loop for the real robot. It talks to the Teensy microcontroller, whose firmware is indiffbot_firmware. -
diffbot_bringup: Launch files to bring up the hardware drivers (camera, lidar, imu, ultrasonic, …) for the real DiffBot robot. -
diffbot_control: Configurations for thediff_drive_controllerof ROS Control used in Gazebo simulation and the real robot. -
diffbot_description: URDF description of DiffBot including its sensors. -
diffbot_gazebo: Simulation specific launch and configuration files for DiffBot. -
diffbot_msgs: Message definitions specific to DiffBot, for example the message for encoder data. -
diffbot_navigation: Navigation based onmove_basepackage; launch and configuration files. -
diffbot_slam: Simultaneous localization and mapping using different implementations (e.g., gmapping) to create a map of the environment
Installation
The packages are written for and tested with ROS 1 Noetic on Ubuntu 20.04 Focal Fossa. For the real robot Ubuntu Mate 20.04 for arm64 is installed on the Raspberry Pi 4 B with 4GB. The communication between the mobile robot and the work pc is done by configuring the ROS Network, see also the documentation.
Development Container
The quickest way to a working setup on a development PC is the dev container in .devcontainer/noetic: a Docker image with ROS Noetic, Gazebo 11 and everything the DiffBot packages need. It works on Linux and on Windows with WSL 2, and CI builds the same image.
The full guide is on the documentation site: Use the Dev Container (setup on Linux and Windows, usage, updating, troubleshooting) and How the Dev Container Works.
- VS Code: install the Dev Containers extension, open your clone of this repository and choose Reopen in Container.
- Command line: with the Dev Container CLI:
  devcontainer up --workspace-folder . --config .devcontainer/noetic/devcontainer.json
  devcontainer exec --workspace-folder . --config .devcontainer/noetic/devcontainer.json bash
Creating the container clones rplidar_ros and remo_description, installs missing dependencies with rosdep and builds the workspace in ~/catkin_ws. Your clone of this repository is mounted at ~/catkin_ws/src/diffbot, so edits on the host show up in the container. The container uses the host network to reach the robot.
RViz and Gazebo open on the host’s display. On Windows, WSLg needs no setup. On a native Linux desktop (X11 or Wayland with Xwayland), install xauth on the host (sudo apt install xauth): before the container starts, host-x11.sh copies your display’s X11 cookie to .devcontainer/noetic/.x11/ (ignored by Git), where the container reads it. So xhost + isn’t needed.
Plain Docker works too. The image’s user has UID 1000; with another UID, use the dev container, which adapts it.
docker build -f .devcontainer/noetic/Dockerfile -t diffbot:noetic .
bash .devcontainer/noetic/host-x11.sh
docker run -it --rm --net=host -v /tmp/.X11-unix:/tmp/.X11-unix -e DISPLAY \
  -e XAUTHORITY=/home/ros/catkin_ws/src/diffbot/.devcontainer/noetic/.x11/xauth \
  -v "$PWD":/home/ros/catkin_ws/src/diffbot diffbot:noetic \
  bash -c "bash src/diffbot/.devcontainer/noetic/setup.sh && bash"
To set up a workspace without Docker, for example on the robot’s Raspberry Pi, follow the steps below.
Dependencies
The required Ubuntu packages are listed in software package sections found in the documentation. Other ROS catkin packages such as rplidar_ros need to be cloned into the catkin workspace.
For an automated and simplified dependency installation process install the vcstool, which is used in the next steps.
sudo apt install python3-vcstool
:hammer: How to Build
To build the packages in this repository including the Remo robot follow these steps:
-
cdinto an existing ROS Noetic catkin workspace or create a new one:
mkdir -p catkin_ws/src
- Clone this repository in the
srcfolder of your ROS Noetic catkin workspace:
cd catkin_ws/src
```console
File truncated at 100 lines see the full file
CONTRIBUTING
Contributing to DiffBot
DiffBot and Remo are two differential drive robots for ROS 1 Noetic. This repository has their ROS packages, the Teensy firmware and the dev container. Remo’s robot model is in remo_description, and the documentation is at ros-mobile-robots.com, from ros-mobile-robots.github.io.
Ask questions and get help with your build in Discussions, where the answers stay easy to find. Report bugs and request features as an issue in the repository they affect: diffbot, remo_description for Remo’s model, or ros-mobile-robots.github.io for the documentation. For a larger change, open an issue first, so the approach can be agreed before you write the code. This branch is ROS 1 Noetic; a move to ROS 2 is future work, so please discuss it in an issue first.
The documentation’s Contributing section explains the repositories, the roadmap, the dev container and the automated checks in more detail.
Set up
The quickest working setup is the dev container in .devcontainer/noetic: open your clone in VS Code and choose Reopen in Container. It has ROS Noetic, Gazebo 11 and everything the packages need, clones remo_description, at the version pinned in diffbot_dev.repos, and rplidar_ros, and builds the workspace in ~/catkin_ws. CI builds the same image. Without the container, follow the installation steps in the README.
When the pin moves to a new version, an existing workspace keeps its old checkout of remo_description, because the setup doesn’t replace repositories that are already there. Check out the new version yourself, then build again. If git status shows changes of your own, commit them on a branch first: the checkout would either stop on them or carry them over to the new version.
cd ~/catkin_ws/src/remo_description
git status                                          # no changes of your own?
git fetch --tags
git checkout 2.0.0                                  # the version in diffbot_dev.repos
Build and test
In ~/catkin_ws:
catkin build                                        # build the workspace
source devel/setup.bash
catkin build --catkin-make-args run_tests           # build and run all tests
catkin_test_results build                           # summary: 10 tests, 0 errors, 0 failures
rostest diffbot_gazebo sim_drive_diffbot.test       # one robot's simulation test
The simulation test drives DiffBot and Remo in Gazebo and checks where they went. Run it for any change to the robot models, the controllers or the simulation.
The Teensy firmware builds with PlatformIO, which isn’t in the dev container. The firmware has a container of its own, .docker/firmware, with PlatformIO 6.2.0 and a compiler, so Docker is all you need. Our script .docker/firmware/run.sh runs a command in that container, here PlatformIO’s pio. When you change the firmware, build both boards, as CI does, because the change has to work on both. From the root folder of your diffbot clone on the PC:
.docker/firmware/run.sh pio run -e teensy31
.docker/firmware/run.sh pio run -e teensy40
The script builds the image first. Later image builds took about 2 seconds on our test PC, because Docker reuses the cached image layers whose inputs haven’t changed. They only show their output when they fail. The script runs the container as your user (id -u and id -g), so the files it writes belong to you. To use other IDs, set LOCAL_UID and LOCAL_GID, for example LOCAL_UID=1001 LOCAL_GID=1001 .docker/firmware/run.sh pio run -e teensy40. The first firmware build downloads the Teensy toolchain, which needs the internet and took about a minute on our test PC. The firmware files land in diffbot_firmware/.pio/build/<board>/, for example firmware.hex, which PJRC’s Teensy Loader can flash. Don’t build in the container and on the PC at the same time: both write to that .pio folder. CI builds the same way.
Or install PlatformIO on your PC, outside the dev container, with its installer script or in a virtual environment. Many Linux distributions don’t allow pip install into the system Python. Then build from your diffbot clone on the PC:
python3 -m venv ~/.venvs/platformio && ~/.venvs/platformio/bin/pip install platformio   # once
cd diffbot_firmware
~/.venvs/platformio/bin/pio run -e teensy31 && ~/.venvs/platformio/bin/pio run -e teensy40
CI runs on every pull request: industrial_ci builds and tests the workspace for Noetic, the firmware is built for both boards, and the dev container image is built.
Pull requests
-
One feature or fix per pull request, on a branch named
feat/…,fix/…,docs/…orchore/…. Keep unrelated changes for another PR. -
Pull requests are squash-merged. The PR title becomes the commit’s subject, so write it as
Area: what changed, for exampleSimulation test: narrower turn checks. Aim for 65 characters or fewer; GitHub adds the PR number. The whole description becomes the commit message, so start it with what changes and why. -
Describe how you tested it: what you ran, on which robot or in simulation, and what you saw. Link the issue with
Closes #N. - Comments explain why the code is the way it is, not what changed or how it used to be. The history belongs in the commit and the PR.
-
Every feature also gets documentation on ros-mobile-robots.com, a new or updated page: open a pull request in ros-mobile-robots.github.io and link it under
## Documentationin the description, asros-mobile-robots/ros-mobile-robots.github.io#N. If a page on ros-mobile-robots.com already explains the change, link that page instead. If nothing user-visible changes, writeNone. The PR description check fails until that section has one of the three. It runs again when you edit the description: look at that new run, because re-running the old one still sees the old text. - Follow REP 103 for units and coordinate frames.
-
Python follows PEP 8 with the settings of ROS 2’s
ament_flake8, with PEP 257 docstrings and type hints. AGENTS.md lists the commands that check it.
AI-assisted contributions
You’re welcome to use AI tools. Whatever produced the code, you’re its author and responsible for it:
- Understand every change and be able to explain it in review, in your own words.
- Build and test it as described above, and report what you actually ran. Don’t claim tests that didn’t run.
- Check that the APIs, parameters, files and links you use exist. Pull requests with invented ones are closed.
- Keep the PR description and your review replies short and specific: what changed, why, and how it was tested.
You don’t need to say whether you used AI. Please don’t add attribution lines for AI tools to commits or pull requests, such as Co-Authored-By: for a tool or “Generated with …”.
License
By contributing, you agree that your contributions are licensed under this repository’s BSD 3-Clause License.
|
|
diffbot repositorydiffbot_base diffbot_bringup diffbot_control diffbot_description diffbot_gazebo diffbot_mbf diffbot_msgs diffbot_navigation diffbot_robot diffbot_slam |
ROS Distro
|
Repository Summary
| Checkout URI | https://github.com/ros-mobile-robots/diffbot.git |
| VCS Type | git |
| VCS Version | noetic-devel |
| Last Updated | 2026-10-30 |
| Dev Status | DEVELOPED |
| Released | RELEASED |
| Contributing |
Help Wanted (-)
Good First Issues (-) Pull Requests to Review (-) |
Packages
| Name | Version |
|---|---|
| diffbot_base | 1.1.0 |
| diffbot_bringup | 1.1.0 |
| diffbot_control | 1.1.0 |
| diffbot_description | 1.1.0 |
| diffbot_gazebo | 1.1.0 |
| diffbot_mbf | 1.1.0 |
| diffbot_msgs | 1.1.0 |
| diffbot_navigation | 1.1.0 |
| diffbot_robot | 1.1.0 |
| diffbot_slam | 1.1.0 |
README
DiffBot
DiffBot is an autonomous differential drive robot with two wheels. Its main processing unit is a Raspberry Pi 4 B running Ubuntu Mate 20.04 and the ROS 1 (ROS Noetic) middleware. This respository contains ROS driver packages, ROS Control Hardware Interface for the real robot and configurations for simulating DiffBot. The formatted documentation can be found at: https://ros-mobile-robots.com.
| DiffBot | Lidar SLAMTEC RPLidar A2 |
|---|---|
|
|
If you are looking for a 3D printable modular base, see the remo_description repository. You can use it directly with the software of this diffbot repository.
| Remo | Gazebo Simulation | RViz |
|---|---|---|
|
|
|
It provides mounts for different camera modules, such as Raspi Cam v2, OAK-1, OAK-D and you can even design your own if you like. There is also support for different single board computers (Raspberry Pi and Nvidia Jetson Nano) through two changable decks. You are agin free to create your own.
Demonstration
SLAM and Navigation
| Real robot | Gazebo Simulation |
|---|---|
|
|
:package: Package Overview
-
diffbot_base: ROS Control hardware interface includingcontroller_managercontrol loop for the real robot. It talks to the Teensy microcontroller, whose firmware is indiffbot_firmware. -
diffbot_bringup: Launch files to bring up the hardware drivers (camera, lidar, imu, ultrasonic, …) for the real DiffBot robot. -
diffbot_control: Configurations for thediff_drive_controllerof ROS Control used in Gazebo simulation and the real robot. -
diffbot_description: URDF description of DiffBot including its sensors. -
diffbot_gazebo: Simulation specific launch and configuration files for DiffBot. -
diffbot_msgs: Message definitions specific to DiffBot, for example the message for encoder data. -
diffbot_navigation: Navigation based onmove_basepackage; launch and configuration files. -
diffbot_slam: Simultaneous localization and mapping using different implementations (e.g., gmapping) to create a map of the environment
Installation
The packages are written for and tested with ROS 1 Noetic on Ubuntu 20.04 Focal Fossa. For the real robot Ubuntu Mate 20.04 for arm64 is installed on the Raspberry Pi 4 B with 4GB. The communication between the mobile robot and the work pc is done by configuring the ROS Network, see also the documentation.
Development Container
The quickest way to a working setup on a development PC is the dev container in .devcontainer/noetic: a Docker image with ROS Noetic, Gazebo 11 and everything the DiffBot packages need. It works on Linux and on Windows with WSL 2, and CI builds the same image.
The full guide is on the documentation site: Use the Dev Container (setup on Linux and Windows, usage, updating, troubleshooting) and How the Dev Container Works.
- VS Code: install the Dev Containers extension, open your clone of this repository and choose Reopen in Container.
- Command line: with the Dev Container CLI:
  devcontainer up --workspace-folder . --config .devcontainer/noetic/devcontainer.json
  devcontainer exec --workspace-folder . --config .devcontainer/noetic/devcontainer.json bash
Creating the container clones rplidar_ros and remo_description, installs missing dependencies with rosdep and builds the workspace in ~/catkin_ws. Your clone of this repository is mounted at ~/catkin_ws/src/diffbot, so edits on the host show up in the container. The container uses the host network to reach the robot.
RViz and Gazebo open on the host’s display. On Windows, WSLg needs no setup. On a native Linux desktop (X11 or Wayland with Xwayland), install xauth on the host (sudo apt install xauth): before the container starts, host-x11.sh copies your display’s X11 cookie to .devcontainer/noetic/.x11/ (ignored by Git), where the container reads it. So xhost + isn’t needed.
Plain Docker works too. The image’s user has UID 1000; with another UID, use the dev container, which adapts it.
docker build -f .devcontainer/noetic/Dockerfile -t diffbot:noetic .
bash .devcontainer/noetic/host-x11.sh
docker run -it --rm --net=host -v /tmp/.X11-unix:/tmp/.X11-unix -e DISPLAY \
  -e XAUTHORITY=/home/ros/catkin_ws/src/diffbot/.devcontainer/noetic/.x11/xauth \
  -v "$PWD":/home/ros/catkin_ws/src/diffbot diffbot:noetic \
  bash -c "bash src/diffbot/.devcontainer/noetic/setup.sh && bash"
To set up a workspace without Docker, for example on the robot’s Raspberry Pi, follow the steps below.
Dependencies
The required Ubuntu packages are listed in software package sections found in the documentation. Other ROS catkin packages such as rplidar_ros need to be cloned into the catkin workspace.
For an automated and simplified dependency installation process install the vcstool, which is used in the next steps.
sudo apt install python3-vcstool
:hammer: How to Build
To build the packages in this repository including the Remo robot follow these steps:
-
cdinto an existing ROS Noetic catkin workspace or create a new one:
mkdir -p catkin_ws/src
- Clone this repository in the
srcfolder of your ROS Noetic catkin workspace:
cd catkin_ws/src
```console
File truncated at 100 lines see the full file
CONTRIBUTING
Contributing to DiffBot
DiffBot and Remo are two differential drive robots for ROS 1 Noetic. This repository has their ROS packages, the Teensy firmware and the dev container. Remo’s robot model is in remo_description, and the documentation is at ros-mobile-robots.com, from ros-mobile-robots.github.io.
Ask questions and get help with your build in Discussions, where the answers stay easy to find. Report bugs and request features as an issue in the repository they affect: diffbot, remo_description for Remo’s model, or ros-mobile-robots.github.io for the documentation. For a larger change, open an issue first, so the approach can be agreed before you write the code. This branch is ROS 1 Noetic; a move to ROS 2 is future work, so please discuss it in an issue first.
The documentation’s Contributing section explains the repositories, the roadmap, the dev container and the automated checks in more detail.
Set up
The quickest working setup is the dev container in .devcontainer/noetic: open your clone in VS Code and choose Reopen in Container. It has ROS Noetic, Gazebo 11 and everything the packages need, clones remo_description, at the version pinned in diffbot_dev.repos, and rplidar_ros, and builds the workspace in ~/catkin_ws. CI builds the same image. Without the container, follow the installation steps in the README.
When the pin moves to a new version, an existing workspace keeps its old checkout of remo_description, because the setup doesn’t replace repositories that are already there. Check out the new version yourself, then build again. If git status shows changes of your own, commit them on a branch first: the checkout would either stop on them or carry them over to the new version.
cd ~/catkin_ws/src/remo_description
git status                                          # no changes of your own?
git fetch --tags
git checkout 2.0.0                                  # the version in diffbot_dev.repos
Build and test
In ~/catkin_ws:
catkin build                                        # build the workspace
source devel/setup.bash
catkin build --catkin-make-args run_tests           # build and run all tests
catkin_test_results build                           # summary: 10 tests, 0 errors, 0 failures
rostest diffbot_gazebo sim_drive_diffbot.test       # one robot's simulation test
The simulation test drives DiffBot and Remo in Gazebo and checks where they went. Run it for any change to the robot models, the controllers or the simulation.
The Teensy firmware builds with PlatformIO, which isn’t in the dev container. The firmware has a container of its own, .docker/firmware, with PlatformIO 6.2.0 and a compiler, so Docker is all you need. Our script .docker/firmware/run.sh runs a command in that container, here PlatformIO’s pio. When you change the firmware, build both boards, as CI does, because the change has to work on both. From the root folder of your diffbot clone on the PC:
.docker/firmware/run.sh pio run -e teensy31
.docker/firmware/run.sh pio run -e teensy40
The script builds the image first. Later image builds took about 2 seconds on our test PC, because Docker reuses the cached image layers whose inputs haven’t changed. They only show their output when they fail. The script runs the container as your user (id -u and id -g), so the files it writes belong to you. To use other IDs, set LOCAL_UID and LOCAL_GID, for example LOCAL_UID=1001 LOCAL_GID=1001 .docker/firmware/run.sh pio run -e teensy40. The first firmware build downloads the Teensy toolchain, which needs the internet and took about a minute on our test PC. The firmware files land in diffbot_firmware/.pio/build/<board>/, for example firmware.hex, which PJRC’s Teensy Loader can flash. Don’t build in the container and on the PC at the same time: both write to that .pio folder. CI builds the same way.
Or install PlatformIO on your PC, outside the dev container, with its installer script or in a virtual environment. Many Linux distributions don’t allow pip install into the system Python. Then build from your diffbot clone on the PC:
python3 -m venv ~/.venvs/platformio && ~/.venvs/platformio/bin/pip install platformio   # once
cd diffbot_firmware
~/.venvs/platformio/bin/pio run -e teensy31 && ~/.venvs/platformio/bin/pio run -e teensy40
CI runs on every pull request: industrial_ci builds and tests the workspace for Noetic, the firmware is built for both boards, and the dev container image is built.
Pull requests
-
One feature or fix per pull request, on a branch named
feat/…,fix/…,docs/…orchore/…. Keep unrelated changes for another PR. -
Pull requests are squash-merged. The PR title becomes the commit’s subject, so write it as
Area: what changed, for exampleSimulation test: narrower turn checks. Aim for 65 characters or fewer; GitHub adds the PR number. The whole description becomes the commit message, so start it with what changes and why. -
Describe how you tested it: what you ran, on which robot or in simulation, and what you saw. Link the issue with
Closes #N. - Comments explain why the code is the way it is, not what changed or how it used to be. The history belongs in the commit and the PR.
-
Every feature also gets documentation on ros-mobile-robots.com, a new or updated page: open a pull request in ros-mobile-robots.github.io and link it under
## Documentationin the description, asros-mobile-robots/ros-mobile-robots.github.io#N. If a page on ros-mobile-robots.com already explains the change, link that page instead. If nothing user-visible changes, writeNone. The PR description check fails until that section has one of the three. It runs again when you edit the description: look at that new run, because re-running the old one still sees the old text. - Follow REP 103 for units and coordinate frames.
-
Python follows PEP 8 with the settings of ROS 2’s
ament_flake8, with PEP 257 docstrings and type hints. AGENTS.md lists the commands that check it.
AI-assisted contributions
You’re welcome to use AI tools. Whatever produced the code, you’re its author and responsible for it:
- Understand every change and be able to explain it in review, in your own words.
- Build and test it as described above, and report what you actually ran. Don’t claim tests that didn’t run.
- Check that the APIs, parameters, files and links you use exist. Pull requests with invented ones are closed.
- Keep the PR description and your review replies short and specific: what changed, why, and how it was tested.
You don’t need to say whether you used AI. Please don’t add attribution lines for AI tools to commits or pull requests, such as Co-Authored-By: for a tool or “Generated with …”.
License
By contributing, you agree that your contributions are licensed under this repository’s BSD 3-Clause License.
|
|
diffbot repositorydiffbot_base diffbot_bringup diffbot_control diffbot_description diffbot_gazebo diffbot_mbf diffbot_msgs diffbot_navigation diffbot_robot diffbot_slam |
ROS Distro
|
Repository Summary
| Checkout URI | https://github.com/ros-mobile-robots/diffbot.git |
| VCS Type | git |
| VCS Version | noetic-devel |
| Last Updated | 2026-10-30 |
| Dev Status | DEVELOPED |
| Released | RELEASED |
| Contributing |
Help Wanted (-)
Good First Issues (-) Pull Requests to Review (-) |
Packages
| Name | Version |
|---|---|
| diffbot_base | 1.1.0 |
| diffbot_bringup | 1.1.0 |
| diffbot_control | 1.1.0 |
| diffbot_description | 1.1.0 |
| diffbot_gazebo | 1.1.0 |
| diffbot_mbf | 1.1.0 |
| diffbot_msgs | 1.1.0 |
| diffbot_navigation | 1.1.0 |
| diffbot_robot | 1.1.0 |
| diffbot_slam | 1.1.0 |
README
DiffBot
DiffBot is an autonomous differential drive robot with two wheels. Its main processing unit is a Raspberry Pi 4 B running Ubuntu Mate 20.04 and the ROS 1 (ROS Noetic) middleware. This respository contains ROS driver packages, ROS Control Hardware Interface for the real robot and configurations for simulating DiffBot. The formatted documentation can be found at: https://ros-mobile-robots.com.
| DiffBot | Lidar SLAMTEC RPLidar A2 |
|---|---|
|
|
If you are looking for a 3D printable modular base, see the remo_description repository. You can use it directly with the software of this diffbot repository.
| Remo | Gazebo Simulation | RViz |
|---|---|---|
|
|
|
It provides mounts for different camera modules, such as Raspi Cam v2, OAK-1, OAK-D and you can even design your own if you like. There is also support for different single board computers (Raspberry Pi and Nvidia Jetson Nano) through two changable decks. You are agin free to create your own.
Demonstration
SLAM and Navigation
| Real robot | Gazebo Simulation |
|---|---|
|
|
:package: Package Overview
-
diffbot_base: ROS Control hardware interface includingcontroller_managercontrol loop for the real robot. It talks to the Teensy microcontroller, whose firmware is indiffbot_firmware. -
diffbot_bringup: Launch files to bring up the hardware drivers (camera, lidar, imu, ultrasonic, …) for the real DiffBot robot. -
diffbot_control: Configurations for thediff_drive_controllerof ROS Control used in Gazebo simulation and the real robot. -
diffbot_description: URDF description of DiffBot including its sensors. -
diffbot_gazebo: Simulation specific launch and configuration files for DiffBot. -
diffbot_msgs: Message definitions specific to DiffBot, for example the message for encoder data. -
diffbot_navigation: Navigation based onmove_basepackage; launch and configuration files. -
diffbot_slam: Simultaneous localization and mapping using different implementations (e.g., gmapping) to create a map of the environment
Installation
The packages are written for and tested with ROS 1 Noetic on Ubuntu 20.04 Focal Fossa. For the real robot Ubuntu Mate 20.04 for arm64 is installed on the Raspberry Pi 4 B with 4GB. The communication between the mobile robot and the work pc is done by configuring the ROS Network, see also the documentation.
Development Container
The quickest way to a working setup on a development PC is the dev container in .devcontainer/noetic: a Docker image with ROS Noetic, Gazebo 11 and everything the DiffBot packages need. It works on Linux and on Windows with WSL 2, and CI builds the same image.
The full guide is on the documentation site: Use the Dev Container (setup on Linux and Windows, usage, updating, troubleshooting) and How the Dev Container Works.
- VS Code: install the Dev Containers extension, open your clone of this repository and choose Reopen in Container.
- Command line: with the Dev Container CLI:
  devcontainer up --workspace-folder . --config .devcontainer/noetic/devcontainer.json
  devcontainer exec --workspace-folder . --config .devcontainer/noetic/devcontainer.json bash
Creating the container clones rplidar_ros and remo_description, installs missing dependencies with rosdep and builds the workspace in ~/catkin_ws. Your clone of this repository is mounted at ~/catkin_ws/src/diffbot, so edits on the host show up in the container. The container uses the host network to reach the robot.
RViz and Gazebo open on the host’s display. On Windows, WSLg needs no setup. On a native Linux desktop (X11 or Wayland with Xwayland), install xauth on the host (sudo apt install xauth): before the container starts, host-x11.sh copies your display’s X11 cookie to .devcontainer/noetic/.x11/ (ignored by Git), where the container reads it. So xhost + isn’t needed.
Plain Docker works too. The image’s user has UID 1000; with another UID, use the dev container, which adapts it.
docker build -f .devcontainer/noetic/Dockerfile -t diffbot:noetic .
bash .devcontainer/noetic/host-x11.sh
docker run -it --rm --net=host -v /tmp/.X11-unix:/tmp/.X11-unix -e DISPLAY \
  -e XAUTHORITY=/home/ros/catkin_ws/src/diffbot/.devcontainer/noetic/.x11/xauth \
  -v "$PWD":/home/ros/catkin_ws/src/diffbot diffbot:noetic \
  bash -c "bash src/diffbot/.devcontainer/noetic/setup.sh && bash"
To set up a workspace without Docker, for example on the robot’s Raspberry Pi, follow the steps below.
Dependencies
The required Ubuntu packages are listed in software package sections found in the documentation. Other ROS catkin packages such as rplidar_ros need to be cloned into the catkin workspace.
For an automated and simplified dependency installation process install the vcstool, which is used in the next steps.
sudo apt install python3-vcstool
:hammer: How to Build
To build the packages in this repository including the Remo robot follow these steps:
-
cdinto an existing ROS Noetic catkin workspace or create a new one:
mkdir -p catkin_ws/src
- Clone this repository in the
srcfolder of your ROS Noetic catkin workspace:
cd catkin_ws/src
```console
File truncated at 100 lines see the full file
CONTRIBUTING
Contributing to DiffBot
DiffBot and Remo are two differential drive robots for ROS 1 Noetic. This repository has their ROS packages, the Teensy firmware and the dev container. Remo’s robot model is in remo_description, and the documentation is at ros-mobile-robots.com, from ros-mobile-robots.github.io.
Ask questions and get help with your build in Discussions, where the answers stay easy to find. Report bugs and request features as an issue in the repository they affect: diffbot, remo_description for Remo’s model, or ros-mobile-robots.github.io for the documentation. For a larger change, open an issue first, so the approach can be agreed before you write the code. This branch is ROS 1 Noetic; a move to ROS 2 is future work, so please discuss it in an issue first.
The documentation’s Contributing section explains the repositories, the roadmap, the dev container and the automated checks in more detail.
Set up
The quickest working setup is the dev container in .devcontainer/noetic: open your clone in VS Code and choose Reopen in Container. It has ROS Noetic, Gazebo 11 and everything the packages need, clones remo_description, at the version pinned in diffbot_dev.repos, and rplidar_ros, and builds the workspace in ~/catkin_ws. CI builds the same image. Without the container, follow the installation steps in the README.
When the pin moves to a new version, an existing workspace keeps its old checkout of remo_description, because the setup doesn’t replace repositories that are already there. Check out the new version yourself, then build again. If git status shows changes of your own, commit them on a branch first: the checkout would either stop on them or carry them over to the new version.
cd ~/catkin_ws/src/remo_description
git status                                          # no changes of your own?
git fetch --tags
git checkout 2.0.0                                  # the version in diffbot_dev.repos
Build and test
In ~/catkin_ws:
catkin build                                        # build the workspace
source devel/setup.bash
catkin build --catkin-make-args run_tests           # build and run all tests
catkin_test_results build                           # summary: 10 tests, 0 errors, 0 failures
rostest diffbot_gazebo sim_drive_diffbot.test       # one robot's simulation test
The simulation test drives DiffBot and Remo in Gazebo and checks where they went. Run it for any change to the robot models, the controllers or the simulation.
The Teensy firmware builds with PlatformIO, which isn’t in the dev container. The firmware has a container of its own, .docker/firmware, with PlatformIO 6.2.0 and a compiler, so Docker is all you need. Our script .docker/firmware/run.sh runs a command in that container, here PlatformIO’s pio. When you change the firmware, build both boards, as CI does, because the change has to work on both. From the root folder of your diffbot clone on the PC:
.docker/firmware/run.sh pio run -e teensy31
.docker/firmware/run.sh pio run -e teensy40
The script builds the image first. Later image builds took about 2 seconds on our test PC, because Docker reuses the cached image layers whose inputs haven’t changed. They only show their output when they fail. The script runs the container as your user (id -u and id -g), so the files it writes belong to you. To use other IDs, set LOCAL_UID and LOCAL_GID, for example LOCAL_UID=1001 LOCAL_GID=1001 .docker/firmware/run.sh pio run -e teensy40. The first firmware build downloads the Teensy toolchain, which needs the internet and took about a minute on our test PC. The firmware files land in diffbot_firmware/.pio/build/<board>/, for example firmware.hex, which PJRC’s Teensy Loader can flash. Don’t build in the container and on the PC at the same time: both write to that .pio folder. CI builds the same way.
Or install PlatformIO on your PC, outside the dev container, with its installer script or in a virtual environment. Many Linux distributions don’t allow pip install into the system Python. Then build from your diffbot clone on the PC:
python3 -m venv ~/.venvs/platformio && ~/.venvs/platformio/bin/pip install platformio   # once
cd diffbot_firmware
~/.venvs/platformio/bin/pio run -e teensy31 && ~/.venvs/platformio/bin/pio run -e teensy40
CI runs on every pull request: industrial_ci builds and tests the workspace for Noetic, the firmware is built for both boards, and the dev container image is built.
Pull requests
-
One feature or fix per pull request, on a branch named
feat/…,fix/…,docs/…orchore/…. Keep unrelated changes for another PR. -
Pull requests are squash-merged. The PR title becomes the commit’s subject, so write it as
Area: what changed, for exampleSimulation test: narrower turn checks. Aim for 65 characters or fewer; GitHub adds the PR number. The whole description becomes the commit message, so start it with what changes and why. -
Describe how you tested it: what you ran, on which robot or in simulation, and what you saw. Link the issue with
Closes #N. - Comments explain why the code is the way it is, not what changed or how it used to be. The history belongs in the commit and the PR.
-
Every feature also gets documentation on ros-mobile-robots.com, a new or updated page: open a pull request in ros-mobile-robots.github.io and link it under
## Documentationin the description, asros-mobile-robots/ros-mobile-robots.github.io#N. If a page on ros-mobile-robots.com already explains the change, link that page instead. If nothing user-visible changes, writeNone. The PR description check fails until that section has one of the three. It runs again when you edit the description: look at that new run, because re-running the old one still sees the old text. - Follow REP 103 for units and coordinate frames.
-
Python follows PEP 8 with the settings of ROS 2’s
ament_flake8, with PEP 257 docstrings and type hints. AGENTS.md lists the commands that check it.
AI-assisted contributions
You’re welcome to use AI tools. Whatever produced the code, you’re its author and responsible for it:
- Understand every change and be able to explain it in review, in your own words.
- Build and test it as described above, and report what you actually ran. Don’t claim tests that didn’t run.
- Check that the APIs, parameters, files and links you use exist. Pull requests with invented ones are closed.
- Keep the PR description and your review replies short and specific: what changed, why, and how it was tested.
You don’t need to say whether you used AI. Please don’t add attribution lines for AI tools to commits or pull requests, such as Co-Authored-By: for a tool or “Generated with …”.
License
By contributing, you agree that your contributions are licensed under this repository’s BSD 3-Clause License.
|
|
diffbot repositorydiffbot_base diffbot_bringup diffbot_control diffbot_description diffbot_gazebo diffbot_mbf diffbot_msgs diffbot_navigation diffbot_robot diffbot_slam |
ROS Distro
|
Repository Summary
| Checkout URI | https://github.com/ros-mobile-robots/diffbot.git |
| VCS Type | git |
| VCS Version | noetic-devel |
| Last Updated | 2026-10-30 |
| Dev Status | DEVELOPED |
| Released | RELEASED |
| Contributing |
Help Wanted (-)
Good First Issues (-) Pull Requests to Review (-) |
Packages
| Name | Version |
|---|---|
| diffbot_base | 1.1.0 |
| diffbot_bringup | 1.1.0 |
| diffbot_control | 1.1.0 |
| diffbot_description | 1.1.0 |
| diffbot_gazebo | 1.1.0 |
| diffbot_mbf | 1.1.0 |
| diffbot_msgs | 1.1.0 |
| diffbot_navigation | 1.1.0 |
| diffbot_robot | 1.1.0 |
| diffbot_slam | 1.1.0 |
README
DiffBot
DiffBot is an autonomous differential drive robot with two wheels. Its main processing unit is a Raspberry Pi 4 B running Ubuntu Mate 20.04 and the ROS 1 (ROS Noetic) middleware. This respository contains ROS driver packages, ROS Control Hardware Interface for the real robot and configurations for simulating DiffBot. The formatted documentation can be found at: https://ros-mobile-robots.com.
| DiffBot | Lidar SLAMTEC RPLidar A2 |
|---|---|
|
|
If you are looking for a 3D printable modular base, see the remo_description repository. You can use it directly with the software of this diffbot repository.
| Remo | Gazebo Simulation | RViz |
|---|---|---|
|
|
|
It provides mounts for different camera modules, such as Raspi Cam v2, OAK-1, OAK-D and you can even design your own if you like. There is also support for different single board computers (Raspberry Pi and Nvidia Jetson Nano) through two changable decks. You are agin free to create your own.
Demonstration
SLAM and Navigation
| Real robot | Gazebo Simulation |
|---|---|
|
|
:package: Package Overview
-
diffbot_base: ROS Control hardware interface includingcontroller_managercontrol loop for the real robot. It talks to the Teensy microcontroller, whose firmware is indiffbot_firmware. -
diffbot_bringup: Launch files to bring up the hardware drivers (camera, lidar, imu, ultrasonic, …) for the real DiffBot robot. -
diffbot_control: Configurations for thediff_drive_controllerof ROS Control used in Gazebo simulation and the real robot. -
diffbot_description: URDF description of DiffBot including its sensors. -
diffbot_gazebo: Simulation specific launch and configuration files for DiffBot. -
diffbot_msgs: Message definitions specific to DiffBot, for example the message for encoder data. -
diffbot_navigation: Navigation based onmove_basepackage; launch and configuration files. -
diffbot_slam: Simultaneous localization and mapping using different implementations (e.g., gmapping) to create a map of the environment
Installation
The packages are written for and tested with ROS 1 Noetic on Ubuntu 20.04 Focal Fossa. For the real robot Ubuntu Mate 20.04 for arm64 is installed on the Raspberry Pi 4 B with 4GB. The communication between the mobile robot and the work pc is done by configuring the ROS Network, see also the documentation.
Development Container
The quickest way to a working setup on a development PC is the dev container in .devcontainer/noetic: a Docker image with ROS Noetic, Gazebo 11 and everything the DiffBot packages need. It works on Linux and on Windows with WSL 2, and CI builds the same image.
The full guide is on the documentation site: Use the Dev Container (setup on Linux and Windows, usage, updating, troubleshooting) and How the Dev Container Works.
- VS Code: install the Dev Containers extension, open your clone of this repository and choose Reopen in Container.
- Command line: with the Dev Container CLI:
  devcontainer up --workspace-folder . --config .devcontainer/noetic/devcontainer.json
  devcontainer exec --workspace-folder . --config .devcontainer/noetic/devcontainer.json bash
Creating the container clones rplidar_ros and remo_description, installs missing dependencies with rosdep and builds the workspace in ~/catkin_ws. Your clone of this repository is mounted at ~/catkin_ws/src/diffbot, so edits on the host show up in the container. The container uses the host network to reach the robot.
RViz and Gazebo open on the host’s display. On Windows, WSLg needs no setup. On a native Linux desktop (X11 or Wayland with Xwayland), install xauth on the host (sudo apt install xauth): before the container starts, host-x11.sh copies your display’s X11 cookie to .devcontainer/noetic/.x11/ (ignored by Git), where the container reads it. So xhost + isn’t needed.
Plain Docker works too. The image’s user has UID 1000; with another UID, use the dev container, which adapts it.
docker build -f .devcontainer/noetic/Dockerfile -t diffbot:noetic .
bash .devcontainer/noetic/host-x11.sh
docker run -it --rm --net=host -v /tmp/.X11-unix:/tmp/.X11-unix -e DISPLAY \
  -e XAUTHORITY=/home/ros/catkin_ws/src/diffbot/.devcontainer/noetic/.x11/xauth \
  -v "$PWD":/home/ros/catkin_ws/src/diffbot diffbot:noetic \
  bash -c "bash src/diffbot/.devcontainer/noetic/setup.sh && bash"
To set up a workspace without Docker, for example on the robot’s Raspberry Pi, follow the steps below.
Dependencies
The required Ubuntu packages are listed in software package sections found in the documentation. Other ROS catkin packages such as rplidar_ros need to be cloned into the catkin workspace.
For an automated and simplified dependency installation process install the vcstool, which is used in the next steps.
sudo apt install python3-vcstool
:hammer: How to Build
To build the packages in this repository including the Remo robot follow these steps:
-
cdinto an existing ROS Noetic catkin workspace or create a new one:
mkdir -p catkin_ws/src
- Clone this repository in the
srcfolder of your ROS Noetic catkin workspace:
cd catkin_ws/src
```console
File truncated at 100 lines see the full file
CONTRIBUTING
Contributing to DiffBot
DiffBot and Remo are two differential drive robots for ROS 1 Noetic. This repository has their ROS packages, the Teensy firmware and the dev container. Remo’s robot model is in remo_description, and the documentation is at ros-mobile-robots.com, from ros-mobile-robots.github.io.
Ask questions and get help with your build in Discussions, where the answers stay easy to find. Report bugs and request features as an issue in the repository they affect: diffbot, remo_description for Remo’s model, or ros-mobile-robots.github.io for the documentation. For a larger change, open an issue first, so the approach can be agreed before you write the code. This branch is ROS 1 Noetic; a move to ROS 2 is future work, so please discuss it in an issue first.
The documentation’s Contributing section explains the repositories, the roadmap, the dev container and the automated checks in more detail.
Set up
The quickest working setup is the dev container in .devcontainer/noetic: open your clone in VS Code and choose Reopen in Container. It has ROS Noetic, Gazebo 11 and everything the packages need, clones remo_description, at the version pinned in diffbot_dev.repos, and rplidar_ros, and builds the workspace in ~/catkin_ws. CI builds the same image. Without the container, follow the installation steps in the README.
When the pin moves to a new version, an existing workspace keeps its old checkout of remo_description, because the setup doesn’t replace repositories that are already there. Check out the new version yourself, then build again. If git status shows changes of your own, commit them on a branch first: the checkout would either stop on them or carry them over to the new version.
cd ~/catkin_ws/src/remo_description
git status                                          # no changes of your own?
git fetch --tags
git checkout 2.0.0                                  # the version in diffbot_dev.repos
Build and test
In ~/catkin_ws:
catkin build                                        # build the workspace
source devel/setup.bash
catkin build --catkin-make-args run_tests           # build and run all tests
catkin_test_results build                           # summary: 10 tests, 0 errors, 0 failures
rostest diffbot_gazebo sim_drive_diffbot.test       # one robot's simulation test
The simulation test drives DiffBot and Remo in Gazebo and checks where they went. Run it for any change to the robot models, the controllers or the simulation.
The Teensy firmware builds with PlatformIO, which isn’t in the dev container. The firmware has a container of its own, .docker/firmware, with PlatformIO 6.2.0 and a compiler, so Docker is all you need. Our script .docker/firmware/run.sh runs a command in that container, here PlatformIO’s pio. When you change the firmware, build both boards, as CI does, because the change has to work on both. From the root folder of your diffbot clone on the PC:
.docker/firmware/run.sh pio run -e teensy31
.docker/firmware/run.sh pio run -e teensy40
The script builds the image first. Later image builds took about 2 seconds on our test PC, because Docker reuses the cached image layers whose inputs haven’t changed. They only show their output when they fail. The script runs the container as your user (id -u and id -g), so the files it writes belong to you. To use other IDs, set LOCAL_UID and LOCAL_GID, for example LOCAL_UID=1001 LOCAL_GID=1001 .docker/firmware/run.sh pio run -e teensy40. The first firmware build downloads the Teensy toolchain, which needs the internet and took about a minute on our test PC. The firmware files land in diffbot_firmware/.pio/build/<board>/, for example firmware.hex, which PJRC’s Teensy Loader can flash. Don’t build in the container and on the PC at the same time: both write to that .pio folder. CI builds the same way.
Or install PlatformIO on your PC, outside the dev container, with its installer script or in a virtual environment. Many Linux distributions don’t allow pip install into the system Python. Then build from your diffbot clone on the PC:
python3 -m venv ~/.venvs/platformio && ~/.venvs/platformio/bin/pip install platformio   # once
cd diffbot_firmware
~/.venvs/platformio/bin/pio run -e teensy31 && ~/.venvs/platformio/bin/pio run -e teensy40
CI runs on every pull request: industrial_ci builds and tests the workspace for Noetic, the firmware is built for both boards, and the dev container image is built.
Pull requests
-
One feature or fix per pull request, on a branch named
feat/…,fix/…,docs/…orchore/…. Keep unrelated changes for another PR. -
Pull requests are squash-merged. The PR title becomes the commit’s subject, so write it as
Area: what changed, for exampleSimulation test: narrower turn checks. Aim for 65 characters or fewer; GitHub adds the PR number. The whole description becomes the commit message, so start it with what changes and why. -
Describe how you tested it: what you ran, on which robot or in simulation, and what you saw. Link the issue with
Closes #N. - Comments explain why the code is the way it is, not what changed or how it used to be. The history belongs in the commit and the PR.
-
Every feature also gets documentation on ros-mobile-robots.com, a new or updated page: open a pull request in ros-mobile-robots.github.io and link it under
## Documentationin the description, asros-mobile-robots/ros-mobile-robots.github.io#N. If a page on ros-mobile-robots.com already explains the change, link that page instead. If nothing user-visible changes, writeNone. The PR description check fails until that section has one of the three. It runs again when you edit the description: look at that new run, because re-running the old one still sees the old text. - Follow REP 103 for units and coordinate frames.
-
Python follows PEP 8 with the settings of ROS 2’s
ament_flake8, with PEP 257 docstrings and type hints. AGENTS.md lists the commands that check it.
AI-assisted contributions
You’re welcome to use AI tools. Whatever produced the code, you’re its author and responsible for it:
- Understand every change and be able to explain it in review, in your own words.
- Build and test it as described above, and report what you actually ran. Don’t claim tests that didn’t run.
- Check that the APIs, parameters, files and links you use exist. Pull requests with invented ones are closed.
- Keep the PR description and your review replies short and specific: what changed, why, and how it was tested.
You don’t need to say whether you used AI. Please don’t add attribution lines for AI tools to commits or pull requests, such as Co-Authored-By: for a tool or “Generated with …”.
License
By contributing, you agree that your contributions are licensed under this repository’s BSD 3-Clause License.
|
|
diffbot repositorydiffbot_base diffbot_bringup diffbot_control diffbot_description diffbot_gazebo diffbot_mbf diffbot_msgs diffbot_navigation diffbot_robot diffbot_slam |
ROS Distro
|
Repository Summary
| Checkout URI | https://github.com/ros-mobile-robots/diffbot.git |
| VCS Type | git |
| VCS Version | noetic-devel |
| Last Updated | 2026-10-30 |
| Dev Status | DEVELOPED |
| Released | RELEASED |
| Contributing |
Help Wanted (-)
Good First Issues (-) Pull Requests to Review (-) |
Packages
| Name | Version |
|---|---|
| diffbot_base | 1.1.0 |
| diffbot_bringup | 1.1.0 |
| diffbot_control | 1.1.0 |
| diffbot_description | 1.1.0 |
| diffbot_gazebo | 1.1.0 |
| diffbot_mbf | 1.1.0 |
| diffbot_msgs | 1.1.0 |
| diffbot_navigation | 1.1.0 |
| diffbot_robot | 1.1.0 |
| diffbot_slam | 1.1.0 |
README
DiffBot
DiffBot is an autonomous differential drive robot with two wheels. Its main processing unit is a Raspberry Pi 4 B running Ubuntu Mate 20.04 and the ROS 1 (ROS Noetic) middleware. This respository contains ROS driver packages, ROS Control Hardware Interface for the real robot and configurations for simulating DiffBot. The formatted documentation can be found at: https://ros-mobile-robots.com.
| DiffBot | Lidar SLAMTEC RPLidar A2 |
|---|---|
|
|
If you are looking for a 3D printable modular base, see the remo_description repository. You can use it directly with the software of this diffbot repository.
| Remo | Gazebo Simulation | RViz |
|---|---|---|
|
|
|
It provides mounts for different camera modules, such as Raspi Cam v2, OAK-1, OAK-D and you can even design your own if you like. There is also support for different single board computers (Raspberry Pi and Nvidia Jetson Nano) through two changable decks. You are agin free to create your own.
Demonstration
SLAM and Navigation
| Real robot | Gazebo Simulation |
|---|---|
|
|
:package: Package Overview
-
diffbot_base: ROS Control hardware interface includingcontroller_managercontrol loop for the real robot. It talks to the Teensy microcontroller, whose firmware is indiffbot_firmware. -
diffbot_bringup: Launch files to bring up the hardware drivers (camera, lidar, imu, ultrasonic, …) for the real DiffBot robot. -
diffbot_control: Configurations for thediff_drive_controllerof ROS Control used in Gazebo simulation and the real robot. -
diffbot_description: URDF description of DiffBot including its sensors. -
diffbot_gazebo: Simulation specific launch and configuration files for DiffBot. -
diffbot_msgs: Message definitions specific to DiffBot, for example the message for encoder data. -
diffbot_navigation: Navigation based onmove_basepackage; launch and configuration files. -
diffbot_slam: Simultaneous localization and mapping using different implementations (e.g., gmapping) to create a map of the environment
Installation
The packages are written for and tested with ROS 1 Noetic on Ubuntu 20.04 Focal Fossa. For the real robot Ubuntu Mate 20.04 for arm64 is installed on the Raspberry Pi 4 B with 4GB. The communication between the mobile robot and the work pc is done by configuring the ROS Network, see also the documentation.
Development Container
The quickest way to a working setup on a development PC is the dev container in .devcontainer/noetic: a Docker image with ROS Noetic, Gazebo 11 and everything the DiffBot packages need. It works on Linux and on Windows with WSL 2, and CI builds the same image.
The full guide is on the documentation site: Use the Dev Container (setup on Linux and Windows, usage, updating, troubleshooting) and How the Dev Container Works.
- VS Code: install the Dev Containers extension, open your clone of this repository and choose Reopen in Container.
- Command line: with the Dev Container CLI:
  devcontainer up --workspace-folder . --config .devcontainer/noetic/devcontainer.json
  devcontainer exec --workspace-folder . --config .devcontainer/noetic/devcontainer.json bash
Creating the container clones rplidar_ros and remo_description, installs missing dependencies with rosdep and builds the workspace in ~/catkin_ws. Your clone of this repository is mounted at ~/catkin_ws/src/diffbot, so edits on the host show up in the container. The container uses the host network to reach the robot.
RViz and Gazebo open on the host’s display. On Windows, WSLg needs no setup. On a native Linux desktop (X11 or Wayland with Xwayland), install xauth on the host (sudo apt install xauth): before the container starts, host-x11.sh copies your display’s X11 cookie to .devcontainer/noetic/.x11/ (ignored by Git), where the container reads it. So xhost + isn’t needed.
Plain Docker works too. The image’s user has UID 1000; with another UID, use the dev container, which adapts it.
docker build -f .devcontainer/noetic/Dockerfile -t diffbot:noetic .
bash .devcontainer/noetic/host-x11.sh
docker run -it --rm --net=host -v /tmp/.X11-unix:/tmp/.X11-unix -e DISPLAY \
  -e XAUTHORITY=/home/ros/catkin_ws/src/diffbot/.devcontainer/noetic/.x11/xauth \
  -v "$PWD":/home/ros/catkin_ws/src/diffbot diffbot:noetic \
  bash -c "bash src/diffbot/.devcontainer/noetic/setup.sh && bash"
To set up a workspace without Docker, for example on the robot’s Raspberry Pi, follow the steps below.
Dependencies
The required Ubuntu packages are listed in software package sections found in the documentation. Other ROS catkin packages such as rplidar_ros need to be cloned into the catkin workspace.
For an automated and simplified dependency installation process install the vcstool, which is used in the next steps.
sudo apt install python3-vcstool
:hammer: How to Build
To build the packages in this repository including the Remo robot follow these steps:
-
cdinto an existing ROS Noetic catkin workspace or create a new one:
mkdir -p catkin_ws/src
- Clone this repository in the
srcfolder of your ROS Noetic catkin workspace:
cd catkin_ws/src
```console
File truncated at 100 lines see the full file
CONTRIBUTING
Contributing to DiffBot
DiffBot and Remo are two differential drive robots for ROS 1 Noetic. This repository has their ROS packages, the Teensy firmware and the dev container. Remo’s robot model is in remo_description, and the documentation is at ros-mobile-robots.com, from ros-mobile-robots.github.io.
Ask questions and get help with your build in Discussions, where the answers stay easy to find. Report bugs and request features as an issue in the repository they affect: diffbot, remo_description for Remo’s model, or ros-mobile-robots.github.io for the documentation. For a larger change, open an issue first, so the approach can be agreed before you write the code. This branch is ROS 1 Noetic; a move to ROS 2 is future work, so please discuss it in an issue first.
The documentation’s Contributing section explains the repositories, the roadmap, the dev container and the automated checks in more detail.
Set up
The quickest working setup is the dev container in .devcontainer/noetic: open your clone in VS Code and choose Reopen in Container. It has ROS Noetic, Gazebo 11 and everything the packages need, clones remo_description, at the version pinned in diffbot_dev.repos, and rplidar_ros, and builds the workspace in ~/catkin_ws. CI builds the same image. Without the container, follow the installation steps in the README.
When the pin moves to a new version, an existing workspace keeps its old checkout of remo_description, because the setup doesn’t replace repositories that are already there. Check out the new version yourself, then build again. If git status shows changes of your own, commit them on a branch first: the checkout would either stop on them or carry them over to the new version.
cd ~/catkin_ws/src/remo_description
git status                                          # no changes of your own?
git fetch --tags
git checkout 2.0.0                                  # the version in diffbot_dev.repos
Build and test
In ~/catkin_ws:
catkin build                                        # build the workspace
source devel/setup.bash
catkin build --catkin-make-args run_tests           # build and run all tests
catkin_test_results build                           # summary: 10 tests, 0 errors, 0 failures
rostest diffbot_gazebo sim_drive_diffbot.test       # one robot's simulation test
The simulation test drives DiffBot and Remo in Gazebo and checks where they went. Run it for any change to the robot models, the controllers or the simulation.
The Teensy firmware builds with PlatformIO, which isn’t in the dev container. The firmware has a container of its own, .docker/firmware, with PlatformIO 6.2.0 and a compiler, so Docker is all you need. Our script .docker/firmware/run.sh runs a command in that container, here PlatformIO’s pio. When you change the firmware, build both boards, as CI does, because the change has to work on both. From the root folder of your diffbot clone on the PC:
.docker/firmware/run.sh pio run -e teensy31
.docker/firmware/run.sh pio run -e teensy40
The script builds the image first. Later image builds took about 2 seconds on our test PC, because Docker reuses the cached image layers whose inputs haven’t changed. They only show their output when they fail. The script runs the container as your user (id -u and id -g), so the files it writes belong to you. To use other IDs, set LOCAL_UID and LOCAL_GID, for example LOCAL_UID=1001 LOCAL_GID=1001 .docker/firmware/run.sh pio run -e teensy40. The first firmware build downloads the Teensy toolchain, which needs the internet and took about a minute on our test PC. The firmware files land in diffbot_firmware/.pio/build/<board>/, for example firmware.hex, which PJRC’s Teensy Loader can flash. Don’t build in the container and on the PC at the same time: both write to that .pio folder. CI builds the same way.
Or install PlatformIO on your PC, outside the dev container, with its installer script or in a virtual environment. Many Linux distributions don’t allow pip install into the system Python. Then build from your diffbot clone on the PC:
python3 -m venv ~/.venvs/platformio && ~/.venvs/platformio/bin/pip install platformio   # once
cd diffbot_firmware
~/.venvs/platformio/bin/pio run -e teensy31 && ~/.venvs/platformio/bin/pio run -e teensy40
CI runs on every pull request: industrial_ci builds and tests the workspace for Noetic, the firmware is built for both boards, and the dev container image is built.
Pull requests
-
One feature or fix per pull request, on a branch named
feat/…,fix/…,docs/…orchore/…. Keep unrelated changes for another PR. -
Pull requests are squash-merged. The PR title becomes the commit’s subject, so write it as
Area: what changed, for exampleSimulation test: narrower turn checks. Aim for 65 characters or fewer; GitHub adds the PR number. The whole description becomes the commit message, so start it with what changes and why. -
Describe how you tested it: what you ran, on which robot or in simulation, and what you saw. Link the issue with
Closes #N. - Comments explain why the code is the way it is, not what changed or how it used to be. The history belongs in the commit and the PR.
-
Every feature also gets documentation on ros-mobile-robots.com, a new or updated page: open a pull request in ros-mobile-robots.github.io and link it under
## Documentationin the description, asros-mobile-robots/ros-mobile-robots.github.io#N. If a page on ros-mobile-robots.com already explains the change, link that page instead. If nothing user-visible changes, writeNone. The PR description check fails until that section has one of the three. It runs again when you edit the description: look at that new run, because re-running the old one still sees the old text. - Follow REP 103 for units and coordinate frames.
-
Python follows PEP 8 with the settings of ROS 2’s
ament_flake8, with PEP 257 docstrings and type hints. AGENTS.md lists the commands that check it.
AI-assisted contributions
You’re welcome to use AI tools. Whatever produced the code, you’re its author and responsible for it:
- Understand every change and be able to explain it in review, in your own words.
- Build and test it as described above, and report what you actually ran. Don’t claim tests that didn’t run.
- Check that the APIs, parameters, files and links you use exist. Pull requests with invented ones are closed.
- Keep the PR description and your review replies short and specific: what changed, why, and how it was tested.
You don’t need to say whether you used AI. Please don’t add attribution lines for AI tools to commits or pull requests, such as Co-Authored-By: for a tool or “Generated with …”.
License
By contributing, you agree that your contributions are licensed under this repository’s BSD 3-Clause License.
|
|
diffbot repositorydiffbot_base diffbot_bringup diffbot_control diffbot_description diffbot_gazebo diffbot_mbf diffbot_msgs diffbot_navigation diffbot_robot diffbot_slam |
ROS Distro
|
Repository Summary
| Checkout URI | https://github.com/ros-mobile-robots/diffbot.git |
| VCS Type | git |
| VCS Version | noetic-devel |
| Last Updated | 2026-10-30 |
| Dev Status | DEVELOPED |
| Released | RELEASED |
| Contributing |
Help Wanted (-)
Good First Issues (-) Pull Requests to Review (-) |
Packages
| Name | Version |
|---|---|
| diffbot_base | 1.1.0 |
| diffbot_bringup | 1.1.0 |
| diffbot_control | 1.1.0 |
| diffbot_description | 1.1.0 |
| diffbot_gazebo | 1.1.0 |
| diffbot_mbf | 1.1.0 |
| diffbot_msgs | 1.1.0 |
| diffbot_navigation | 1.1.0 |
| diffbot_robot | 1.1.0 |
| diffbot_slam | 1.1.0 |
README
DiffBot
DiffBot is an autonomous differential drive robot with two wheels. Its main processing unit is a Raspberry Pi 4 B running Ubuntu Mate 20.04 and the ROS 1 (ROS Noetic) middleware. This respository contains ROS driver packages, ROS Control Hardware Interface for the real robot and configurations for simulating DiffBot. The formatted documentation can be found at: https://ros-mobile-robots.com.
| DiffBot | Lidar SLAMTEC RPLidar A2 |
|---|---|
|
|
If you are looking for a 3D printable modular base, see the remo_description repository. You can use it directly with the software of this diffbot repository.
| Remo | Gazebo Simulation | RViz |
|---|---|---|
|
|
|
It provides mounts for different camera modules, such as Raspi Cam v2, OAK-1, OAK-D and you can even design your own if you like. There is also support for different single board computers (Raspberry Pi and Nvidia Jetson Nano) through two changable decks. You are agin free to create your own.
Demonstration
SLAM and Navigation
| Real robot | Gazebo Simulation |
|---|---|
|
|
:package: Package Overview
-
diffbot_base: ROS Control hardware interface includingcontroller_managercontrol loop for the real robot. It talks to the Teensy microcontroller, whose firmware is indiffbot_firmware. -
diffbot_bringup: Launch files to bring up the hardware drivers (camera, lidar, imu, ultrasonic, …) for the real DiffBot robot. -
diffbot_control: Configurations for thediff_drive_controllerof ROS Control used in Gazebo simulation and the real robot. -
diffbot_description: URDF description of DiffBot including its sensors. -
diffbot_gazebo: Simulation specific launch and configuration files for DiffBot. -
diffbot_msgs: Message definitions specific to DiffBot, for example the message for encoder data. -
diffbot_navigation: Navigation based onmove_basepackage; launch and configuration files. -
diffbot_slam: Simultaneous localization and mapping using different implementations (e.g., gmapping) to create a map of the environment
Installation
The packages are written for and tested with ROS 1 Noetic on Ubuntu 20.04 Focal Fossa. For the real robot Ubuntu Mate 20.04 for arm64 is installed on the Raspberry Pi 4 B with 4GB. The communication between the mobile robot and the work pc is done by configuring the ROS Network, see also the documentation.
Development Container
The quickest way to a working setup on a development PC is the dev container in .devcontainer/noetic: a Docker image with ROS Noetic, Gazebo 11 and everything the DiffBot packages need. It works on Linux and on Windows with WSL 2, and CI builds the same image.
The full guide is on the documentation site: Use the Dev Container (setup on Linux and Windows, usage, updating, troubleshooting) and How the Dev Container Works.
- VS Code: install the Dev Containers extension, open your clone of this repository and choose Reopen in Container.
- Command line: with the Dev Container CLI:
  devcontainer up --workspace-folder . --config .devcontainer/noetic/devcontainer.json
  devcontainer exec --workspace-folder . --config .devcontainer/noetic/devcontainer.json bash
Creating the container clones rplidar_ros and remo_description, installs missing dependencies with rosdep and builds the workspace in ~/catkin_ws. Your clone of this repository is mounted at ~/catkin_ws/src/diffbot, so edits on the host show up in the container. The container uses the host network to reach the robot.
RViz and Gazebo open on the host’s display. On Windows, WSLg needs no setup. On a native Linux desktop (X11 or Wayland with Xwayland), install xauth on the host (sudo apt install xauth): before the container starts, host-x11.sh copies your display’s X11 cookie to .devcontainer/noetic/.x11/ (ignored by Git), where the container reads it. So xhost + isn’t needed.
Plain Docker works too. The image’s user has UID 1000; with another UID, use the dev container, which adapts it.
docker build -f .devcontainer/noetic/Dockerfile -t diffbot:noetic .
bash .devcontainer/noetic/host-x11.sh
docker run -it --rm --net=host -v /tmp/.X11-unix:/tmp/.X11-unix -e DISPLAY \
  -e XAUTHORITY=/home/ros/catkin_ws/src/diffbot/.devcontainer/noetic/.x11/xauth \
  -v "$PWD":/home/ros/catkin_ws/src/diffbot diffbot:noetic \
  bash -c "bash src/diffbot/.devcontainer/noetic/setup.sh && bash"
To set up a workspace without Docker, for example on the robot’s Raspberry Pi, follow the steps below.
Dependencies
The required Ubuntu packages are listed in software package sections found in the documentation. Other ROS catkin packages such as rplidar_ros need to be cloned into the catkin workspace.
For an automated and simplified dependency installation process install the vcstool, which is used in the next steps.
sudo apt install python3-vcstool
:hammer: How to Build
To build the packages in this repository including the Remo robot follow these steps:
-
cdinto an existing ROS Noetic catkin workspace or create a new one:
mkdir -p catkin_ws/src
- Clone this repository in the
srcfolder of your ROS Noetic catkin workspace:
cd catkin_ws/src
```console
File truncated at 100 lines see the full file
CONTRIBUTING
Contributing to DiffBot
DiffBot and Remo are two differential drive robots for ROS 1 Noetic. This repository has their ROS packages, the Teensy firmware and the dev container. Remo’s robot model is in remo_description, and the documentation is at ros-mobile-robots.com, from ros-mobile-robots.github.io.
Ask questions and get help with your build in Discussions, where the answers stay easy to find. Report bugs and request features as an issue in the repository they affect: diffbot, remo_description for Remo’s model, or ros-mobile-robots.github.io for the documentation. For a larger change, open an issue first, so the approach can be agreed before you write the code. This branch is ROS 1 Noetic; a move to ROS 2 is future work, so please discuss it in an issue first.
The documentation’s Contributing section explains the repositories, the roadmap, the dev container and the automated checks in more detail.
Set up
The quickest working setup is the dev container in .devcontainer/noetic: open your clone in VS Code and choose Reopen in Container. It has ROS Noetic, Gazebo 11 and everything the packages need, clones remo_description, at the version pinned in diffbot_dev.repos, and rplidar_ros, and builds the workspace in ~/catkin_ws. CI builds the same image. Without the container, follow the installation steps in the README.
When the pin moves to a new version, an existing workspace keeps its old checkout of remo_description, because the setup doesn’t replace repositories that are already there. Check out the new version yourself, then build again. If git status shows changes of your own, commit them on a branch first: the checkout would either stop on them or carry them over to the new version.
cd ~/catkin_ws/src/remo_description
git status                                          # no changes of your own?
git fetch --tags
git checkout 2.0.0                                  # the version in diffbot_dev.repos
Build and test
In ~/catkin_ws:
catkin build                                        # build the workspace
source devel/setup.bash
catkin build --catkin-make-args run_tests           # build and run all tests
catkin_test_results build                           # summary: 10 tests, 0 errors, 0 failures
rostest diffbot_gazebo sim_drive_diffbot.test       # one robot's simulation test
The simulation test drives DiffBot and Remo in Gazebo and checks where they went. Run it for any change to the robot models, the controllers or the simulation.
The Teensy firmware builds with PlatformIO, which isn’t in the dev container. The firmware has a container of its own, .docker/firmware, with PlatformIO 6.2.0 and a compiler, so Docker is all you need. Our script .docker/firmware/run.sh runs a command in that container, here PlatformIO’s pio. When you change the firmware, build both boards, as CI does, because the change has to work on both. From the root folder of your diffbot clone on the PC:
.docker/firmware/run.sh pio run -e teensy31
.docker/firmware/run.sh pio run -e teensy40
The script builds the image first. Later image builds took about 2 seconds on our test PC, because Docker reuses the cached image layers whose inputs haven’t changed. They only show their output when they fail. The script runs the container as your user (id -u and id -g), so the files it writes belong to you. To use other IDs, set LOCAL_UID and LOCAL_GID, for example LOCAL_UID=1001 LOCAL_GID=1001 .docker/firmware/run.sh pio run -e teensy40. The first firmware build downloads the Teensy toolchain, which needs the internet and took about a minute on our test PC. The firmware files land in diffbot_firmware/.pio/build/<board>/, for example firmware.hex, which PJRC’s Teensy Loader can flash. Don’t build in the container and on the PC at the same time: both write to that .pio folder. CI builds the same way.
Or install PlatformIO on your PC, outside the dev container, with its installer script or in a virtual environment. Many Linux distributions don’t allow pip install into the system Python. Then build from your diffbot clone on the PC:
python3 -m venv ~/.venvs/platformio && ~/.venvs/platformio/bin/pip install platformio   # once
cd diffbot_firmware
~/.venvs/platformio/bin/pio run -e teensy31 && ~/.venvs/platformio/bin/pio run -e teensy40
CI runs on every pull request: industrial_ci builds and tests the workspace for Noetic, the firmware is built for both boards, and the dev container image is built.
Pull requests
-
One feature or fix per pull request, on a branch named
feat/…,fix/…,docs/…orchore/…. Keep unrelated changes for another PR. -
Pull requests are squash-merged. The PR title becomes the commit’s subject, so write it as
Area: what changed, for exampleSimulation test: narrower turn checks. Aim for 65 characters or fewer; GitHub adds the PR number. The whole description becomes the commit message, so start it with what changes and why. -
Describe how you tested it: what you ran, on which robot or in simulation, and what you saw. Link the issue with
Closes #N. - Comments explain why the code is the way it is, not what changed or how it used to be. The history belongs in the commit and the PR.
-
Every feature also gets documentation on ros-mobile-robots.com, a new or updated page: open a pull request in ros-mobile-robots.github.io and link it under
## Documentationin the description, asros-mobile-robots/ros-mobile-robots.github.io#N. If a page on ros-mobile-robots.com already explains the change, link that page instead. If nothing user-visible changes, writeNone. The PR description check fails until that section has one of the three. It runs again when you edit the description: look at that new run, because re-running the old one still sees the old text. - Follow REP 103 for units and coordinate frames.
-
Python follows PEP 8 with the settings of ROS 2’s
ament_flake8, with PEP 257 docstrings and type hints. AGENTS.md lists the commands that check it.
AI-assisted contributions
You’re welcome to use AI tools. Whatever produced the code, you’re its author and responsible for it:
- Understand every change and be able to explain it in review, in your own words.
- Build and test it as described above, and report what you actually ran. Don’t claim tests that didn’t run.
- Check that the APIs, parameters, files and links you use exist. Pull requests with invented ones are closed.
- Keep the PR description and your review replies short and specific: what changed, why, and how it was tested.
You don’t need to say whether you used AI. Please don’t add attribution lines for AI tools to commits or pull requests, such as Co-Authored-By: for a tool or “Generated with …”.
License
By contributing, you agree that your contributions are licensed under this repository’s BSD 3-Clause License.
|
|
diffbot repositorydiffbot_base diffbot_bringup diffbot_control diffbot_description diffbot_gazebo diffbot_mbf diffbot_msgs diffbot_navigation diffbot_robot diffbot_slam |
ROS Distro
|
Repository Summary
| Checkout URI | https://github.com/ros-mobile-robots/diffbot.git |
| VCS Type | git |
| VCS Version | noetic-devel |
| Last Updated | 2026-10-30 |
| Dev Status | DEVELOPED |
| Released | RELEASED |
| Contributing |
Help Wanted (-)
Good First Issues (-) Pull Requests to Review (-) |
Packages
| Name | Version |
|---|---|
| diffbot_base | 1.1.0 |
| diffbot_bringup | 1.1.0 |
| diffbot_control | 1.1.0 |
| diffbot_description | 1.1.0 |
| diffbot_gazebo | 1.1.0 |
| diffbot_mbf | 1.1.0 |
| diffbot_msgs | 1.1.0 |
| diffbot_navigation | 1.1.0 |
| diffbot_robot | 1.1.0 |
| diffbot_slam | 1.1.0 |
README
DiffBot
DiffBot is an autonomous differential drive robot with two wheels. Its main processing unit is a Raspberry Pi 4 B running Ubuntu Mate 20.04 and the ROS 1 (ROS Noetic) middleware. This respository contains ROS driver packages, ROS Control Hardware Interface for the real robot and configurations for simulating DiffBot. The formatted documentation can be found at: https://ros-mobile-robots.com.
| DiffBot | Lidar SLAMTEC RPLidar A2 |
|---|---|
|
|
If you are looking for a 3D printable modular base, see the remo_description repository. You can use it directly with the software of this diffbot repository.
| Remo | Gazebo Simulation | RViz |
|---|---|---|
|
|
|
It provides mounts for different camera modules, such as Raspi Cam v2, OAK-1, OAK-D and you can even design your own if you like. There is also support for different single board computers (Raspberry Pi and Nvidia Jetson Nano) through two changable decks. You are agin free to create your own.
Demonstration
SLAM and Navigation
| Real robot | Gazebo Simulation |
|---|---|
|
|
:package: Package Overview
-
diffbot_base: ROS Control hardware interface includingcontroller_managercontrol loop for the real robot. It talks to the Teensy microcontroller, whose firmware is indiffbot_firmware. -
diffbot_bringup: Launch files to bring up the hardware drivers (camera, lidar, imu, ultrasonic, …) for the real DiffBot robot. -
diffbot_control: Configurations for thediff_drive_controllerof ROS Control used in Gazebo simulation and the real robot. -
diffbot_description: URDF description of DiffBot including its sensors. -
diffbot_gazebo: Simulation specific launch and configuration files for DiffBot. -
diffbot_msgs: Message definitions specific to DiffBot, for example the message for encoder data. -
diffbot_navigation: Navigation based onmove_basepackage; launch and configuration files. -
diffbot_slam: Simultaneous localization and mapping using different implementations (e.g., gmapping) to create a map of the environment
Installation
The packages are written for and tested with ROS 1 Noetic on Ubuntu 20.04 Focal Fossa. For the real robot Ubuntu Mate 20.04 for arm64 is installed on the Raspberry Pi 4 B with 4GB. The communication between the mobile robot and the work pc is done by configuring the ROS Network, see also the documentation.
Development Container
The quickest way to a working setup on a development PC is the dev container in .devcontainer/noetic: a Docker image with ROS Noetic, Gazebo 11 and everything the DiffBot packages need. It works on Linux and on Windows with WSL 2, and CI builds the same image.
The full guide is on the documentation site: Use the Dev Container (setup on Linux and Windows, usage, updating, troubleshooting) and How the Dev Container Works.
- VS Code: install the Dev Containers extension, open your clone of this repository and choose Reopen in Container.
- Command line: with the Dev Container CLI:
  devcontainer up --workspace-folder . --config .devcontainer/noetic/devcontainer.json
  devcontainer exec --workspace-folder . --config .devcontainer/noetic/devcontainer.json bash
Creating the container clones rplidar_ros and remo_description, installs missing dependencies with rosdep and builds the workspace in ~/catkin_ws. Your clone of this repository is mounted at ~/catkin_ws/src/diffbot, so edits on the host show up in the container. The container uses the host network to reach the robot.
RViz and Gazebo open on the host’s display. On Windows, WSLg needs no setup. On a native Linux desktop (X11 or Wayland with Xwayland), install xauth on the host (sudo apt install xauth): before the container starts, host-x11.sh copies your display’s X11 cookie to .devcontainer/noetic/.x11/ (ignored by Git), where the container reads it. So xhost + isn’t needed.
Plain Docker works too. The image’s user has UID 1000; with another UID, use the dev container, which adapts it.
docker build -f .devcontainer/noetic/Dockerfile -t diffbot:noetic .
bash .devcontainer/noetic/host-x11.sh
docker run -it --rm --net=host -v /tmp/.X11-unix:/tmp/.X11-unix -e DISPLAY \
  -e XAUTHORITY=/home/ros/catkin_ws/src/diffbot/.devcontainer/noetic/.x11/xauth \
  -v "$PWD":/home/ros/catkin_ws/src/diffbot diffbot:noetic \
  bash -c "bash src/diffbot/.devcontainer/noetic/setup.sh && bash"
To set up a workspace without Docker, for example on the robot’s Raspberry Pi, follow the steps below.
Dependencies
The required Ubuntu packages are listed in software package sections found in the documentation. Other ROS catkin packages such as rplidar_ros need to be cloned into the catkin workspace.
For an automated and simplified dependency installation process install the vcstool, which is used in the next steps.
sudo apt install python3-vcstool
:hammer: How to Build
To build the packages in this repository including the Remo robot follow these steps:
-
cdinto an existing ROS Noetic catkin workspace or create a new one:
mkdir -p catkin_ws/src
- Clone this repository in the
srcfolder of your ROS Noetic catkin workspace:
cd catkin_ws/src
```console
File truncated at 100 lines see the full file
CONTRIBUTING
Contributing to DiffBot
DiffBot and Remo are two differential drive robots for ROS 1 Noetic. This repository has their ROS packages, the Teensy firmware and the dev container. Remo’s robot model is in remo_description, and the documentation is at ros-mobile-robots.com, from ros-mobile-robots.github.io.
Ask questions and get help with your build in Discussions, where the answers stay easy to find. Report bugs and request features as an issue in the repository they affect: diffbot, remo_description for Remo’s model, or ros-mobile-robots.github.io for the documentation. For a larger change, open an issue first, so the approach can be agreed before you write the code. This branch is ROS 1 Noetic; a move to ROS 2 is future work, so please discuss it in an issue first.
The documentation’s Contributing section explains the repositories, the roadmap, the dev container and the automated checks in more detail.
Set up
The quickest working setup is the dev container in .devcontainer/noetic: open your clone in VS Code and choose Reopen in Container. It has ROS Noetic, Gazebo 11 and everything the packages need, clones remo_description, at the version pinned in diffbot_dev.repos, and rplidar_ros, and builds the workspace in ~/catkin_ws. CI builds the same image. Without the container, follow the installation steps in the README.
When the pin moves to a new version, an existing workspace keeps its old checkout of remo_description, because the setup doesn’t replace repositories that are already there. Check out the new version yourself, then build again. If git status shows changes of your own, commit them on a branch first: the checkout would either stop on them or carry them over to the new version.
cd ~/catkin_ws/src/remo_description
git status                                          # no changes of your own?
git fetch --tags
git checkout 2.0.0                                  # the version in diffbot_dev.repos
Build and test
In ~/catkin_ws:
catkin build                                        # build the workspace
source devel/setup.bash
catkin build --catkin-make-args run_tests           # build and run all tests
catkin_test_results build                           # summary: 10 tests, 0 errors, 0 failures
rostest diffbot_gazebo sim_drive_diffbot.test       # one robot's simulation test
The simulation test drives DiffBot and Remo in Gazebo and checks where they went. Run it for any change to the robot models, the controllers or the simulation.
The Teensy firmware builds with PlatformIO, which isn’t in the dev container. The firmware has a container of its own, .docker/firmware, with PlatformIO 6.2.0 and a compiler, so Docker is all you need. Our script .docker/firmware/run.sh runs a command in that container, here PlatformIO’s pio. When you change the firmware, build both boards, as CI does, because the change has to work on both. From the root folder of your diffbot clone on the PC:
.docker/firmware/run.sh pio run -e teensy31
.docker/firmware/run.sh pio run -e teensy40
The script builds the image first. Later image builds took about 2 seconds on our test PC, because Docker reuses the cached image layers whose inputs haven’t changed. They only show their output when they fail. The script runs the container as your user (id -u and id -g), so the files it writes belong to you. To use other IDs, set LOCAL_UID and LOCAL_GID, for example LOCAL_UID=1001 LOCAL_GID=1001 .docker/firmware/run.sh pio run -e teensy40. The first firmware build downloads the Teensy toolchain, which needs the internet and took about a minute on our test PC. The firmware files land in diffbot_firmware/.pio/build/<board>/, for example firmware.hex, which PJRC’s Teensy Loader can flash. Don’t build in the container and on the PC at the same time: both write to that .pio folder. CI builds the same way.
Or install PlatformIO on your PC, outside the dev container, with its installer script or in a virtual environment. Many Linux distributions don’t allow pip install into the system Python. Then build from your diffbot clone on the PC:
python3 -m venv ~/.venvs/platformio && ~/.venvs/platformio/bin/pip install platformio   # once
cd diffbot_firmware
~/.venvs/platformio/bin/pio run -e teensy31 && ~/.venvs/platformio/bin/pio run -e teensy40
CI runs on every pull request: industrial_ci builds and tests the workspace for Noetic, the firmware is built for both boards, and the dev container image is built.
Pull requests
-
One feature or fix per pull request, on a branch named
feat/…,fix/…,docs/…orchore/…. Keep unrelated changes for another PR. -
Pull requests are squash-merged. The PR title becomes the commit’s subject, so write it as
Area: what changed, for exampleSimulation test: narrower turn checks. Aim for 65 characters or fewer; GitHub adds the PR number. The whole description becomes the commit message, so start it with what changes and why. -
Describe how you tested it: what you ran, on which robot or in simulation, and what you saw. Link the issue with
Closes #N. - Comments explain why the code is the way it is, not what changed or how it used to be. The history belongs in the commit and the PR.
-
Every feature also gets documentation on ros-mobile-robots.com, a new or updated page: open a pull request in ros-mobile-robots.github.io and link it under
## Documentationin the description, asros-mobile-robots/ros-mobile-robots.github.io#N. If a page on ros-mobile-robots.com already explains the change, link that page instead. If nothing user-visible changes, writeNone. The PR description check fails until that section has one of the three. It runs again when you edit the description: look at that new run, because re-running the old one still sees the old text. - Follow REP 103 for units and coordinate frames.
-
Python follows PEP 8 with the settings of ROS 2’s
ament_flake8, with PEP 257 docstrings and type hints. AGENTS.md lists the commands that check it.
AI-assisted contributions
You’re welcome to use AI tools. Whatever produced the code, you’re its author and responsible for it:
- Understand every change and be able to explain it in review, in your own words.
- Build and test it as described above, and report what you actually ran. Don’t claim tests that didn’t run.
- Check that the APIs, parameters, files and links you use exist. Pull requests with invented ones are closed.
- Keep the PR description and your review replies short and specific: what changed, why, and how it was tested.
You don’t need to say whether you used AI. Please don’t add attribution lines for AI tools to commits or pull requests, such as Co-Authored-By: for a tool or “Generated with …”.
License
By contributing, you agree that your contributions are licensed under this repository’s BSD 3-Clause License.
|
|
diffbot repositorydiffbot_base diffbot_bringup diffbot_control diffbot_description diffbot_gazebo diffbot_mbf diffbot_msgs diffbot_navigation diffbot_robot diffbot_slam |
ROS Distro
|
Repository Summary
| Checkout URI | https://github.com/ros-mobile-robots/diffbot.git |
| VCS Type | git |
| VCS Version | noetic-devel |
| Last Updated | 2026-10-30 |
| Dev Status | DEVELOPED |
| Released | RELEASED |
| Contributing |
Help Wanted (-)
Good First Issues (-) Pull Requests to Review (-) |
Packages
| Name | Version |
|---|---|
| diffbot_base | 1.1.0 |
| diffbot_bringup | 1.1.0 |
| diffbot_control | 1.1.0 |
| diffbot_description | 1.1.0 |
| diffbot_gazebo | 1.1.0 |
| diffbot_mbf | 1.1.0 |
| diffbot_msgs | 1.1.0 |
| diffbot_navigation | 1.1.0 |
| diffbot_robot | 1.1.0 |
| diffbot_slam | 1.1.0 |
README
DiffBot
DiffBot is an autonomous differential drive robot with two wheels. Its main processing unit is a Raspberry Pi 4 B running Ubuntu Mate 20.04 and the ROS 1 (ROS Noetic) middleware. This respository contains ROS driver packages, ROS Control Hardware Interface for the real robot and configurations for simulating DiffBot. The formatted documentation can be found at: https://ros-mobile-robots.com.
| DiffBot | Lidar SLAMTEC RPLidar A2 |
|---|---|
|
|
If you are looking for a 3D printable modular base, see the remo_description repository. You can use it directly with the software of this diffbot repository.
| Remo | Gazebo Simulation | RViz |
|---|---|---|
|
|
|
It provides mounts for different camera modules, such as Raspi Cam v2, OAK-1, OAK-D and you can even design your own if you like. There is also support for different single board computers (Raspberry Pi and Nvidia Jetson Nano) through two changable decks. You are agin free to create your own.
Demonstration
SLAM and Navigation
| Real robot | Gazebo Simulation |
|---|---|
|
|
:package: Package Overview
-
diffbot_base: ROS Control hardware interface includingcontroller_managercontrol loop for the real robot. It talks to the Teensy microcontroller, whose firmware is indiffbot_firmware. -
diffbot_bringup: Launch files to bring up the hardware drivers (camera, lidar, imu, ultrasonic, …) for the real DiffBot robot. -
diffbot_control: Configurations for thediff_drive_controllerof ROS Control used in Gazebo simulation and the real robot. -
diffbot_description: URDF description of DiffBot including its sensors. -
diffbot_gazebo: Simulation specific launch and configuration files for DiffBot. -
diffbot_msgs: Message definitions specific to DiffBot, for example the message for encoder data. -
diffbot_navigation: Navigation based onmove_basepackage; launch and configuration files. -
diffbot_slam: Simultaneous localization and mapping using different implementations (e.g., gmapping) to create a map of the environment
Installation
The packages are written for and tested with ROS 1 Noetic on Ubuntu 20.04 Focal Fossa. For the real robot Ubuntu Mate 20.04 for arm64 is installed on the Raspberry Pi 4 B with 4GB. The communication between the mobile robot and the work pc is done by configuring the ROS Network, see also the documentation.
Development Container
The quickest way to a working setup on a development PC is the dev container in .devcontainer/noetic: a Docker image with ROS Noetic, Gazebo 11 and everything the DiffBot packages need. It works on Linux and on Windows with WSL 2, and CI builds the same image.
The full guide is on the documentation site: Use the Dev Container (setup on Linux and Windows, usage, updating, troubleshooting) and How the Dev Container Works.
- VS Code: install the Dev Containers extension, open your clone of this repository and choose Reopen in Container.
- Command line: with the Dev Container CLI:
  devcontainer up --workspace-folder . --config .devcontainer/noetic/devcontainer.json
  devcontainer exec --workspace-folder . --config .devcontainer/noetic/devcontainer.json bash
Creating the container clones rplidar_ros and remo_description, installs missing dependencies with rosdep and builds the workspace in ~/catkin_ws. Your clone of this repository is mounted at ~/catkin_ws/src/diffbot, so edits on the host show up in the container. The container uses the host network to reach the robot.
RViz and Gazebo open on the host’s display. On Windows, WSLg needs no setup. On a native Linux desktop (X11 or Wayland with Xwayland), install xauth on the host (sudo apt install xauth): before the container starts, host-x11.sh copies your display’s X11 cookie to .devcontainer/noetic/.x11/ (ignored by Git), where the container reads it. So xhost + isn’t needed.
Plain Docker works too. The image’s user has UID 1000; with another UID, use the dev container, which adapts it.
docker build -f .devcontainer/noetic/Dockerfile -t diffbot:noetic .
bash .devcontainer/noetic/host-x11.sh
docker run -it --rm --net=host -v /tmp/.X11-unix:/tmp/.X11-unix -e DISPLAY \
  -e XAUTHORITY=/home/ros/catkin_ws/src/diffbot/.devcontainer/noetic/.x11/xauth \
  -v "$PWD":/home/ros/catkin_ws/src/diffbot diffbot:noetic \
  bash -c "bash src/diffbot/.devcontainer/noetic/setup.sh && bash"
To set up a workspace without Docker, for example on the robot’s Raspberry Pi, follow the steps below.
Dependencies
The required Ubuntu packages are listed in software package sections found in the documentation. Other ROS catkin packages such as rplidar_ros need to be cloned into the catkin workspace.
For an automated and simplified dependency installation process install the vcstool, which is used in the next steps.
sudo apt install python3-vcstool
:hammer: How to Build
To build the packages in this repository including the Remo robot follow these steps:
-
cdinto an existing ROS Noetic catkin workspace or create a new one:
mkdir -p catkin_ws/src
- Clone this repository in the
srcfolder of your ROS Noetic catkin workspace:
cd catkin_ws/src
```console
File truncated at 100 lines see the full file
CONTRIBUTING
Contributing to DiffBot
DiffBot and Remo are two differential drive robots for ROS 1 Noetic. This repository has their ROS packages, the Teensy firmware and the dev container. Remo’s robot model is in remo_description, and the documentation is at ros-mobile-robots.com, from ros-mobile-robots.github.io.
Ask questions and get help with your build in Discussions, where the answers stay easy to find. Report bugs and request features as an issue in the repository they affect: diffbot, remo_description for Remo’s model, or ros-mobile-robots.github.io for the documentation. For a larger change, open an issue first, so the approach can be agreed before you write the code. This branch is ROS 1 Noetic; a move to ROS 2 is future work, so please discuss it in an issue first.
The documentation’s Contributing section explains the repositories, the roadmap, the dev container and the automated checks in more detail.
Set up
The quickest working setup is the dev container in .devcontainer/noetic: open your clone in VS Code and choose Reopen in Container. It has ROS Noetic, Gazebo 11 and everything the packages need, clones remo_description, at the version pinned in diffbot_dev.repos, and rplidar_ros, and builds the workspace in ~/catkin_ws. CI builds the same image. Without the container, follow the installation steps in the README.
When the pin moves to a new version, an existing workspace keeps its old checkout of remo_description, because the setup doesn’t replace repositories that are already there. Check out the new version yourself, then build again. If git status shows changes of your own, commit them on a branch first: the checkout would either stop on them or carry them over to the new version.
cd ~/catkin_ws/src/remo_description
git status                                          # no changes of your own?
git fetch --tags
git checkout 2.0.0                                  # the version in diffbot_dev.repos
Build and test
In ~/catkin_ws:
catkin build                                        # build the workspace
source devel/setup.bash
catkin build --catkin-make-args run_tests           # build and run all tests
catkin_test_results build                           # summary: 10 tests, 0 errors, 0 failures
rostest diffbot_gazebo sim_drive_diffbot.test       # one robot's simulation test
The simulation test drives DiffBot and Remo in Gazebo and checks where they went. Run it for any change to the robot models, the controllers or the simulation.
The Teensy firmware builds with PlatformIO, which isn’t in the dev container. The firmware has a container of its own, .docker/firmware, with PlatformIO 6.2.0 and a compiler, so Docker is all you need. Our script .docker/firmware/run.sh runs a command in that container, here PlatformIO’s pio. When you change the firmware, build both boards, as CI does, because the change has to work on both. From the root folder of your diffbot clone on the PC:
.docker/firmware/run.sh pio run -e teensy31
.docker/firmware/run.sh pio run -e teensy40
The script builds the image first. Later image builds took about 2 seconds on our test PC, because Docker reuses the cached image layers whose inputs haven’t changed. They only show their output when they fail. The script runs the container as your user (id -u and id -g), so the files it writes belong to you. To use other IDs, set LOCAL_UID and LOCAL_GID, for example LOCAL_UID=1001 LOCAL_GID=1001 .docker/firmware/run.sh pio run -e teensy40. The first firmware build downloads the Teensy toolchain, which needs the internet and took about a minute on our test PC. The firmware files land in diffbot_firmware/.pio/build/<board>/, for example firmware.hex, which PJRC’s Teensy Loader can flash. Don’t build in the container and on the PC at the same time: both write to that .pio folder. CI builds the same way.
Or install PlatformIO on your PC, outside the dev container, with its installer script or in a virtual environment. Many Linux distributions don’t allow pip install into the system Python. Then build from your diffbot clone on the PC:
python3 -m venv ~/.venvs/platformio && ~/.venvs/platformio/bin/pip install platformio   # once
cd diffbot_firmware
~/.venvs/platformio/bin/pio run -e teensy31 && ~/.venvs/platformio/bin/pio run -e teensy40
CI runs on every pull request: industrial_ci builds and tests the workspace for Noetic, the firmware is built for both boards, and the dev container image is built.
Pull requests
-
One feature or fix per pull request, on a branch named
feat/…,fix/…,docs/…orchore/…. Keep unrelated changes for another PR. -
Pull requests are squash-merged. The PR title becomes the commit’s subject, so write it as
Area: what changed, for exampleSimulation test: narrower turn checks. Aim for 65 characters or fewer; GitHub adds the PR number. The whole description becomes the commit message, so start it with what changes and why. -
Describe how you tested it: what you ran, on which robot or in simulation, and what you saw. Link the issue with
Closes #N. - Comments explain why the code is the way it is, not what changed or how it used to be. The history belongs in the commit and the PR.
-
Every feature also gets documentation on ros-mobile-robots.com, a new or updated page: open a pull request in ros-mobile-robots.github.io and link it under
## Documentationin the description, asros-mobile-robots/ros-mobile-robots.github.io#N. If a page on ros-mobile-robots.com already explains the change, link that page instead. If nothing user-visible changes, writeNone. The PR description check fails until that section has one of the three. It runs again when you edit the description: look at that new run, because re-running the old one still sees the old text. - Follow REP 103 for units and coordinate frames.
-
Python follows PEP 8 with the settings of ROS 2’s
ament_flake8, with PEP 257 docstrings and type hints. AGENTS.md lists the commands that check it.
AI-assisted contributions
You’re welcome to use AI tools. Whatever produced the code, you’re its author and responsible for it:
- Understand every change and be able to explain it in review, in your own words.
- Build and test it as described above, and report what you actually ran. Don’t claim tests that didn’t run.
- Check that the APIs, parameters, files and links you use exist. Pull requests with invented ones are closed.
- Keep the PR description and your review replies short and specific: what changed, why, and how it was tested.
You don’t need to say whether you used AI. Please don’t add attribution lines for AI tools to commits or pull requests, such as Co-Authored-By: for a tool or “Generated with …”.
License
By contributing, you agree that your contributions are licensed under this repository’s BSD 3-Clause License.
|
|
diffbot repositorydiffbot_base diffbot_bringup diffbot_control diffbot_description diffbot_gazebo diffbot_mbf diffbot_msgs diffbot_navigation diffbot_robot diffbot_slam |
ROS Distro
|
Repository Summary
| Checkout URI | https://github.com/ros-mobile-robots/diffbot.git |
| VCS Type | git |
| VCS Version | noetic-devel |
| Last Updated | 2026-10-30 |
| Dev Status | DEVELOPED |
| Released | RELEASED |
| Contributing |
Help Wanted (-)
Good First Issues (-) Pull Requests to Review (-) |
Packages
| Name | Version |
|---|---|
| diffbot_base | 1.1.0 |
| diffbot_bringup | 1.1.0 |
| diffbot_control | 1.1.0 |
| diffbot_description | 1.1.0 |
| diffbot_gazebo | 1.1.0 |
| diffbot_mbf | 1.1.0 |
| diffbot_msgs | 1.1.0 |
| diffbot_navigation | 1.1.0 |
| diffbot_robot | 1.1.0 |
| diffbot_slam | 1.1.0 |
README
DiffBot
DiffBot is an autonomous differential drive robot with two wheels. Its main processing unit is a Raspberry Pi 4 B running Ubuntu Mate 20.04 and the ROS 1 (ROS Noetic) middleware. This respository contains ROS driver packages, ROS Control Hardware Interface for the real robot and configurations for simulating DiffBot. The formatted documentation can be found at: https://ros-mobile-robots.com.
| DiffBot | Lidar SLAMTEC RPLidar A2 |
|---|---|
|
|
If you are looking for a 3D printable modular base, see the remo_description repository. You can use it directly with the software of this diffbot repository.
| Remo | Gazebo Simulation | RViz |
|---|---|---|
|
|
|
It provides mounts for different camera modules, such as Raspi Cam v2, OAK-1, OAK-D and you can even design your own if you like. There is also support for different single board computers (Raspberry Pi and Nvidia Jetson Nano) through two changable decks. You are agin free to create your own.
Demonstration
SLAM and Navigation
| Real robot | Gazebo Simulation |
|---|---|
|
|
:package: Package Overview
-
diffbot_base: ROS Control hardware interface includingcontroller_managercontrol loop for the real robot. It talks to the Teensy microcontroller, whose firmware is indiffbot_firmware. -
diffbot_bringup: Launch files to bring up the hardware drivers (camera, lidar, imu, ultrasonic, …) for the real DiffBot robot. -
diffbot_control: Configurations for thediff_drive_controllerof ROS Control used in Gazebo simulation and the real robot. -
diffbot_description: URDF description of DiffBot including its sensors. -
diffbot_gazebo: Simulation specific launch and configuration files for DiffBot. -
diffbot_msgs: Message definitions specific to DiffBot, for example the message for encoder data. -
diffbot_navigation: Navigation based onmove_basepackage; launch and configuration files. -
diffbot_slam: Simultaneous localization and mapping using different implementations (e.g., gmapping) to create a map of the environment
Installation
The packages are written for and tested with ROS 1 Noetic on Ubuntu 20.04 Focal Fossa. For the real robot Ubuntu Mate 20.04 for arm64 is installed on the Raspberry Pi 4 B with 4GB. The communication between the mobile robot and the work pc is done by configuring the ROS Network, see also the documentation.
Development Container
The quickest way to a working setup on a development PC is the dev container in .devcontainer/noetic: a Docker image with ROS Noetic, Gazebo 11 and everything the DiffBot packages need. It works on Linux and on Windows with WSL 2, and CI builds the same image.
The full guide is on the documentation site: Use the Dev Container (setup on Linux and Windows, usage, updating, troubleshooting) and How the Dev Container Works.
- VS Code: install the Dev Containers extension, open your clone of this repository and choose Reopen in Container.
- Command line: with the Dev Container CLI:
  devcontainer up --workspace-folder . --config .devcontainer/noetic/devcontainer.json
  devcontainer exec --workspace-folder . --config .devcontainer/noetic/devcontainer.json bash
Creating the container clones rplidar_ros and remo_description, installs missing dependencies with rosdep and builds the workspace in ~/catkin_ws. Your clone of this repository is mounted at ~/catkin_ws/src/diffbot, so edits on the host show up in the container. The container uses the host network to reach the robot.
RViz and Gazebo open on the host’s display. On Windows, WSLg needs no setup. On a native Linux desktop (X11 or Wayland with Xwayland), install xauth on the host (sudo apt install xauth): before the container starts, host-x11.sh copies your display’s X11 cookie to .devcontainer/noetic/.x11/ (ignored by Git), where the container reads it. So xhost + isn’t needed.
Plain Docker works too. The image’s user has UID 1000; with another UID, use the dev container, which adapts it.
docker build -f .devcontainer/noetic/Dockerfile -t diffbot:noetic .
bash .devcontainer/noetic/host-x11.sh
docker run -it --rm --net=host -v /tmp/.X11-unix:/tmp/.X11-unix -e DISPLAY \
  -e XAUTHORITY=/home/ros/catkin_ws/src/diffbot/.devcontainer/noetic/.x11/xauth \
  -v "$PWD":/home/ros/catkin_ws/src/diffbot diffbot:noetic \
  bash -c "bash src/diffbot/.devcontainer/noetic/setup.sh && bash"
To set up a workspace without Docker, for example on the robot’s Raspberry Pi, follow the steps below.
Dependencies
The required Ubuntu packages are listed in software package sections found in the documentation. Other ROS catkin packages such as rplidar_ros need to be cloned into the catkin workspace.
For an automated and simplified dependency installation process install the vcstool, which is used in the next steps.
sudo apt install python3-vcstool
:hammer: How to Build
To build the packages in this repository including the Remo robot follow these steps:
-
cdinto an existing ROS Noetic catkin workspace or create a new one:
mkdir -p catkin_ws/src
- Clone this repository in the
srcfolder of your ROS Noetic catkin workspace:
cd catkin_ws/src
```console
File truncated at 100 lines see the full file
CONTRIBUTING
Contributing to DiffBot
DiffBot and Remo are two differential drive robots for ROS 1 Noetic. This repository has their ROS packages, the Teensy firmware and the dev container. Remo’s robot model is in remo_description, and the documentation is at ros-mobile-robots.com, from ros-mobile-robots.github.io.
Ask questions and get help with your build in Discussions, where the answers stay easy to find. Report bugs and request features as an issue in the repository they affect: diffbot, remo_description for Remo’s model, or ros-mobile-robots.github.io for the documentation. For a larger change, open an issue first, so the approach can be agreed before you write the code. This branch is ROS 1 Noetic; a move to ROS 2 is future work, so please discuss it in an issue first.
The documentation’s Contributing section explains the repositories, the roadmap, the dev container and the automated checks in more detail.
Set up
The quickest working setup is the dev container in .devcontainer/noetic: open your clone in VS Code and choose Reopen in Container. It has ROS Noetic, Gazebo 11 and everything the packages need, clones remo_description, at the version pinned in diffbot_dev.repos, and rplidar_ros, and builds the workspace in ~/catkin_ws. CI builds the same image. Without the container, follow the installation steps in the README.
When the pin moves to a new version, an existing workspace keeps its old checkout of remo_description, because the setup doesn’t replace repositories that are already there. Check out the new version yourself, then build again. If git status shows changes of your own, commit them on a branch first: the checkout would either stop on them or carry them over to the new version.
cd ~/catkin_ws/src/remo_description
git status                                          # no changes of your own?
git fetch --tags
git checkout 2.0.0                                  # the version in diffbot_dev.repos
Build and test
In ~/catkin_ws:
catkin build                                        # build the workspace
source devel/setup.bash
catkin build --catkin-make-args run_tests           # build and run all tests
catkin_test_results build                           # summary: 10 tests, 0 errors, 0 failures
rostest diffbot_gazebo sim_drive_diffbot.test       # one robot's simulation test
The simulation test drives DiffBot and Remo in Gazebo and checks where they went. Run it for any change to the robot models, the controllers or the simulation.
The Teensy firmware builds with PlatformIO, which isn’t in the dev container. The firmware has a container of its own, .docker/firmware, with PlatformIO 6.2.0 and a compiler, so Docker is all you need. Our script .docker/firmware/run.sh runs a command in that container, here PlatformIO’s pio. When you change the firmware, build both boards, as CI does, because the change has to work on both. From the root folder of your diffbot clone on the PC:
.docker/firmware/run.sh pio run -e teensy31
.docker/firmware/run.sh pio run -e teensy40
The script builds the image first. Later image builds took about 2 seconds on our test PC, because Docker reuses the cached image layers whose inputs haven’t changed. They only show their output when they fail. The script runs the container as your user (id -u and id -g), so the files it writes belong to you. To use other IDs, set LOCAL_UID and LOCAL_GID, for example LOCAL_UID=1001 LOCAL_GID=1001 .docker/firmware/run.sh pio run -e teensy40. The first firmware build downloads the Teensy toolchain, which needs the internet and took about a minute on our test PC. The firmware files land in diffbot_firmware/.pio/build/<board>/, for example firmware.hex, which PJRC’s Teensy Loader can flash. Don’t build in the container and on the PC at the same time: both write to that .pio folder. CI builds the same way.
Or install PlatformIO on your PC, outside the dev container, with its installer script or in a virtual environment. Many Linux distributions don’t allow pip install into the system Python. Then build from your diffbot clone on the PC:
python3 -m venv ~/.venvs/platformio && ~/.venvs/platformio/bin/pip install platformio   # once
cd diffbot_firmware
~/.venvs/platformio/bin/pio run -e teensy31 && ~/.venvs/platformio/bin/pio run -e teensy40
CI runs on every pull request: industrial_ci builds and tests the workspace for Noetic, the firmware is built for both boards, and the dev container image is built.
Pull requests
-
One feature or fix per pull request, on a branch named
feat/…,fix/…,docs/…orchore/…. Keep unrelated changes for another PR. -
Pull requests are squash-merged. The PR title becomes the commit’s subject, so write it as
Area: what changed, for exampleSimulation test: narrower turn checks. Aim for 65 characters or fewer; GitHub adds the PR number. The whole description becomes the commit message, so start it with what changes and why. -
Describe how you tested it: what you ran, on which robot or in simulation, and what you saw. Link the issue with
Closes #N. - Comments explain why the code is the way it is, not what changed or how it used to be. The history belongs in the commit and the PR.
-
Every feature also gets documentation on ros-mobile-robots.com, a new or updated page: open a pull request in ros-mobile-robots.github.io and link it under
## Documentationin the description, asros-mobile-robots/ros-mobile-robots.github.io#N. If a page on ros-mobile-robots.com already explains the change, link that page instead. If nothing user-visible changes, writeNone. The PR description check fails until that section has one of the three. It runs again when you edit the description: look at that new run, because re-running the old one still sees the old text. - Follow REP 103 for units and coordinate frames.
-
Python follows PEP 8 with the settings of ROS 2’s
ament_flake8, with PEP 257 docstrings and type hints. AGENTS.md lists the commands that check it.
AI-assisted contributions
You’re welcome to use AI tools. Whatever produced the code, you’re its author and responsible for it:
- Understand every change and be able to explain it in review, in your own words.
- Build and test it as described above, and report what you actually ran. Don’t claim tests that didn’t run.
- Check that the APIs, parameters, files and links you use exist. Pull requests with invented ones are closed.
- Keep the PR description and your review replies short and specific: what changed, why, and how it was tested.
You don’t need to say whether you used AI. Please don’t add attribution lines for AI tools to commits or pull requests, such as Co-Authored-By: for a tool or “Generated with …”.
License
By contributing, you agree that your contributions are licensed under this repository’s BSD 3-Clause License.
|
|
diffbot repositorydiffbot_base diffbot_bringup diffbot_control diffbot_description diffbot_gazebo diffbot_mbf diffbot_msgs diffbot_navigation diffbot_robot diffbot_slam |
ROS Distro
|
Repository Summary
| Checkout URI | https://github.com/ros-mobile-robots/diffbot.git |
| VCS Type | git |
| VCS Version | noetic-devel |
| Last Updated | 2026-10-30 |
| Dev Status | DEVELOPED |
| Released | RELEASED |
| Contributing |
Help Wanted (-)
Good First Issues (-) Pull Requests to Review (-) |
Packages
| Name | Version |
|---|---|
| diffbot_base | 1.1.0 |
| diffbot_bringup | 1.1.0 |
| diffbot_control | 1.1.0 |
| diffbot_description | 1.1.0 |
| diffbot_gazebo | 1.1.0 |
| diffbot_mbf | 1.1.0 |
| diffbot_msgs | 1.1.0 |
| diffbot_navigation | 1.1.0 |
| diffbot_robot | 1.1.0 |
| diffbot_slam | 1.1.0 |
README
DiffBot
DiffBot is an autonomous differential drive robot with two wheels. Its main processing unit is a Raspberry Pi 4 B running Ubuntu Mate 20.04 and the ROS 1 (ROS Noetic) middleware. This respository contains ROS driver packages, ROS Control Hardware Interface for the real robot and configurations for simulating DiffBot. The formatted documentation can be found at: https://ros-mobile-robots.com.
| DiffBot | Lidar SLAMTEC RPLidar A2 |
|---|---|
|
|
If you are looking for a 3D printable modular base, see the remo_description repository. You can use it directly with the software of this diffbot repository.
| Remo | Gazebo Simulation | RViz |
|---|---|---|
|
|
|
It provides mounts for different camera modules, such as Raspi Cam v2, OAK-1, OAK-D and you can even design your own if you like. There is also support for different single board computers (Raspberry Pi and Nvidia Jetson Nano) through two changable decks. You are agin free to create your own.
Demonstration
SLAM and Navigation
| Real robot | Gazebo Simulation |
|---|---|
|
|
:package: Package Overview
-
diffbot_base: ROS Control hardware interface includingcontroller_managercontrol loop for the real robot. It talks to the Teensy microcontroller, whose firmware is indiffbot_firmware. -
diffbot_bringup: Launch files to bring up the hardware drivers (camera, lidar, imu, ultrasonic, …) for the real DiffBot robot. -
diffbot_control: Configurations for thediff_drive_controllerof ROS Control used in Gazebo simulation and the real robot. -
diffbot_description: URDF description of DiffBot including its sensors. -
diffbot_gazebo: Simulation specific launch and configuration files for DiffBot. -
diffbot_msgs: Message definitions specific to DiffBot, for example the message for encoder data. -
diffbot_navigation: Navigation based onmove_basepackage; launch and configuration files. -
diffbot_slam: Simultaneous localization and mapping using different implementations (e.g., gmapping) to create a map of the environment
Installation
The packages are written for and tested with ROS 1 Noetic on Ubuntu 20.04 Focal Fossa. For the real robot Ubuntu Mate 20.04 for arm64 is installed on the Raspberry Pi 4 B with 4GB. The communication between the mobile robot and the work pc is done by configuring the ROS Network, see also the documentation.
Development Container
The quickest way to a working setup on a development PC is the dev container in .devcontainer/noetic: a Docker image with ROS Noetic, Gazebo 11 and everything the DiffBot packages need. It works on Linux and on Windows with WSL 2, and CI builds the same image.
The full guide is on the documentation site: Use the Dev Container (setup on Linux and Windows, usage, updating, troubleshooting) and How the Dev Container Works.
- VS Code: install the Dev Containers extension, open your clone of this repository and choose Reopen in Container.
- Command line: with the Dev Container CLI:
  devcontainer up --workspace-folder . --config .devcontainer/noetic/devcontainer.json
  devcontainer exec --workspace-folder . --config .devcontainer/noetic/devcontainer.json bash
Creating the container clones rplidar_ros and remo_description, installs missing dependencies with rosdep and builds the workspace in ~/catkin_ws. Your clone of this repository is mounted at ~/catkin_ws/src/diffbot, so edits on the host show up in the container. The container uses the host network to reach the robot.
RViz and Gazebo open on the host’s display. On Windows, WSLg needs no setup. On a native Linux desktop (X11 or Wayland with Xwayland), install xauth on the host (sudo apt install xauth): before the container starts, host-x11.sh copies your display’s X11 cookie to .devcontainer/noetic/.x11/ (ignored by Git), where the container reads it. So xhost + isn’t needed.
Plain Docker works too. The image’s user has UID 1000; with another UID, use the dev container, which adapts it.
docker build -f .devcontainer/noetic/Dockerfile -t diffbot:noetic .
bash .devcontainer/noetic/host-x11.sh
docker run -it --rm --net=host -v /tmp/.X11-unix:/tmp/.X11-unix -e DISPLAY \
  -e XAUTHORITY=/home/ros/catkin_ws/src/diffbot/.devcontainer/noetic/.x11/xauth \
  -v "$PWD":/home/ros/catkin_ws/src/diffbot diffbot:noetic \
  bash -c "bash src/diffbot/.devcontainer/noetic/setup.sh && bash"
To set up a workspace without Docker, for example on the robot’s Raspberry Pi, follow the steps below.
Dependencies
The required Ubuntu packages are listed in software package sections found in the documentation. Other ROS catkin packages such as rplidar_ros need to be cloned into the catkin workspace.
For an automated and simplified dependency installation process install the vcstool, which is used in the next steps.
sudo apt install python3-vcstool
:hammer: How to Build
To build the packages in this repository including the Remo robot follow these steps:
-
cdinto an existing ROS Noetic catkin workspace or create a new one:
mkdir -p catkin_ws/src
- Clone this repository in the
srcfolder of your ROS Noetic catkin workspace:
cd catkin_ws/src
```console
File truncated at 100 lines see the full file
CONTRIBUTING
Contributing to DiffBot
DiffBot and Remo are two differential drive robots for ROS 1 Noetic. This repository has their ROS packages, the Teensy firmware and the dev container. Remo’s robot model is in remo_description, and the documentation is at ros-mobile-robots.com, from ros-mobile-robots.github.io.
Ask questions and get help with your build in Discussions, where the answers stay easy to find. Report bugs and request features as an issue in the repository they affect: diffbot, remo_description for Remo’s model, or ros-mobile-robots.github.io for the documentation. For a larger change, open an issue first, so the approach can be agreed before you write the code. This branch is ROS 1 Noetic; a move to ROS 2 is future work, so please discuss it in an issue first.
The documentation’s Contributing section explains the repositories, the roadmap, the dev container and the automated checks in more detail.
Set up
The quickest working setup is the dev container in .devcontainer/noetic: open your clone in VS Code and choose Reopen in Container. It has ROS Noetic, Gazebo 11 and everything the packages need, clones remo_description, at the version pinned in diffbot_dev.repos, and rplidar_ros, and builds the workspace in ~/catkin_ws. CI builds the same image. Without the container, follow the installation steps in the README.
When the pin moves to a new version, an existing workspace keeps its old checkout of remo_description, because the setup doesn’t replace repositories that are already there. Check out the new version yourself, then build again. If git status shows changes of your own, commit them on a branch first: the checkout would either stop on them or carry them over to the new version.
cd ~/catkin_ws/src/remo_description
git status                                          # no changes of your own?
git fetch --tags
git checkout 2.0.0                                  # the version in diffbot_dev.repos
Build and test
In ~/catkin_ws:
catkin build                                        # build the workspace
source devel/setup.bash
catkin build --catkin-make-args run_tests           # build and run all tests
catkin_test_results build                           # summary: 10 tests, 0 errors, 0 failures
rostest diffbot_gazebo sim_drive_diffbot.test       # one robot's simulation test
The simulation test drives DiffBot and Remo in Gazebo and checks where they went. Run it for any change to the robot models, the controllers or the simulation.
The Teensy firmware builds with PlatformIO, which isn’t in the dev container. The firmware has a container of its own, .docker/firmware, with PlatformIO 6.2.0 and a compiler, so Docker is all you need. Our script .docker/firmware/run.sh runs a command in that container, here PlatformIO’s pio. When you change the firmware, build both boards, as CI does, because the change has to work on both. From the root folder of your diffbot clone on the PC:
.docker/firmware/run.sh pio run -e teensy31
.docker/firmware/run.sh pio run -e teensy40
The script builds the image first. Later image builds took about 2 seconds on our test PC, because Docker reuses the cached image layers whose inputs haven’t changed. They only show their output when they fail. The script runs the container as your user (id -u and id -g), so the files it writes belong to you. To use other IDs, set LOCAL_UID and LOCAL_GID, for example LOCAL_UID=1001 LOCAL_GID=1001 .docker/firmware/run.sh pio run -e teensy40. The first firmware build downloads the Teensy toolchain, which needs the internet and took about a minute on our test PC. The firmware files land in diffbot_firmware/.pio/build/<board>/, for example firmware.hex, which PJRC’s Teensy Loader can flash. Don’t build in the container and on the PC at the same time: both write to that .pio folder. CI builds the same way.
Or install PlatformIO on your PC, outside the dev container, with its installer script or in a virtual environment. Many Linux distributions don’t allow pip install into the system Python. Then build from your diffbot clone on the PC:
python3 -m venv ~/.venvs/platformio && ~/.venvs/platformio/bin/pip install platformio   # once
cd diffbot_firmware
~/.venvs/platformio/bin/pio run -e teensy31 && ~/.venvs/platformio/bin/pio run -e teensy40
CI runs on every pull request: industrial_ci builds and tests the workspace for Noetic, the firmware is built for both boards, and the dev container image is built.
Pull requests
-
One feature or fix per pull request, on a branch named
feat/…,fix/…,docs/…orchore/…. Keep unrelated changes for another PR. -
Pull requests are squash-merged. The PR title becomes the commit’s subject, so write it as
Area: what changed, for exampleSimulation test: narrower turn checks. Aim for 65 characters or fewer; GitHub adds the PR number. The whole description becomes the commit message, so start it with what changes and why. -
Describe how you tested it: what you ran, on which robot or in simulation, and what you saw. Link the issue with
Closes #N. - Comments explain why the code is the way it is, not what changed or how it used to be. The history belongs in the commit and the PR.
-
Every feature also gets documentation on ros-mobile-robots.com, a new or updated page: open a pull request in ros-mobile-robots.github.io and link it under
## Documentationin the description, asros-mobile-robots/ros-mobile-robots.github.io#N. If a page on ros-mobile-robots.com already explains the change, link that page instead. If nothing user-visible changes, writeNone. The PR description check fails until that section has one of the three. It runs again when you edit the description: look at that new run, because re-running the old one still sees the old text. - Follow REP 103 for units and coordinate frames.
-
Python follows PEP 8 with the settings of ROS 2’s
ament_flake8, with PEP 257 docstrings and type hints. AGENTS.md lists the commands that check it.
AI-assisted contributions
You’re welcome to use AI tools. Whatever produced the code, you’re its author and responsible for it:
- Understand every change and be able to explain it in review, in your own words.
- Build and test it as described above, and report what you actually ran. Don’t claim tests that didn’t run.
- Check that the APIs, parameters, files and links you use exist. Pull requests with invented ones are closed.
- Keep the PR description and your review replies short and specific: what changed, why, and how it was tested.
You don’t need to say whether you used AI. Please don’t add attribution lines for AI tools to commits or pull requests, such as Co-Authored-By: for a tool or “Generated with …”.
License
By contributing, you agree that your contributions are licensed under this repository’s BSD 3-Clause License.