
Repository Summary
| Checkout URI | https://github.com/rt-net/raspimouse_ros2_examples.git |
| VCS Type | git |
| VCS Version | humble-devel |
| Last Updated | 2024-08-28 |
| Dev Status | MAINTAINED |
| Released | RELEASED |
| Contributing |
Help Wanted (-)
Good First Issues (-) Pull Requests to Review (-) |
Packages
| Name | Version |
|---|---|
| raspimouse_ros2_examples | 2.2.1 |
README
| English | 日本語 |
raspimouse_ros2_examples
![]()
ROS 2 examples for Raspberry Pi Mouse.
ROS1 examples is here.
To run on Gazebo, click here.
<img src=https://rt-net.github.io/images/raspberry-pi-mouse/raspberry_pi_mouse.JPG width=500 />
Supported ROS 2 distributions
- Foxy
- Humble (This branch)
Requirements
- Raspberry Pi Mouse
- https://rt-net.jp/products/raspberrypimousev3/
- Linux OS
- Ubuntu server 22.04
- https://ubuntu.com/download/raspberry-pi
- Device Driver
- ROS
- Raspberry Pi Mouse ROS 2 package
- https://github.com/rt-net/raspimouse2
- Remote Computer (Optional)
- ROS
- Raspberry Pi Mouse ROS 2 package
- https://github.com/rt-net/raspimouse2
Installation
$ cd ~/ros2_ws/src
# Clone package
$ git clone -b $ROS_DISTRO-devel https://github.com/rt-net/raspimouse_ros2_examples.git

# Install dependencies
$ rosdep install -r -y --from-paths . --ignore-src

# Build & Install
$ cd ~/ros2_ws
$ colcon build --symlink-install
$ source ~/ros2_ws/install/setup.bash
License
This repository is licensed under the Apache 2.0, see LICENSE for details.
How To Use Examples
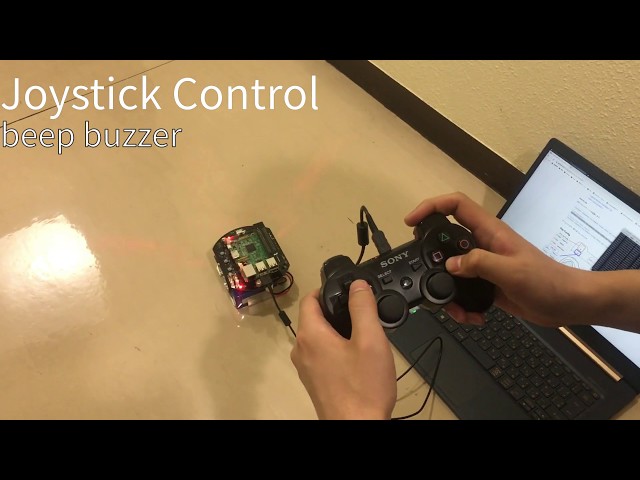
joystick_control
This is an example to use joystick controller to control a Raspberry Pi Mouse.
Requirements
- Joystick Controller
How to use
Launch nodes with the following command:
# Use F710
$ ros2 launch raspimouse_ros2_examples teleop_joy.launch.py joydev:="/dev/input/js0" joyconfig:=f710 mouse:=true

# Use DUALSHOCK 3
$ ros2 launch raspimouse_ros2_examples teleop_joy.launch.py joydev:="/dev/input/js0" joyconfig:=dualshock3 mouse:=true

# Control from remote computer
## on RaspberryPiMouse
$ ros2 run raspimouse raspimouse
## on remote computer
$ ros2 launch raspimouse_ros2_examples teleop_joy.launch.py mouse:=false
This picture shows the default key configuration.
To use Logicool Wireless Gamepad F710, set the input mode to D (DirectInput Mode).
File truncated at 100 lines see the full file
CONTRIBUTING
Any contribution that you make to this repository will be under the Apache 2 License, as dictated by that license:
5. Submission of Contributions. Unless You explicitly state otherwise,
   any Contribution intentionally submitted for inclusion in the Work
   by You to the Licensor shall be under the terms and conditions of
   this License, without any additional terms or conditions.
   Notwithstanding the above, nothing herein shall supersede or modify
   the terms of any separate license agreement you may have executed
   with Licensor regarding such Contributions.
Repository Summary
| Checkout URI | https://github.com/rt-net/raspimouse_ros2_examples.git |
| VCS Type | git |
| VCS Version | jazzy |
| Last Updated | 2026-02-05 |
| Dev Status | MAINTAINED |
| Released | RELEASED |
| Contributing |
Help Wanted (-)
Good First Issues (-) Pull Requests to Review (-) |
Packages
| Name | Version |
|---|---|
| raspimouse_ros2_examples | 3.0.0 |
README
| English | 日本語 |
raspimouse_ros2_examples
![]()
ROS 2 examples for Raspberry Pi Mouse.
For running in Gazebo (simulator), see the rt-net/raspimouse_sim packages.
<img src=https://rt-net.github.io/images/raspberry-pi-mouse/raspberry_pi_mouse.JPG width=500 />
Table of Contents
Supported ROS distributions
ROS 2
Requirements
- Raspberry Pi Mouse
- https://rt-net.jp/products/raspberrypimousev3/
- Linux OS
- Ubuntu server 24.04
- Device Driver
- ROS 2
- Raspberry Pi Mouse ROS 2 package
- https://github.com/rt-net/raspimouse2
- Remote Computer (Optional)
- ROS 2
- Raspberry Pi Mouse ROS 2 package
- https://github.com/rt-net/raspimouse2
Installation
Binary Installation
sudo apt install ros-$ROS_DISTRO-raspimouse-ros2-examples
Source Build
# Create workspace directory
mkdir -p ~/ros2_ws/src && cd ~/ros2_ws/src

# Clone package
git clone -b $ROS_DISTRO https://github.com/rt-net/raspimouse_ros2_examples.git

# Install dependencies
rosdep install -r -y -i --from-paths .

# Build & Install
cd ~/ros2_ws
colcon build --symlink-install
source ~/ros2_ws/install/setup.bash
How to Use Examples
Sample programs for the Raspberry Pi Mouse.
Joystick Control
This is an example with a joystick controller to operate a Raspberry Pi Mouse.
Details
File truncated at 100 lines [see the full file](https://github.com/rt-net/raspimouse_ros2_examples/tree/jazzy/README.en.md)CONTRIBUTING
Any contribution that you make to this repository will be under the Apache 2 License, as dictated by that license:
5. Submission of Contributions. Unless You explicitly state otherwise,
   any Contribution intentionally submitted for inclusion in the Work
   by You to the Licensor shall be under the terms and conditions of
   this License, without any additional terms or conditions.
   Notwithstanding the above, nothing herein shall supersede or modify
   the terms of any separate license agreement you may have executed
   with Licensor regarding such Contributions.
Repository Summary
| Checkout URI | https://github.com/rt-net/raspimouse_ros2_examples.git |
| VCS Type | git |
| VCS Version | humble-devel |
| Last Updated | 2024-08-28 |
| Dev Status | MAINTAINED |
| Released | RELEASED |
| Contributing |
Help Wanted (-)
Good First Issues (-) Pull Requests to Review (-) |
Packages
| Name | Version |
|---|---|
| raspimouse_ros2_examples | 2.2.1 |
README
| English | 日本語 |
raspimouse_ros2_examples
![]()
ROS 2 examples for Raspberry Pi Mouse.
ROS1 examples is here.
To run on Gazebo, click here.
<img src=https://rt-net.github.io/images/raspberry-pi-mouse/raspberry_pi_mouse.JPG width=500 />
Supported ROS 2 distributions
- Foxy
- Humble (This branch)
Requirements
- Raspberry Pi Mouse
- https://rt-net.jp/products/raspberrypimousev3/
- Linux OS
- Ubuntu server 22.04
- https://ubuntu.com/download/raspberry-pi
- Device Driver
- ROS
- Raspberry Pi Mouse ROS 2 package
- https://github.com/rt-net/raspimouse2
- Remote Computer (Optional)
- ROS
- Raspberry Pi Mouse ROS 2 package
- https://github.com/rt-net/raspimouse2
Installation
$ cd ~/ros2_ws/src
# Clone package
$ git clone -b $ROS_DISTRO-devel https://github.com/rt-net/raspimouse_ros2_examples.git

# Install dependencies
$ rosdep install -r -y --from-paths . --ignore-src

# Build & Install
$ cd ~/ros2_ws
$ colcon build --symlink-install
$ source ~/ros2_ws/install/setup.bash
License
This repository is licensed under the Apache 2.0, see LICENSE for details.
How To Use Examples
joystick_control
This is an example to use joystick controller to control a Raspberry Pi Mouse.
Requirements
- Joystick Controller
How to use
Launch nodes with the following command:
# Use F710
$ ros2 launch raspimouse_ros2_examples teleop_joy.launch.py joydev:="/dev/input/js0" joyconfig:=f710 mouse:=true

# Use DUALSHOCK 3
$ ros2 launch raspimouse_ros2_examples teleop_joy.launch.py joydev:="/dev/input/js0" joyconfig:=dualshock3 mouse:=true

# Control from remote computer
## on RaspberryPiMouse
$ ros2 run raspimouse raspimouse
## on remote computer
$ ros2 launch raspimouse_ros2_examples teleop_joy.launch.py mouse:=false
This picture shows the default key configuration.
To use Logicool Wireless Gamepad F710, set the input mode to D (DirectInput Mode).
File truncated at 100 lines see the full file
CONTRIBUTING
Any contribution that you make to this repository will be under the Apache 2 License, as dictated by that license:
5. Submission of Contributions. Unless You explicitly state otherwise,
   any Contribution intentionally submitted for inclusion in the Work
   by You to the Licensor shall be under the terms and conditions of
   this License, without any additional terms or conditions.
   Notwithstanding the above, nothing herein shall supersede or modify
   the terms of any separate license agreement you may have executed
   with Licensor regarding such Contributions.
Repository Summary
| Checkout URI | https://github.com/rt-net/raspimouse_ros2_examples.git |
| VCS Type | git |
| VCS Version | foxy-devel |
| Last Updated | 2022-07-29 |
| Dev Status | MAINTAINED |
| Released | RELEASED |
| Contributing |
Help Wanted (-)
Good First Issues (-) Pull Requests to Review (-) |
Packages
| Name | Version |
|---|---|
| raspimouse_ros2_examples | 1.0.0 |
README
| English | 日本語 |
raspimouse_ros2_examples
![]()
ROS 2 examples for Raspberry Pi Mouse.
ROS1 examples is here.
<img src=https://rt-net.github.io/images/raspberry-pi-mouse/raspberry_pi_mouse.JPG width=500 />
Requirements
- Raspberry Pi Mouse
- https://rt-net.jp/products/raspberrypimousev3/
- Linux OS
- Ubuntu server 20.04
- https://ubuntu.com/download/raspberry-pi
- Device Driver
- ROS
- Raspberry Pi Mouse ROS 2 package
- https://github.com/rt-net/raspimouse2
- Remote Computer (Optional)
- ROS
- Raspberry Pi Mouse ROS 2 package
- https://github.com/rt-net/raspimouse2
Installation
$ cd ~/ros2_ws/src
# Clone package
$ git clone -b $ROS_DISTRO-devel https://github.com/rt-net/raspimouse_ros2_examples

# Install dependencies
$ rosdep install -r -y --from-paths . --ignore-src

# Build & Install
$ cd ~/ros2_ws
$ colcon build --symlink-install
$ source ~/ros2_ws/install/setup.bash
License
This repository is licensed under the Apache 2.0, see LICENSE for details.
How To Use Examples
joystick_control
This is an example to use joystick controller to control a Raspberry Pi Mouse.
Requirements
- Joystick Controller
How to use
Launch nodes with the following command:
# Use F710
$ ros2 launch raspimouse_ros2_examples teleop_joy.launch.py joydev:="/dev/input/js0" joyconfig:=f710 mouse:=true

# Use DUALSHOCK 3
$ ros2 launch raspimouse_ros2_examples teleop_joy.launch.py joydev:="/dev/input/js0" joyconfig:=dualshock3 mouse:=true

# Control from remote computer
## on RaspberryPiMouse
$ ros2 run raspimouse raspimouse
## on remote computer
$ ros2 launch raspimouse_ros2_examples teleop_joy.launch.py mouse:=false
This picture shows the default key configuration.
To use Logicool Wireless Gamepad F710, set the input mode to D (DirectInput Mode).
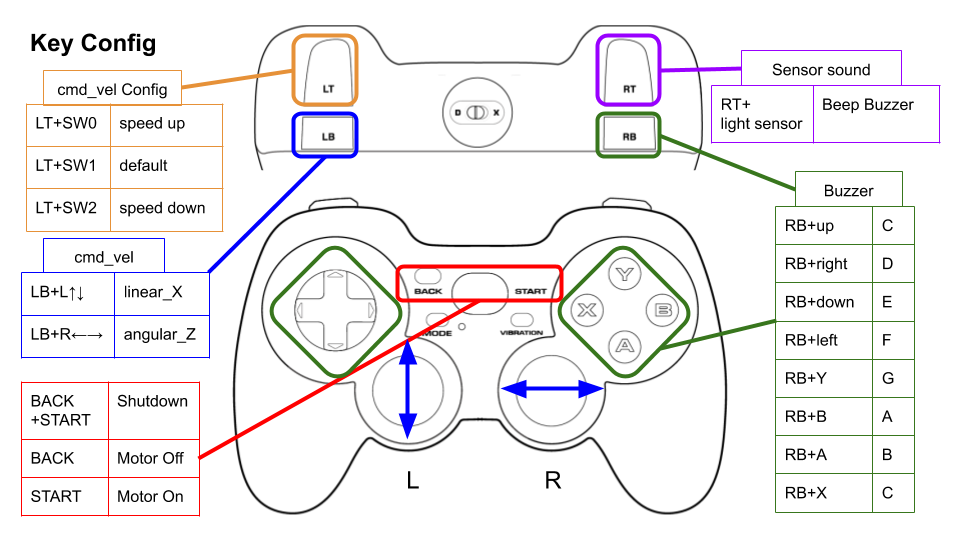
Configure
Key assignments can be edited with key numbers in ./config/joy_f710.yml or ./config/joy_dualshock3.yml.
File truncated at 100 lines see the full file
CONTRIBUTING
Any contribution that you make to this repository will be under the Apache 2 License, as dictated by that license:
5. Submission of Contributions. Unless You explicitly state otherwise,
   any Contribution intentionally submitted for inclusion in the Work
   by You to the Licensor shall be under the terms and conditions of
   this License, without any additional terms or conditions.
   Notwithstanding the above, nothing herein shall supersede or modify
   the terms of any separate license agreement you may have executed
   with Licensor regarding such Contributions.
Repository Summary
| Checkout URI | https://github.com/rt-net/raspimouse_ros2_examples.git |
| VCS Type | git |
| VCS Version | humble-devel |
| Last Updated | 2024-08-28 |
| Dev Status | MAINTAINED |
| Released | RELEASED |
| Contributing |
Help Wanted (-)
Good First Issues (-) Pull Requests to Review (-) |
Packages
| Name | Version |
|---|---|
| raspimouse_ros2_examples | 2.2.1 |
README
| English | 日本語 |
raspimouse_ros2_examples
![]()
ROS 2 examples for Raspberry Pi Mouse.
ROS1 examples is here.
To run on Gazebo, click here.
<img src=https://rt-net.github.io/images/raspberry-pi-mouse/raspberry_pi_mouse.JPG width=500 />
Supported ROS 2 distributions
- Foxy
- Humble (This branch)
Requirements
- Raspberry Pi Mouse
- https://rt-net.jp/products/raspberrypimousev3/
- Linux OS
- Ubuntu server 22.04
- https://ubuntu.com/download/raspberry-pi
- Device Driver
- ROS
- Raspberry Pi Mouse ROS 2 package
- https://github.com/rt-net/raspimouse2
- Remote Computer (Optional)
- ROS
- Raspberry Pi Mouse ROS 2 package
- https://github.com/rt-net/raspimouse2
Installation
$ cd ~/ros2_ws/src
# Clone package
$ git clone -b $ROS_DISTRO-devel https://github.com/rt-net/raspimouse_ros2_examples.git

# Install dependencies
$ rosdep install -r -y --from-paths . --ignore-src

# Build & Install
$ cd ~/ros2_ws
$ colcon build --symlink-install
$ source ~/ros2_ws/install/setup.bash
License
This repository is licensed under the Apache 2.0, see LICENSE for details.
How To Use Examples
joystick_control
This is an example to use joystick controller to control a Raspberry Pi Mouse.
Requirements
- Joystick Controller
How to use
Launch nodes with the following command:
# Use F710
$ ros2 launch raspimouse_ros2_examples teleop_joy.launch.py joydev:="/dev/input/js0" joyconfig:=f710 mouse:=true

# Use DUALSHOCK 3
$ ros2 launch raspimouse_ros2_examples teleop_joy.launch.py joydev:="/dev/input/js0" joyconfig:=dualshock3 mouse:=true

# Control from remote computer
## on RaspberryPiMouse
$ ros2 run raspimouse raspimouse
## on remote computer
$ ros2 launch raspimouse_ros2_examples teleop_joy.launch.py mouse:=false
This picture shows the default key configuration.
To use Logicool Wireless Gamepad F710, set the input mode to D (DirectInput Mode).
File truncated at 100 lines see the full file
CONTRIBUTING
Any contribution that you make to this repository will be under the Apache 2 License, as dictated by that license:
5. Submission of Contributions. Unless You explicitly state otherwise,
   any Contribution intentionally submitted for inclusion in the Work
   by You to the Licensor shall be under the terms and conditions of
   this License, without any additional terms or conditions.
   Notwithstanding the above, nothing herein shall supersede or modify
   the terms of any separate license agreement you may have executed
   with Licensor regarding such Contributions.
Repository Summary
| Checkout URI | https://github.com/rt-net/raspimouse_ros2_examples.git |
| VCS Type | git |
| VCS Version | humble-devel |
| Last Updated | 2024-08-28 |
| Dev Status | MAINTAINED |
| Released | RELEASED |
| Contributing |
Help Wanted (-)
Good First Issues (-) Pull Requests to Review (-) |
Packages
| Name | Version |
|---|---|
| raspimouse_ros2_examples | 2.2.1 |
README
| English | 日本語 |
raspimouse_ros2_examples
![]()
ROS 2 examples for Raspberry Pi Mouse.
ROS1 examples is here.
To run on Gazebo, click here.
<img src=https://rt-net.github.io/images/raspberry-pi-mouse/raspberry_pi_mouse.JPG width=500 />
Supported ROS 2 distributions
- Foxy
- Humble (This branch)
Requirements
- Raspberry Pi Mouse
- https://rt-net.jp/products/raspberrypimousev3/
- Linux OS
- Ubuntu server 22.04
- https://ubuntu.com/download/raspberry-pi
- Device Driver
- ROS
- Raspberry Pi Mouse ROS 2 package
- https://github.com/rt-net/raspimouse2
- Remote Computer (Optional)
- ROS
- Raspberry Pi Mouse ROS 2 package
- https://github.com/rt-net/raspimouse2
Installation
$ cd ~/ros2_ws/src
# Clone package
$ git clone -b $ROS_DISTRO-devel https://github.com/rt-net/raspimouse_ros2_examples.git

# Install dependencies
$ rosdep install -r -y --from-paths . --ignore-src

# Build & Install
$ cd ~/ros2_ws
$ colcon build --symlink-install
$ source ~/ros2_ws/install/setup.bash
License
This repository is licensed under the Apache 2.0, see LICENSE for details.
How To Use Examples
joystick_control
This is an example to use joystick controller to control a Raspberry Pi Mouse.
Requirements
- Joystick Controller
How to use
Launch nodes with the following command:
# Use F710
$ ros2 launch raspimouse_ros2_examples teleop_joy.launch.py joydev:="/dev/input/js0" joyconfig:=f710 mouse:=true

# Use DUALSHOCK 3
$ ros2 launch raspimouse_ros2_examples teleop_joy.launch.py joydev:="/dev/input/js0" joyconfig:=dualshock3 mouse:=true

# Control from remote computer
## on RaspberryPiMouse
$ ros2 run raspimouse raspimouse
## on remote computer
$ ros2 launch raspimouse_ros2_examples teleop_joy.launch.py mouse:=false
This picture shows the default key configuration.
To use Logicool Wireless Gamepad F710, set the input mode to D (DirectInput Mode).
File truncated at 100 lines see the full file
CONTRIBUTING
Any contribution that you make to this repository will be under the Apache 2 License, as dictated by that license:
5. Submission of Contributions. Unless You explicitly state otherwise,
   any Contribution intentionally submitted for inclusion in the Work
   by You to the Licensor shall be under the terms and conditions of
   this License, without any additional terms or conditions.
   Notwithstanding the above, nothing herein shall supersede or modify
   the terms of any separate license agreement you may have executed
   with Licensor regarding such Contributions.