
Repository Summary
| Checkout URI | https://github.com/ros-drivers/video_stream_opencv.git |
| VCS Type | git |
| VCS Version | master |
| Last Updated | 2021-04-13 |
| Dev Status | MAINTAINED |
| Released | RELEASED |
| Contributing |
Help Wanted (-)
Good First Issues (-) Pull Requests to Review (-) |
Packages
| Name | Version |
|---|---|
| video_stream_opencv | 1.1.6 |
README
video_stream_opencv 
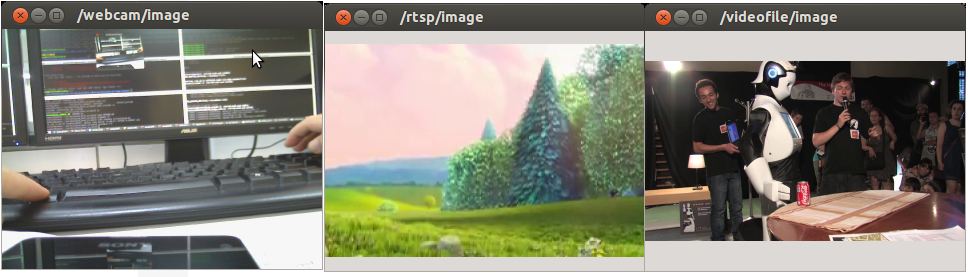
A package to view video streams based on the OpenCV VideoCapture module, easy way to publish on a ROS Image topic (including camera info) usb cams, ethernet cameras, video streams or video files. It also supports flipping of images and fps throttling.
Example usages in launch folder (only the argument video_stream_provider is mandatory):
<launch>
   <!-- launch video stream -->
   <include file="$(find video_stream_opencv)/launch/camera.launch" >
        <!-- node name and ros graph name -->
        <arg name="camera_name" value="webcam" />
        <!-- means video device 0, /dev/video0 -->
        <arg name="video_stream_provider" value="0" />
        <!-- set camera fps to (if the device allows) -->
        <arg name="set_camera_fps" value="30"/>
        <!-- set buffer queue size of frame capturing to -->
        <arg name="buffer_queue_size" value="100" />
        <!-- throttling the publishing of frames to -->
        <arg name="fps" value="30" />
        <!-- setting frame_id -->
        <arg name="frame_id" value="webcam" />
        <!-- camera info loading, take care as it needs the "file:///" at the start , e.g.:
        "file:///$(find your_camera_package)/config/your_camera.yaml" -->
        <arg name="camera_info_url" value="" />
        <!-- flip the image horizontally (mirror it) -->
        <arg name="flip_horizontal" value="false" />
        <!-- flip the image vertically -->
        <arg name="flip_vertical" value="false" />
        <!-- force a width and height, 0 means no forcing -->
        <arg name="width" value="640"/>
        <arg name="height" value="480"/>
        <!-- visualize on an image_view window the stream generated -->
        <arg name="visualize" value="true" />
   </include>
</launch>
Based on the ROS tutorial to convert opencv images to ROS messages.
Usability
You can use any input that OpenCV on your system accepts, e.g.:
-
Video devices that appear in linux as /dev/videoX, e.g.: USB webcams appearing as /dev/video0
-
Video streamings, e.g.: rtsp://wowzaec2demo.streamlock.net/vod/mp4:BigBuckBunny_115k.mov
-
Video files, anything you can play, e.g.: myvideo.avi
-
Etc.
Parameters
Note these important ones on the behaviour of the node:
-
set_camera_fps: Will set the OpenCV parameterCV_CAP_PROP_FPSto that amount of fps, if the camera allows it. Does nothing on video streams or video files. -
buffer_queue_size: Will set the size of the buffer of images read from the capturing device. We read as fast as possible (in another thread) from the device and store in the buffer the images. The main thread consumes from the buffer. If you want the shortest delay/lag set it to 1. If you don’t want to lose images set it higher. -
fps: The effective rate at which you want the image topic to publish, if lower than the effective fps of the camera it will throttle the publication dropping frames when needed.
So if you want the very latest image published from a camera, set buffer_queue_size to 1, set_camera_fps to the max the camera allows and fps to that same max.
If you want to publish all images (don’t drop any and you don’t mind some possible delay from real time), set buffer_queue_size big enough for your case (1000?),
set_camera_fps and fps to whatever FPS it has.
The rest of the parameters explained, even though they are pretty self explanatory:
-
camera_name: node name and ros graph name. All topics will hang from this e.g.: /camera_name/. -
video_stream_provider: A number for the /dev/videoX device, e.g.: 0 for /dev/video0. A string for a path for a video file, e.g.: /home/user/Videos/myvideo.avi or a url of a video stream e.g.: rtsp://wowzaec2demo.streamlock.net/vod/mp4:BigBuckBunny_115k.mov and http://10.68.0.6/mjpg/video.mjpg. -
frame_id: frame_id to be published in the Header of the messages. -
camera_info_url: camera info loading, take care as it needs the “file:///” at the start , e.g.:"file:///$(find your_camera_package)/config/your_camera.yaml". -
flip_horizontal: flip horizontally the image (mirror it). -
flip_vertical: flip vertically the image (upside down). -
loop_videofile: if the provider is a video file, enable loop playback. -
widthandheight: force a width and height to the capturing device (if it allows), 0 means no forcing. -
start_frame: if the provider is a video file, set the start frame of video. -
stop_frame: if the provider is a video file, set the stop frame of video.-1means the end of the video. Also settingstop_frame = start_frame + 1can publish a single frame with a certain rate.
Extras
In the scripts folder you’ll find test_video_resource.py which you can use to test if your system
installation can use this node to open your video stream (not using any ROS, just copy the file to your computer and try). Just do any of those:
./test_video_resource.py 0
./test_video_resource.py rtsp://wowzaec2demo.streamlock.net/vod/mp4:BigBuckBunny_115k.mov
./test_video_resource.py /home/youruser/myvideo.mkv
And you’ll see an output like:
Trying to open resource: /dev/video0
Correctly opened resource, starting to show feed.
File truncated at 100 lines see the full file
CONTRIBUTING
Repository Summary
| Checkout URI | https://github.com/ros-drivers/video_stream_opencv.git |
| VCS Type | git |
| VCS Version | master |
| Last Updated | 2021-04-13 |
| Dev Status | MAINTAINED |
| Released | RELEASED |
| Contributing |
Help Wanted (-)
Good First Issues (-) Pull Requests to Review (-) |
Packages
| Name | Version |
|---|---|
| video_stream_opencv | 1.1.6 |
README
video_stream_opencv
A package to view video streams based on the OpenCV VideoCapture module, easy way to publish on a ROS Image topic (including camera info) usb cams, ethernet cameras, video streams or video files. It also supports flipping of images and fps throttling.
Example usages in launch folder (only the argument video_stream_provider is mandatory):
<launch>
   <!-- launch video stream -->
   <include file="$(find video_stream_opencv)/launch/camera.launch" >
        <!-- node name and ros graph name -->
        <arg name="camera_name" value="webcam" />
        <!-- means video device 0, /dev/video0 -->
        <arg name="video_stream_provider" value="0" />
        <!-- set camera fps to (if the device allows) -->
        <arg name="set_camera_fps" value="30"/>
        <!-- set buffer queue size of frame capturing to -->
        <arg name="buffer_queue_size" value="100" />
        <!-- throttling the publishing of frames to -->
        <arg name="fps" value="30" />
        <!-- setting frame_id -->
        <arg name="frame_id" value="webcam" />
        <!-- camera info loading, take care as it needs the "file:///" at the start , e.g.:
        "file:///$(find your_camera_package)/config/your_camera.yaml" -->
        <arg name="camera_info_url" value="" />
        <!-- flip the image horizontally (mirror it) -->
        <arg name="flip_horizontal" value="false" />
        <!-- flip the image vertically -->
        <arg name="flip_vertical" value="false" />
        <!-- force a width and height, 0 means no forcing -->
        <arg name="width" value="640"/>
        <arg name="height" value="480"/>
        <!-- visualize on an image_view window the stream generated -->
        <arg name="visualize" value="true" />
   </include>
</launch>
Based on the ROS tutorial to convert opencv images to ROS messages.
Usability
You can use any input that OpenCV on your system accepts, e.g.:
-
Video devices that appear in linux as /dev/videoX, e.g.: USB webcams appearing as /dev/video0
-
Video streamings, e.g.: rtsp://wowzaec2demo.streamlock.net/vod/mp4:BigBuckBunny_115k.mov
-
Video files, anything you can play, e.g.: myvideo.avi
-
Etc.
Parameters
Note these important ones on the behaviour of the node:
-
set_camera_fps: Will set the OpenCV parameterCV_CAP_PROP_FPSto that amount of fps, if the camera allows it. Does nothing on video streams or video files. -
buffer_queue_size: Will set the size of the buffer of images read from the capturing device. We read as fast as possible (in another thread) from the device and store in the buffer the images. The main thread consumes from the buffer. If you want the shortest delay/lag set it to 1. If you don’t want to lose images set it higher. -
fps: The effective rate at which you want the image topic to publish, if lower than the effective fps of the camera it will throttle the publication dropping frames when needed.
So if you want the very latest image published from a camera, set buffer_queue_size to 1, set_camera_fps to the max the camera allows and fps to that same max.
If you want to publish all images (don’t drop any and you don’t mind some possible delay from real time), set buffer_queue_size big enough for your case (1000?),
set_camera_fps and fps to whatever FPS it has.
The rest of the parameters explained, even though they are pretty self explanatory:
-
camera_name: node name and ros graph name. All topics will hang from this e.g.: /camera_name/. -
video_stream_provider: A number for the /dev/videoX device, e.g.: 0 for /dev/video0. A string for a path for a video file, e.g.: /home/user/Videos/myvideo.avi or a url of a video stream e.g.: rtsp://wowzaec2demo.streamlock.net/vod/mp4:BigBuckBunny_115k.mov and http://10.68.0.6/mjpg/video.mjpg. -
frame_id: frame_id to be published in the Header of the messages. -
camera_info_url: camera info loading, take care as it needs the “file:///” at the start , e.g.:"file:///$(find your_camera_package)/config/your_camera.yaml". -
flip_horizontal: flip horizontally the image (mirror it). -
flip_vertical: flip vertically the image (upside down). -
loop_videofile: if the provider is a video file, enable loop playback. -
widthandheight: force a width and height to the capturing device (if it allows), 0 means no forcing. -
start_frame: if the provider is a video file, set the start frame of video. -
stop_frame: if the provider is a video file, set the stop frame of video.-1means the end of the video. Also settingstop_frame = start_frame + 1can publish a single frame with a certain rate.
Extras
In the scripts folder you’ll find test_video_resource.py which you can use to test if your system
installation can use this node to open your video stream (not using any ROS, just copy the file to your computer and try). Just do any of those:
./test_video_resource.py 0
./test_video_resource.py rtsp://wowzaec2demo.streamlock.net/vod/mp4:BigBuckBunny_115k.mov
./test_video_resource.py /home/youruser/myvideo.mkv
And you’ll see an output like:
Trying to open resource: /dev/video0
Correctly opened resource, starting to show feed.
File truncated at 100 lines see the full file
CONTRIBUTING
Repository Summary
| Checkout URI | https://github.com/ros-drivers/video_stream_opencv.git |
| VCS Type | git |
| VCS Version | master |
| Last Updated | 2021-04-13 |
| Dev Status | MAINTAINED |
| Released | UNRELEASED |
| Contributing |
Help Wanted (-)
Good First Issues (-) Pull Requests to Review (-) |
Packages
| Name | Version |
|---|---|
| video_stream_opencv | 1.1.6 |
README
video_stream_opencv
A package to view video streams based on the OpenCV VideoCapture module, easy way to publish on a ROS Image topic (including camera info) usb cams, ethernet cameras, video streams or video files. It also supports flipping of images and fps throttling.
Example usages in launch folder (only the argument video_stream_provider is mandatory):
<launch>
   <!-- launch video stream -->
   <include file="$(find video_stream_opencv)/launch/camera.launch" >
        <!-- node name and ros graph name -->
        <arg name="camera_name" value="webcam" />
        <!-- means video device 0, /dev/video0 -->
        <arg name="video_stream_provider" value="0" />
        <!-- set camera fps to (if the device allows) -->
        <arg name="set_camera_fps" value="30"/>
        <!-- set buffer queue size of frame capturing to -->
        <arg name="buffer_queue_size" value="100" />
        <!-- throttling the publishing of frames to -->
        <arg name="fps" value="30" />
        <!-- setting frame_id -->
        <arg name="frame_id" value="webcam" />
        <!-- camera info loading, take care as it needs the "file:///" at the start , e.g.:
        "file:///$(find your_camera_package)/config/your_camera.yaml" -->
        <arg name="camera_info_url" value="" />
        <!-- flip the image horizontally (mirror it) -->
        <arg name="flip_horizontal" value="false" />
        <!-- flip the image vertically -->
        <arg name="flip_vertical" value="false" />
        <!-- force a width and height, 0 means no forcing -->
        <arg name="width" value="640"/>
        <arg name="height" value="480"/>
        <!-- visualize on an image_view window the stream generated -->
        <arg name="visualize" value="true" />
   </include>
</launch>
Based on the ROS tutorial to convert opencv images to ROS messages.
Usability
You can use any input that OpenCV on your system accepts, e.g.:
-
Video devices that appear in linux as /dev/videoX, e.g.: USB webcams appearing as /dev/video0
-
Video streamings, e.g.: rtsp://wowzaec2demo.streamlock.net/vod/mp4:BigBuckBunny_115k.mov
-
Video files, anything you can play, e.g.: myvideo.avi
-
Etc.
Parameters
Note these important ones on the behaviour of the node:
-
set_camera_fps: Will set the OpenCV parameterCV_CAP_PROP_FPSto that amount of fps, if the camera allows it. Does nothing on video streams or video files. -
buffer_queue_size: Will set the size of the buffer of images read from the capturing device. We read as fast as possible (in another thread) from the device and store in the buffer the images. The main thread consumes from the buffer. If you want the shortest delay/lag set it to 1. If you don’t want to lose images set it higher. -
fps: The effective rate at which you want the image topic to publish, if lower than the effective fps of the camera it will throttle the publication dropping frames when needed.
So if you want the very latest image published from a camera, set buffer_queue_size to 1, set_camera_fps to the max the camera allows and fps to that same max.
If you want to publish all images (don’t drop any and you don’t mind some possible delay from real time), set buffer_queue_size big enough for your case (1000?),
set_camera_fps and fps to whatever FPS it has.
The rest of the parameters explained, even though they are pretty self explanatory:
-
camera_name: node name and ros graph name. All topics will hang from this e.g.: /camera_name/. -
video_stream_provider: A number for the /dev/videoX device, e.g.: 0 for /dev/video0. A string for a path for a video file, e.g.: /home/user/Videos/myvideo.avi or a url of a video stream e.g.: rtsp://wowzaec2demo.streamlock.net/vod/mp4:BigBuckBunny_115k.mov and http://10.68.0.6/mjpg/video.mjpg. -
frame_id: frame_id to be published in the Header of the messages. -
camera_info_url: camera info loading, take care as it needs the “file:///” at the start , e.g.:"file:///$(find your_camera_package)/config/your_camera.yaml". -
flip_horizontal: flip horizontally the image (mirror it). -
flip_vertical: flip vertically the image (upside down). -
loop_videofile: if the provider is a video file, enable loop playback. -
widthandheight: force a width and height to the capturing device (if it allows), 0 means no forcing. -
start_frame: if the provider is a video file, set the start frame of video. -
stop_frame: if the provider is a video file, set the stop frame of video.-1means the end of the video. Also settingstop_frame = start_frame + 1can publish a single frame with a certain rate.
Extras
In the scripts folder you’ll find test_video_resource.py which you can use to test if your system
installation can use this node to open your video stream (not using any ROS, just copy the file to your computer and try). Just do any of those:
./test_video_resource.py 0
./test_video_resource.py rtsp://wowzaec2demo.streamlock.net/vod/mp4:BigBuckBunny_115k.mov
./test_video_resource.py /home/youruser/myvideo.mkv
And you’ll see an output like:
Trying to open resource: /dev/video0
Correctly opened resource, starting to show feed.
File truncated at 100 lines see the full file
CONTRIBUTING
Repository Summary
| Checkout URI | https://github.com/ros-drivers/video_stream_opencv.git |
| VCS Type | git |
| VCS Version | master |
| Last Updated | 2021-04-13 |
| Dev Status | MAINTAINED |
| Released | RELEASED |
| Contributing |
Help Wanted (-)
Good First Issues (-) Pull Requests to Review (-) |
Packages
| Name | Version |
|---|---|
| video_stream_opencv | 1.1.6 |
README
video_stream_opencv
A package to view video streams based on the OpenCV VideoCapture module, easy way to publish on a ROS Image topic (including camera info) usb cams, ethernet cameras, video streams or video files. It also supports flipping of images and fps throttling.
Example usages in launch folder (only the argument video_stream_provider is mandatory):
<launch>
   <!-- launch video stream -->
   <include file="$(find video_stream_opencv)/launch/camera.launch" >
        <!-- node name and ros graph name -->
        <arg name="camera_name" value="webcam" />
        <!-- means video device 0, /dev/video0 -->
        <arg name="video_stream_provider" value="0" />
        <!-- set camera fps to (if the device allows) -->
        <arg name="set_camera_fps" value="30"/>
        <!-- set buffer queue size of frame capturing to -->
        <arg name="buffer_queue_size" value="100" />
        <!-- throttling the publishing of frames to -->
        <arg name="fps" value="30" />
        <!-- setting frame_id -->
        <arg name="frame_id" value="webcam" />
        <!-- camera info loading, take care as it needs the "file:///" at the start , e.g.:
        "file:///$(find your_camera_package)/config/your_camera.yaml" -->
        <arg name="camera_info_url" value="" />
        <!-- flip the image horizontally (mirror it) -->
        <arg name="flip_horizontal" value="false" />
        <!-- flip the image vertically -->
        <arg name="flip_vertical" value="false" />
        <!-- force a width and height, 0 means no forcing -->
        <arg name="width" value="640"/>
        <arg name="height" value="480"/>
        <!-- visualize on an image_view window the stream generated -->
        <arg name="visualize" value="true" />
   </include>
</launch>
Based on the ROS tutorial to convert opencv images to ROS messages.
Usability
You can use any input that OpenCV on your system accepts, e.g.:
-
Video devices that appear in linux as /dev/videoX, e.g.: USB webcams appearing as /dev/video0
-
Video streamings, e.g.: rtsp://wowzaec2demo.streamlock.net/vod/mp4:BigBuckBunny_115k.mov
-
Video files, anything you can play, e.g.: myvideo.avi
-
Etc.
Parameters
Note these important ones on the behaviour of the node:
-
set_camera_fps: Will set the OpenCV parameterCV_CAP_PROP_FPSto that amount of fps, if the camera allows it. Does nothing on video streams or video files. -
buffer_queue_size: Will set the size of the buffer of images read from the capturing device. We read as fast as possible (in another thread) from the device and store in the buffer the images. The main thread consumes from the buffer. If you want the shortest delay/lag set it to 1. If you don’t want to lose images set it higher. -
fps: The effective rate at which you want the image topic to publish, if lower than the effective fps of the camera it will throttle the publication dropping frames when needed.
So if you want the very latest image published from a camera, set buffer_queue_size to 1, set_camera_fps to the max the camera allows and fps to that same max.
If you want to publish all images (don’t drop any and you don’t mind some possible delay from real time), set buffer_queue_size big enough for your case (1000?),
set_camera_fps and fps to whatever FPS it has.
The rest of the parameters explained, even though they are pretty self explanatory:
-
camera_name: node name and ros graph name. All topics will hang from this e.g.: /camera_name/. -
video_stream_provider: A number for the /dev/videoX device, e.g.: 0 for /dev/video0. A string for a path for a video file, e.g.: /home/user/Videos/myvideo.avi or a url of a video stream e.g.: rtsp://wowzaec2demo.streamlock.net/vod/mp4:BigBuckBunny_115k.mov and http://10.68.0.6/mjpg/video.mjpg. -
frame_id: frame_id to be published in the Header of the messages. -
camera_info_url: camera info loading, take care as it needs the “file:///” at the start , e.g.:"file:///$(find your_camera_package)/config/your_camera.yaml". -
flip_horizontal: flip horizontally the image (mirror it). -
flip_vertical: flip vertically the image (upside down). -
loop_videofile: if the provider is a video file, enable loop playback. -
widthandheight: force a width and height to the capturing device (if it allows), 0 means no forcing. -
start_frame: if the provider is a video file, set the start frame of video. -
stop_frame: if the provider is a video file, set the stop frame of video.-1means the end of the video. Also settingstop_frame = start_frame + 1can publish a single frame with a certain rate.
Extras
In the scripts folder you’ll find test_video_resource.py which you can use to test if your system
installation can use this node to open your video stream (not using any ROS, just copy the file to your computer and try). Just do any of those:
./test_video_resource.py 0
./test_video_resource.py rtsp://wowzaec2demo.streamlock.net/vod/mp4:BigBuckBunny_115k.mov
./test_video_resource.py /home/youruser/myvideo.mkv
And you’ll see an output like:
Trying to open resource: /dev/video0
Correctly opened resource, starting to show feed.
File truncated at 100 lines see the full file
CONTRIBUTING
Repository Summary
| Checkout URI | https://github.com/ros-drivers/video_stream_opencv.git |
| VCS Type | git |
| VCS Version | master |
| Last Updated | 2021-04-13 |
| Dev Status | MAINTAINED |
| Released | RELEASED |
| Contributing |
Help Wanted (-)
Good First Issues (-) Pull Requests to Review (-) |
Packages
| Name | Version |
|---|---|
| video_stream_opencv | 1.1.6 |
README
video_stream_opencv
A package to view video streams based on the OpenCV VideoCapture module, easy way to publish on a ROS Image topic (including camera info) usb cams, ethernet cameras, video streams or video files. It also supports flipping of images and fps throttling.
Example usages in launch folder (only the argument video_stream_provider is mandatory):
<launch>
   <!-- launch video stream -->
   <include file="$(find video_stream_opencv)/launch/camera.launch" >
        <!-- node name and ros graph name -->
        <arg name="camera_name" value="webcam" />
        <!-- means video device 0, /dev/video0 -->
        <arg name="video_stream_provider" value="0" />
        <!-- set camera fps to (if the device allows) -->
        <arg name="set_camera_fps" value="30"/>
        <!-- set buffer queue size of frame capturing to -->
        <arg name="buffer_queue_size" value="100" />
        <!-- throttling the publishing of frames to -->
        <arg name="fps" value="30" />
        <!-- setting frame_id -->
        <arg name="frame_id" value="webcam" />
        <!-- camera info loading, take care as it needs the "file:///" at the start , e.g.:
        "file:///$(find your_camera_package)/config/your_camera.yaml" -->
        <arg name="camera_info_url" value="" />
        <!-- flip the image horizontally (mirror it) -->
        <arg name="flip_horizontal" value="false" />
        <!-- flip the image vertically -->
        <arg name="flip_vertical" value="false" />
        <!-- force a width and height, 0 means no forcing -->
        <arg name="width" value="640"/>
        <arg name="height" value="480"/>
        <!-- visualize on an image_view window the stream generated -->
        <arg name="visualize" value="true" />
   </include>
</launch>
Based on the ROS tutorial to convert opencv images to ROS messages.
Usability
You can use any input that OpenCV on your system accepts, e.g.:
-
Video devices that appear in linux as /dev/videoX, e.g.: USB webcams appearing as /dev/video0
-
Video streamings, e.g.: rtsp://wowzaec2demo.streamlock.net/vod/mp4:BigBuckBunny_115k.mov
-
Video files, anything you can play, e.g.: myvideo.avi
-
Etc.
Parameters
Note these important ones on the behaviour of the node:
-
set_camera_fps: Will set the OpenCV parameterCV_CAP_PROP_FPSto that amount of fps, if the camera allows it. Does nothing on video streams or video files. -
buffer_queue_size: Will set the size of the buffer of images read from the capturing device. We read as fast as possible (in another thread) from the device and store in the buffer the images. The main thread consumes from the buffer. If you want the shortest delay/lag set it to 1. If you don’t want to lose images set it higher. -
fps: The effective rate at which you want the image topic to publish, if lower than the effective fps of the camera it will throttle the publication dropping frames when needed.
So if you want the very latest image published from a camera, set buffer_queue_size to 1, set_camera_fps to the max the camera allows and fps to that same max.
If you want to publish all images (don’t drop any and you don’t mind some possible delay from real time), set buffer_queue_size big enough for your case (1000?),
set_camera_fps and fps to whatever FPS it has.
The rest of the parameters explained, even though they are pretty self explanatory:
-
camera_name: node name and ros graph name. All topics will hang from this e.g.: /camera_name/. -
video_stream_provider: A number for the /dev/videoX device, e.g.: 0 for /dev/video0. A string for a path for a video file, e.g.: /home/user/Videos/myvideo.avi or a url of a video stream e.g.: rtsp://wowzaec2demo.streamlock.net/vod/mp4:BigBuckBunny_115k.mov and http://10.68.0.6/mjpg/video.mjpg. -
frame_id: frame_id to be published in the Header of the messages. -
camera_info_url: camera info loading, take care as it needs the “file:///” at the start , e.g.:"file:///$(find your_camera_package)/config/your_camera.yaml". -
flip_horizontal: flip horizontally the image (mirror it). -
flip_vertical: flip vertically the image (upside down). -
loop_videofile: if the provider is a video file, enable loop playback. -
widthandheight: force a width and height to the capturing device (if it allows), 0 means no forcing. -
start_frame: if the provider is a video file, set the start frame of video. -
stop_frame: if the provider is a video file, set the stop frame of video.-1means the end of the video. Also settingstop_frame = start_frame + 1can publish a single frame with a certain rate.
Extras
In the scripts folder you’ll find test_video_resource.py which you can use to test if your system
installation can use this node to open your video stream (not using any ROS, just copy the file to your computer and try). Just do any of those:
./test_video_resource.py 0
./test_video_resource.py rtsp://wowzaec2demo.streamlock.net/vod/mp4:BigBuckBunny_115k.mov
./test_video_resource.py /home/youruser/myvideo.mkv
And you’ll see an output like:
Trying to open resource: /dev/video0
Correctly opened resource, starting to show feed.
File truncated at 100 lines see the full file