
Repository Summary
| Checkout URI | https://github.com/PickNikRobotics/rviz_visual_tools.git |
| VCS Type | git |
| VCS Version | ros2 |
| Last Updated | 2026-01-19 |
| Dev Status | MAINTAINED |
| Released | RELEASED |
| Contributing |
Help Wanted (-)
Good First Issues (-) Pull Requests to Review (-) |
Packages
| Name | Version |
|---|---|
| rviz_visual_tools | 4.1.4 |
README
Rviz Visual Tools
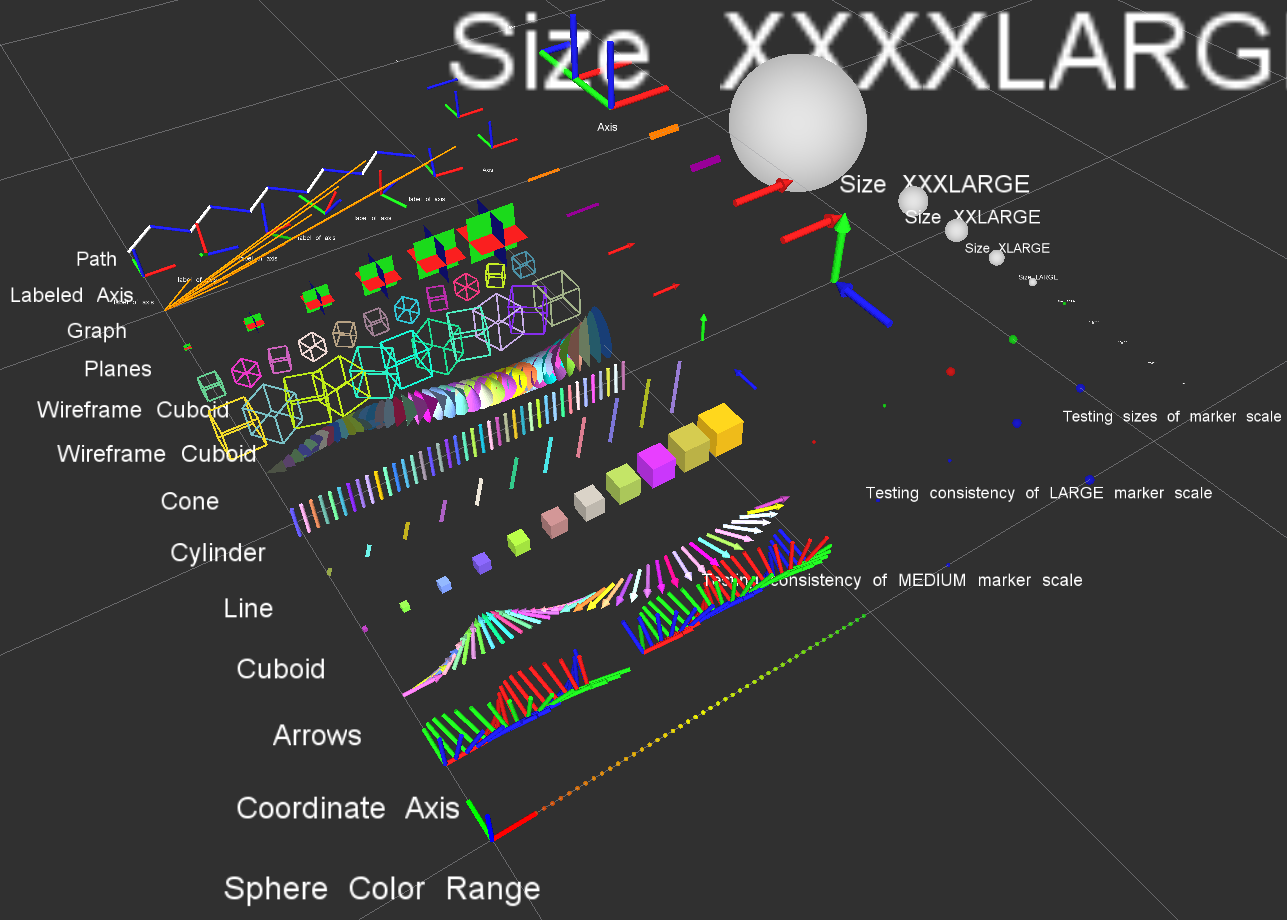
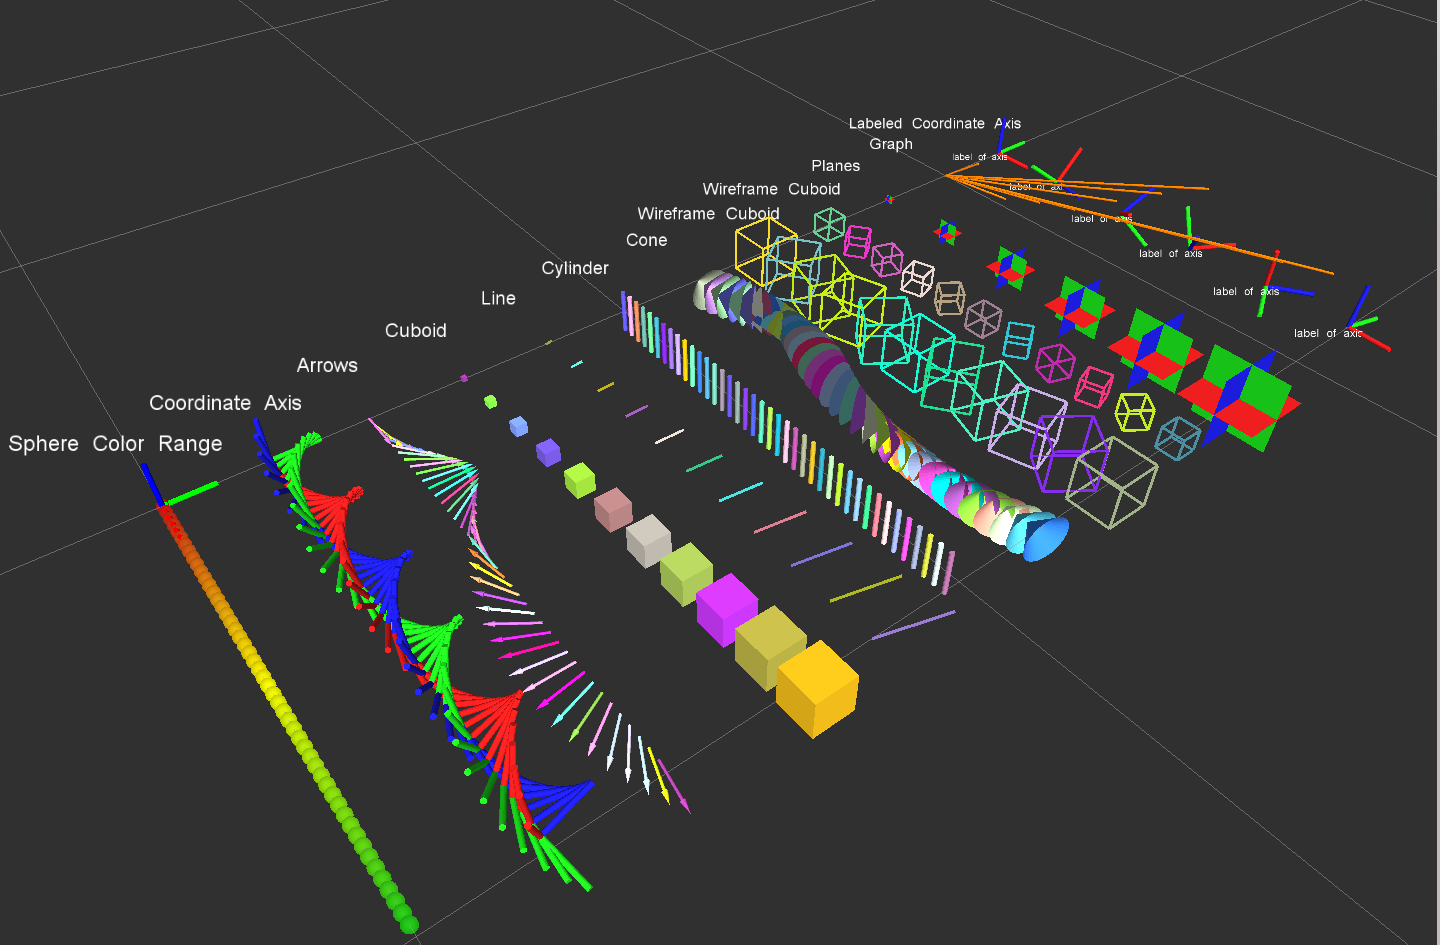
C++ API wrapper for displaying shapes and meshes in Rviz via helper functions that publish markers. Useful for displaying and debugging data. For more advanced robot visualization features, see the moveit_visual_tools which builds on this class.
This package includes:
- Rviz Panel GUI to step through your code for debugging and testing
- Rviz-based keyboard control for stepping through application
- Easy to use helper functions for visualizing in Rviz fast
- Basic geometric markers for Rviz
- More complex geometric shapes such as coordinate frames, framed boxes, planes, paths, graphs
- Ability to quickly choose standard colors and sizes
- Tools to ensure proper connection to Rviz before publishing visualizations
- Shortcuts to convert between different types of points and poses - ROS msgs, Eigen, tf, etc
- Batch publishing capabilities to reduce over throttling ROS messages
- A tf publishing helper class
- An interactive marker helper class
Developed by Dave Coleman at the Correll Robotics Lab, University of Colorado Boulder with help from Andy McEvoy and many others.
![]()


-
ROS Kinetic Buildfarm - AMD64 Xenial Debian Build for Ubuntu 16.04
-
ROS Kinetic Buildfarm - AMD64 Xenial Devel Build for Ubuntu 16.04
-
ROS Melodic Buildfarm - AMD64 Bionic Debian Build for Ubuntu 18.04
-
ROS Melodic Buildfarm - AMD64 Bionic Devel Build for Ubuntu 18.04

Install
Ubuntu Debian
sudo apt-get install ros-${ROS_DISTRO}-rviz-visual-tools
Build from Source
Clone this repository into a catkin workspace, then use the rosdep install tool to automatically download its dependencies. Depending on your current version of ROS, use:
rosdep install --from-paths src --ignore-src --rosdistro ${ROS_DISTRO}
Quick Start Demo
To see random shapes generated in Rviz, first launch Rviz:
ros2 launch rviz_visual_tools demo_rviz.launch.py
Then start the RViz Visual Tools demo:
ros2 run rviz_visual_tools rviz_visual_tools_demo
Code API
Usage
We’ll assume you will be using these helper functions within a class. Almost all of the functions assume you are publishing transforms in the world frame (whatever you call that e.g. /odom).
Initialize
Add to your includes:
#include <rviz_visual_tools/rviz_visual_tools.hpp>
Add to your class’s member variables:
// For visualizing things in rviz
rviz_visual_tools::RvizVisualToolsPtr visual_tools_;
In your class’ constructor add:
visual_tools_.reset(new rviz_visual_tools::RvizVisualTools("base_frame","/rviz_visual_markers", node));
Change the first parameter to the name of your robot’s base frame, and the second parameter to whatever name you’d like to use for the corresponding Rviz marker ROS topic.
Tools
Now in your code you can easily debug your code using visual markers in Rviz
Start rviz and create a new marker using the ‘Add’ button at the bottom right. Choose the marker topic to be the same as the topic you specified in the constructor.
Example Code
In the following snippet we create a pose at xyz (0.1, 0.1, 0.1) and rotate the pose down 45 degrees along the Y axis. Then we publish the pose as a arrow for visualziation in Rviz. Make sure your Rviz fixed frame is the same as the one chosen in the code.
// Create pose
Eigen::Isometry3d pose;
pose = Eigen::AngleAxisd(M_PI/4, Eigen::Vector3d::UnitY()); // rotate along X axis by 45 degrees
pose.translation() = Eigen::Vector3d( 0.1, 0.1, 0.1 ); // translate x,y,z
File truncated at 100 lines see the full file
CONTRIBUTING
Any contribution that you make to this repository will be under the 3-Clause BSD License, as dictated by that license.
Repository Summary
| Checkout URI | https://github.com/PickNikRobotics/rviz_visual_tools.git |
| VCS Type | git |
| VCS Version | ros2 |
| Last Updated | 2026-01-19 |
| Dev Status | MAINTAINED |
| Released | RELEASED |
| Contributing |
Help Wanted (-)
Good First Issues (-) Pull Requests to Review (-) |
Packages
| Name | Version |
|---|---|
| rviz_visual_tools | 4.1.4 |
README
Rviz Visual Tools
C++ API wrapper for displaying shapes and meshes in Rviz via helper functions that publish markers. Useful for displaying and debugging data. For more advanced robot visualization features, see the moveit_visual_tools which builds on this class.
This package includes:
- Rviz Panel GUI to step through your code for debugging and testing
- Rviz-based keyboard control for stepping through application
- Easy to use helper functions for visualizing in Rviz fast
- Basic geometric markers for Rviz
- More complex geometric shapes such as coordinate frames, framed boxes, planes, paths, graphs
- Ability to quickly choose standard colors and sizes
- Tools to ensure proper connection to Rviz before publishing visualizations
- Shortcuts to convert between different types of points and poses - ROS msgs, Eigen, tf, etc
- Batch publishing capabilities to reduce over throttling ROS messages
- A tf publishing helper class
- An interactive marker helper class
Developed by Dave Coleman at the Correll Robotics Lab, University of Colorado Boulder with help from Andy McEvoy and many others.
![]()
-
-
-
-
Install
Ubuntu Debian
sudo apt-get install ros-${ROS_DISTRO}-rviz-visual-tools
Build from Source
Clone this repository into a catkin workspace, then use the rosdep install tool to automatically download its dependencies. Depending on your current version of ROS, use:
rosdep install --from-paths src --ignore-src --rosdistro ${ROS_DISTRO}
Quick Start Demo
To see random shapes generated in Rviz, first launch Rviz:
ros2 launch rviz_visual_tools demo_rviz.launch.py
Then start the RViz Visual Tools demo:
ros2 run rviz_visual_tools rviz_visual_tools_demo
Code API
Usage
We’ll assume you will be using these helper functions within a class. Almost all of the functions assume you are publishing transforms in the world frame (whatever you call that e.g. /odom).
Initialize
Add to your includes:
#include <rviz_visual_tools/rviz_visual_tools.hpp>
Add to your class’s member variables:
// For visualizing things in rviz
rviz_visual_tools::RvizVisualToolsPtr visual_tools_;
In your class’ constructor add:
visual_tools_.reset(new rviz_visual_tools::RvizVisualTools("base_frame","/rviz_visual_markers", node));
Change the first parameter to the name of your robot’s base frame, and the second parameter to whatever name you’d like to use for the corresponding Rviz marker ROS topic.
Tools
Now in your code you can easily debug your code using visual markers in Rviz
Start rviz and create a new marker using the ‘Add’ button at the bottom right. Choose the marker topic to be the same as the topic you specified in the constructor.
Example Code
In the following snippet we create a pose at xyz (0.1, 0.1, 0.1) and rotate the pose down 45 degrees along the Y axis. Then we publish the pose as a arrow for visualziation in Rviz. Make sure your Rviz fixed frame is the same as the one chosen in the code.
// Create pose
Eigen::Isometry3d pose;
pose = Eigen::AngleAxisd(M_PI/4, Eigen::Vector3d::UnitY()); // rotate along X axis by 45 degrees
pose.translation() = Eigen::Vector3d( 0.1, 0.1, 0.1 ); // translate x,y,z
File truncated at 100 lines see the full file
CONTRIBUTING
Any contribution that you make to this repository will be under the 3-Clause BSD License, as dictated by that license.
Repository Summary
| Checkout URI | https://github.com/PickNikRobotics/rviz_visual_tools.git |
| VCS Type | git |
| VCS Version | foxy-devel |
| Last Updated | 2021-12-13 |
| Dev Status | MAINTAINED |
| Released | RELEASED |
| Contributing |
Help Wanted (-)
Good First Issues (-) Pull Requests to Review (-) |
Packages
| Name | Version |
|---|---|
| rviz_visual_tools | 4.0.3 |
README
Rviz Visual Tools
C++ API wrapper for displaying shapes and meshes in Rviz via helper functions that publish markers. Useful for displaying and debugging data. For more advanced robot visualization features, see the moveit_visual_tools which builds on this class.
This package includes:
- Rviz Panel GUI to step through your code for debugging and testing
- Rviz-based keyboard control for stepping through application
- Easy to use helper functions for visualizing in Rviz fast
- Basic geometric markers for Rviz
- More complex geometric shapes such as coordinate frames, framed boxes, planes, paths, graphs
- Ability to quickly choose standard colors and sizes
- Tools to ensure proper connection to Rviz before publishing visualizations
- Shortcuts to convert between different types of points and poses - ROS msgs, Eigen, tf, etc
- Batch publishing capabilities to reduce over throttling ROS messages
- A tf publishing helper class
- An interactive marker helper class
Developed by Dave Coleman at the Correll Robotics Lab, University of Colorado Boulder with help from Andy McEvoy and many others.
![]()


-
-
-
-

Install
Ubuntu Debian
sudo apt-get install ros-${ROS_DISTRO}-rviz-visual-tools
Build from Source
Clone this repository into a catkin workspace, then use the rosdep install tool to automatically download its dependencies. Depending on your current version of ROS, use:
rosdep install --from-paths src --ignore-src --rosdistro ${ROS_DISTRO}
Quick Start Demo
To see random shapes generated in Rviz, first launch Rviz:
ros2 launch rviz_visual_tools demo_rviz.launch.py
Then start the RViz Visual Tools demo:
ros2 run rviz_visual_tools rviz_visual_tools_demo
Code API
Usage
We’ll assume you will be using these helper functions within a class. Almost all of the functions assume you are publishing transforms in the world frame (whatever you call that e.g. /odom).
Initialize
Add to your includes:
#include <rviz_visual_tools/rviz_visual_tools.hpp>
Add to your class’s member variables:
// For visualizing things in rviz
rviz_visual_tools::RvizVisualToolsPtr visual_tools_;
In your class’ constructor add:
visual_tools_.reset(new rviz_visual_tools::RvizVisualTools("base_frame","/rviz_visual_markers", node));
Change the first parameter to the name of your robot’s base frame, and the second parameter to whatever name you’d like to use for the corresponding Rviz marker ROS topic.
Tools
Now in your code you can easily debug your code using visual markers in Rviz
Start rviz and create a new marker using the ‘Add’ button at the bottom right. Choose the marker topic to be the same as the topic you specified in the constructor.
Example Code
In the following snippet we create a pose at xyz (0.1, 0.1, 0.1) and rotate the pose down 45 degrees along the Y axis. Then we publish the pose as a arrow for visualziation in Rviz. Make sure your Rviz fixed frame is the same as the one chosen in the code.
// Create pose
Eigen::Isometry3d pose;
pose = Eigen::AngleAxisd(M_PI/4, Eigen::Vector3d::UnitY()); // rotate along X axis by 45 degrees
pose.translation() = Eigen::Vector3d( 0.1, 0.1, 0.1 ); // translate x,y,z
File truncated at 100 lines see the full file
CONTRIBUTING
Any contribution that you make to this repository will be under the 3-Clause BSD License, as dictated by that license.
Repository Summary
| Checkout URI | https://github.com/PickNikRobotics/rviz_visual_tools.git |
| VCS Type | git |
| VCS Version | ros2 |
| Last Updated | 2026-01-19 |
| Dev Status | MAINTAINED |
| Released | RELEASED |
| Contributing |
Help Wanted (-)
Good First Issues (-) Pull Requests to Review (-) |
Packages
| Name | Version |
|---|---|
| rviz_visual_tools | 4.1.4 |
README
Rviz Visual Tools
C++ API wrapper for displaying shapes and meshes in Rviz via helper functions that publish markers. Useful for displaying and debugging data. For more advanced robot visualization features, see the moveit_visual_tools which builds on this class.
This package includes:
- Rviz Panel GUI to step through your code for debugging and testing
- Rviz-based keyboard control for stepping through application
- Easy to use helper functions for visualizing in Rviz fast
- Basic geometric markers for Rviz
- More complex geometric shapes such as coordinate frames, framed boxes, planes, paths, graphs
- Ability to quickly choose standard colors and sizes
- Tools to ensure proper connection to Rviz before publishing visualizations
- Shortcuts to convert between different types of points and poses - ROS msgs, Eigen, tf, etc
- Batch publishing capabilities to reduce over throttling ROS messages
- A tf publishing helper class
- An interactive marker helper class
Developed by Dave Coleman at the Correll Robotics Lab, University of Colorado Boulder with help from Andy McEvoy and many others.
![]()
-
-
-
-
Install
Ubuntu Debian
sudo apt-get install ros-${ROS_DISTRO}-rviz-visual-tools
Build from Source
Clone this repository into a catkin workspace, then use the rosdep install tool to automatically download its dependencies. Depending on your current version of ROS, use:
rosdep install --from-paths src --ignore-src --rosdistro ${ROS_DISTRO}
Quick Start Demo
To see random shapes generated in Rviz, first launch Rviz:
ros2 launch rviz_visual_tools demo_rviz.launch.py
Then start the RViz Visual Tools demo:
ros2 run rviz_visual_tools rviz_visual_tools_demo
Code API
Usage
We’ll assume you will be using these helper functions within a class. Almost all of the functions assume you are publishing transforms in the world frame (whatever you call that e.g. /odom).
Initialize
Add to your includes:
#include <rviz_visual_tools/rviz_visual_tools.hpp>
Add to your class’s member variables:
// For visualizing things in rviz
rviz_visual_tools::RvizVisualToolsPtr visual_tools_;
In your class’ constructor add:
visual_tools_.reset(new rviz_visual_tools::RvizVisualTools("base_frame","/rviz_visual_markers", node));
Change the first parameter to the name of your robot’s base frame, and the second parameter to whatever name you’d like to use for the corresponding Rviz marker ROS topic.
Tools
Now in your code you can easily debug your code using visual markers in Rviz
Start rviz and create a new marker using the ‘Add’ button at the bottom right. Choose the marker topic to be the same as the topic you specified in the constructor.
Example Code
In the following snippet we create a pose at xyz (0.1, 0.1, 0.1) and rotate the pose down 45 degrees along the Y axis. Then we publish the pose as a arrow for visualziation in Rviz. Make sure your Rviz fixed frame is the same as the one chosen in the code.
// Create pose
Eigen::Isometry3d pose;
pose = Eigen::AngleAxisd(M_PI/4, Eigen::Vector3d::UnitY()); // rotate along X axis by 45 degrees
pose.translation() = Eigen::Vector3d( 0.1, 0.1, 0.1 ); // translate x,y,z
File truncated at 100 lines see the full file
CONTRIBUTING
Any contribution that you make to this repository will be under the 3-Clause BSD License, as dictated by that license.
Repository Summary
| Checkout URI | https://github.com/davetcoleman/rviz_visual_tools.git |
| VCS Type | git |
| VCS Version | kinetic-devel |
| Last Updated | 2019-02-23 |
| Dev Status | DEVELOPED |
| Released | RELEASED |
| Contributing |
Help Wanted (-)
Good First Issues (-) Pull Requests to Review (-) |
Packages
| Name | Version |
|---|---|
| rviz_visual_tools | 3.6.0 |
README
Rviz Visual Tools
C++ API wrapper for displaying shapes and meshes in Rviz via helper functions that publish markers. Useful for displaying and debugging data. For more advanced robot visualization features, see the moveit_visual_tools which builds on this class.
This package includes:
- Rviz Panel GUI to step through your code for debugging and testing
- Rviz-based keyboard control for stepping through application
- Easy to use helper functions for visualizing in Rviz fast
- Basic geometric markers for Rviz
- More complex geometric shapes such as coordinate frames, framed boxes, planes, paths, graphs
- Ability to quickly choose standard colors and sizes
- Tools to ensure proper connection to Rviz before publishing visualizations
- Shortcuts to convert between different types of points and poses - ROS msgs, Eigen, tf, etc
- Batch publishing capabilities to reduce over throttling ROS messages
- A tf publishing helper class
- An interactive marker helper class
Developed by Dave Coleman at the Correll Robotics Lab, University of Colorado Boulder with help from Andy McEvoy and many others.
![]()
-
 Travis CI
 -
-
Install
Ubuntu Debian
sudo apt-get install ros-kinetic-rviz-visual-tools
Build from Source
Clone this repository into a catkin workspace, then use the rosdep install tool to automatically download its dependencies. Depending on your current version of ROS, use:
rosdep install --from-paths src --ignore-src --rosdistro kinetic
Quick Start Demo
To see random shapes generated in Rviz, first launch Rviz:
roslaunch rviz_visual_tools demo_rviz.launch
Then start demo:
roslaunch rviz_visual_tools demo.launch
Code API
Usage
We’ll assume you will be using these helper functions within a class. Almost all of the functions assume you are publishing transforms in the world frame (whatever you call that e.g. /odom).
Initialize
Add to your includes:
#include <rviz_visual_tools/rviz_visual_tools.h>
Add to your class’s member variables:
// For visualizing things in rviz
rviz_visual_tools::RvizVisualToolsPtr visual_tools_;
In your class’ constructor add:
visual_tools_.reset(new rviz_visual_tools::RvizVisualTools("base_frame","/rviz_visual_markers"));
Change the first parameter to the name of your robot’s base frame, and the second parameter to whatever name you’d like to use for the corresponding Rviz marker ROS topic.
Tools
Now in your code you can easily debug your code using visual markers in Rviz
Start rviz and create a new marker using the ‘Add’ button at the bottom right. Choose the marker topic to be the same as the topic you specified in the constructor.
Example Code
In the following snippet we create a pose at xyz (0.1, 0.1, 0.1) and rotate the pose down 45 degrees along the Y axis. Then we publish the pose as a arrow for visualziation in Rviz. Make sure your Rviz fixed frame is the same as the one chosen in the code.
// Create pose
Eigen::Affine3d pose;
pose = Eigen::AngleAxisd(M_PI/4, Eigen::Vector3d::UnitY()); // rotate along X axis by 45 degrees
pose.translation() = Eigen::Vector3d( 0.1, 0.1, 0.1 ); // translate x,y,z

// Publish arrow vector of pose
ROS_INFO_STREAM_NAMED("test","Publishing Arrow");
visual_tools_->publishArrow(pose, rviz_visual_tools::RED, rviz_visual_tools::LARGE);
File truncated at 100 lines see the full file
CONTRIBUTING
Repository Summary
| Checkout URI | https://github.com/davetcoleman/rviz_visual_tools.git |
| VCS Type | git |
| VCS Version | jade-devel |
| Last Updated | 2016-08-06 |
| Dev Status | DEVELOPED |
| Released | RELEASED |
| Contributing |
Help Wanted (-)
Good First Issues (-) Pull Requests to Review (-) |
Packages
| Name | Version |
|---|---|
| rviz_visual_tools | 2.2.0 |
README
Rviz Visual Tools
C++ API wrapper for displaying shapes and meshes in Rviz via helper functions that publish markers. Useful for displaying and debugging data. For more advanced robot visualization features, see the moveit_visual_tools which builds on this class, or ompl_visual_tools if you are an OMPL ROS user.
This package includes:
- Easy to use helper functions for visualizing in Rviz fast
- Basic geometric markers for Rviz
- More complex geometric shapes such as coordinate frames, framed boxes, planes, paths, graphs
- Ability to quickly choose standard colors and sizes
- Tools to ensure proper connection to Rviz before publishing visualizations
- Shortcuts to convert between different types of points and poses - ROS msgs, Eigen, tf, etc
- Batch publishing capabilities to reduce over throttling ROS messages
- A tf publishing helper class
Developed by Dave Coleman at the Correll Robotics Lab, University of Colorado Boulder with help from Andy McEvoy and many others.
-
 Travis CI
 -
ROS Buildfarm - Trusty Devel Source Build
-
ROS Buildfarm - AMD64 Trusty Debian Build
Install
Ubuntu Debian
sudo apt-get install ros-jade-rviz-visual-tools
Build from Source
Clone this repository into a catkin workspace, then use the rosdep install tool to automatically download its dependencies. Depending on your current version of ROS, use:
rosdep install --from-paths src --ignore-src --rosdistro jade
Quick Start Demo
To see random shapes generated in Rviz, first launch Rviz:
roslaunch rviz_visual_tools demo_rviz.launch
Then start demo:
roslaunch rviz_visual_tools demo.launch
Code API
Usage
We’ll assume you will be using these helper functions within a class. Almost all of the functions assume you are publishing transforms in the world frame (whatever you call that e.g. /odom).
Initialize
Add to your includes:
#include <rviz_visual_tools/rviz_visual_tools.h>
Add to your class’s member variables:
// For visualizing things in rviz
rviz_visual_tools::RvizVisualToolsPtr visual_tools_;
In your class’ constructor add:
visual_tools_.reset(new rviz_visual_tools::RvizVisualTools("base_frame","/rviz_visual_markers"));
Change the first parameter to the name of your robot’s base frame, and the second parameter to whatever name you’d like to use for the corresponding Rviz marker ROS topic.
Tools
Now in your code you can easily debug your code using visual markers in Rviz
Start rviz and create a new marker using the ‘Add’ button at the bottom right. Choose the marker topic to be the same as the topic you specified in the constructor.
Example Code
In the following snippet we create a pose at xyz (0.1, 0.1, 0.1) and rotate the pose down 45 degrees along the Y axis. Then we publish the pose as a arrow for visualziation in Rviz. Make sure your Rviz fixed frame is the same as the one chosen in the code.
// Create pose
Eigen::Affine3d pose;
pose = Eigen::AngleAxisd(M_PI/4, Eigen::Vector3d::UnitY()); // rotate along X axis by 45 degrees
pose.translation() = Eigen::Vector3d( 0.1, 0.1, 0.1 ); // translate x,y,z

// Publish arrow vector of pose
ROS_INFO_STREAM_NAMED("test","Publishing Arrow");
visual_tools_->publishArrow(pose, rviz_visual_tools::RED, rviz_visual_tools::LARGE);
Basic Publishing Functions
See visual_tools.h for more details and documentation on the following functions:
File truncated at 100 lines see the full file
CONTRIBUTING
Repository Summary
| Checkout URI | https://github.com/davetcoleman/rviz_visual_tools.git |
| VCS Type | git |
| VCS Version | indigo-devel |
| Last Updated | 2017-11-13 |
| Dev Status | DEVELOPED |
| Released | RELEASED |
| Contributing |
Help Wanted (-)
Good First Issues (-) Pull Requests to Review (-) |
Packages
| Name | Version |
|---|---|
| rviz_visual_tools | 2.3.1 |
README
Rviz Visual Tools
Helper functions for displaying and debugging data in Rviz via published markers.
This package includes:
- Basic geometric markers for Rviz
- A tf publishing helper class
Developed by Dave Coleman at the Correll Robotics Lab, University of Colorado Boulder with help from Andy McEvoy and others.
-
Travis CI
-
-

Install
Ubuntu Debian
sudo apt-get install ros-indigo-rviz-visual-tools
Build from Source
Clone this repository into a catkin workspace, then use the rosdep install tool to automatically download its dependencies. Depending on your current version of ROS, use:
rosdep install --from-paths src --ignore-src --rosdistro indigo
Quick Start Demo
To see random shapes generated in Rviz, first launch Rviz:
roslaunch rviz_visual_tools demo_rviz.launch
Then start demo:
roslaunch rviz_visual_tools demo.launch
Or used combined roslaunch file:
roslaunch rviz_visual_tools demo_combined.launch
Code API
See VisualTools Class Reference
Usage
We’ll assume you will be using these helper functions within a class. Almost all of the functions assume you are publishing transforms in the world frame (whatever you call that e.g. /odom).
Initialize
Add to your includes:
#include <rviz_visual_tools/visual_tools.h>
Add to your class’s member variables:
// For visualizing things in rviz
rviz_visual_tools::VisualToolsPtr visual_tools_;
In your class’ constructor add:
visual_tools_.reset(new rviz_visual_tools::VisualTools("base_frame","/rviz_visual_markers"));
Change the first parameter to the name of your robot’s base frame, and the second parameter to whatever name you’d like to use for the corresponding Rviz marker ROS topic.
Tools
Now in your code you can easily debug your code using visual markers in Rviz
Start rviz and create a new marker using the ‘Add’ button at the bottom right. Choose the marker topic to be the same as the topic you specified in the constructor.
Example Code
In the following snippet we create a pose at xyz (0.1, 0.1, 0.1) and rotate the pose down 45 degrees along the Y axis. Then we publish the pose as a arrow for visualziation in Rviz. Make sure your Rviz fixed frame is the same as the one chosen in the code.
// Create pose
Eigen::Affine3d pose;
pose = Eigen::AngleAxisd(M_PI/4, Eigen::Vector3d::UnitY()); // rotate along X axis by 45 degrees
pose.translation() = Eigen::Vector3d( 0.1, 0.1, 0.1 ); // translate x,y,z

// Publish arrow vector of pose
ROS_INFO_STREAM_NAMED("test","Publishing Arrow");
visual_tools_->publishArrow(pose, rviz_visual_tools::RED, rviz_visual_tools::LARGE);
Basic Publishing Functions
See visual_tools.h for more details and documentation on the following functions:
- publishSphere
- publishSpheres
File truncated at 100 lines see the full file
CONTRIBUTING
Repository Summary
| Checkout URI | https://github.com/PickNikRobotics/rviz_visual_tools.git |
| VCS Type | git |
| VCS Version | ros2 |
| Last Updated | 2026-01-19 |
| Dev Status | MAINTAINED |
| Released | RELEASED |
| Contributing |
Help Wanted (-)
Good First Issues (-) Pull Requests to Review (-) |
Packages
| Name | Version |
|---|---|
| rviz_visual_tools | 4.1.4 |
README
Rviz Visual Tools
C++ API wrapper for displaying shapes and meshes in Rviz via helper functions that publish markers. Useful for displaying and debugging data. For more advanced robot visualization features, see the moveit_visual_tools which builds on this class.
This package includes:
- Rviz Panel GUI to step through your code for debugging and testing
- Rviz-based keyboard control for stepping through application
- Easy to use helper functions for visualizing in Rviz fast
- Basic geometric markers for Rviz
- More complex geometric shapes such as coordinate frames, framed boxes, planes, paths, graphs
- Ability to quickly choose standard colors and sizes
- Tools to ensure proper connection to Rviz before publishing visualizations
- Shortcuts to convert between different types of points and poses - ROS msgs, Eigen, tf, etc
- Batch publishing capabilities to reduce over throttling ROS messages
- A tf publishing helper class
- An interactive marker helper class
Developed by Dave Coleman at the Correll Robotics Lab, University of Colorado Boulder with help from Andy McEvoy and many others.
![]()
-
-
-
-
Install
Ubuntu Debian
sudo apt-get install ros-${ROS_DISTRO}-rviz-visual-tools
Build from Source
Clone this repository into a catkin workspace, then use the rosdep install tool to automatically download its dependencies. Depending on your current version of ROS, use:
rosdep install --from-paths src --ignore-src --rosdistro ${ROS_DISTRO}
Quick Start Demo
To see random shapes generated in Rviz, first launch Rviz:
ros2 launch rviz_visual_tools demo_rviz.launch.py
Then start the RViz Visual Tools demo:
ros2 run rviz_visual_tools rviz_visual_tools_demo
Code API
Usage
We’ll assume you will be using these helper functions within a class. Almost all of the functions assume you are publishing transforms in the world frame (whatever you call that e.g. /odom).
Initialize
Add to your includes:
#include <rviz_visual_tools/rviz_visual_tools.hpp>
Add to your class’s member variables:
// For visualizing things in rviz
rviz_visual_tools::RvizVisualToolsPtr visual_tools_;
In your class’ constructor add:
visual_tools_.reset(new rviz_visual_tools::RvizVisualTools("base_frame","/rviz_visual_markers", node));
Change the first parameter to the name of your robot’s base frame, and the second parameter to whatever name you’d like to use for the corresponding Rviz marker ROS topic.
Tools
Now in your code you can easily debug your code using visual markers in Rviz
Start rviz and create a new marker using the ‘Add’ button at the bottom right. Choose the marker topic to be the same as the topic you specified in the constructor.
Example Code
In the following snippet we create a pose at xyz (0.1, 0.1, 0.1) and rotate the pose down 45 degrees along the Y axis. Then we publish the pose as a arrow for visualziation in Rviz. Make sure your Rviz fixed frame is the same as the one chosen in the code.
// Create pose
Eigen::Isometry3d pose;
pose = Eigen::AngleAxisd(M_PI/4, Eigen::Vector3d::UnitY()); // rotate along X axis by 45 degrees
pose.translation() = Eigen::Vector3d( 0.1, 0.1, 0.1 ); // translate x,y,z
File truncated at 100 lines see the full file
CONTRIBUTING
Any contribution that you make to this repository will be under the 3-Clause BSD License, as dictated by that license.
Repository Summary
| Checkout URI | https://github.com/davetcoleman/rviz_visual_tools.git |
| VCS Type | git |
| VCS Version | kinetic-devel |
| Last Updated | 2019-02-23 |
| Dev Status | DEVELOPED |
| Released | RELEASED |
| Contributing |
Help Wanted (-)
Good First Issues (-) Pull Requests to Review (-) |
Packages
| Name | Version |
|---|---|
| rviz_visual_tools | 3.6.0 |
README
Rviz Visual Tools
C++ API wrapper for displaying shapes and meshes in Rviz via helper functions that publish markers. Useful for displaying and debugging data. For more advanced robot visualization features, see the moveit_visual_tools which builds on this class.
This package includes:
- Rviz Panel GUI to step through your code for debugging and testing
- Rviz-based keyboard control for stepping through application
- Easy to use helper functions for visualizing in Rviz fast
- Basic geometric markers for Rviz
- More complex geometric shapes such as coordinate frames, framed boxes, planes, paths, graphs
- Ability to quickly choose standard colors and sizes
- Tools to ensure proper connection to Rviz before publishing visualizations
- Shortcuts to convert between different types of points and poses - ROS msgs, Eigen, tf, etc
- Batch publishing capabilities to reduce over throttling ROS messages
- A tf publishing helper class
- An interactive marker helper class
Developed by Dave Coleman at the Correll Robotics Lab, University of Colorado Boulder with help from Andy McEvoy and many others.
![]()
-
Travis CI
-
-
Install
Ubuntu Debian
sudo apt-get install ros-kinetic-rviz-visual-tools
Build from Source
Clone this repository into a catkin workspace, then use the rosdep install tool to automatically download its dependencies. Depending on your current version of ROS, use:
rosdep install --from-paths src --ignore-src --rosdistro kinetic
Quick Start Demo
To see random shapes generated in Rviz, first launch Rviz:
roslaunch rviz_visual_tools demo_rviz.launch
Then start demo:
roslaunch rviz_visual_tools demo.launch
Code API
Usage
We’ll assume you will be using these helper functions within a class. Almost all of the functions assume you are publishing transforms in the world frame (whatever you call that e.g. /odom).
Initialize
Add to your includes:
#include <rviz_visual_tools/rviz_visual_tools.h>
Add to your class’s member variables:
// For visualizing things in rviz
rviz_visual_tools::RvizVisualToolsPtr visual_tools_;
In your class’ constructor add:
visual_tools_.reset(new rviz_visual_tools::RvizVisualTools("base_frame","/rviz_visual_markers"));
Change the first parameter to the name of your robot’s base frame, and the second parameter to whatever name you’d like to use for the corresponding Rviz marker ROS topic.
Tools
Now in your code you can easily debug your code using visual markers in Rviz
Start rviz and create a new marker using the ‘Add’ button at the bottom right. Choose the marker topic to be the same as the topic you specified in the constructor.
Example Code
In the following snippet we create a pose at xyz (0.1, 0.1, 0.1) and rotate the pose down 45 degrees along the Y axis. Then we publish the pose as a arrow for visualziation in Rviz. Make sure your Rviz fixed frame is the same as the one chosen in the code.
// Create pose
Eigen::Affine3d pose;
pose = Eigen::AngleAxisd(M_PI/4, Eigen::Vector3d::UnitY()); // rotate along X axis by 45 degrees
pose.translation() = Eigen::Vector3d( 0.1, 0.1, 0.1 ); // translate x,y,z

// Publish arrow vector of pose
ROS_INFO_STREAM_NAMED("test","Publishing Arrow");
visual_tools_->publishArrow(pose, rviz_visual_tools::RED, rviz_visual_tools::LARGE);
File truncated at 100 lines see the full file
CONTRIBUTING
Repository Summary
| Checkout URI | https://github.com/PickNikRobotics/rviz_visual_tools.git |
| VCS Type | git |
| VCS Version | melodic-devel |
| Last Updated | 2020-06-09 |
| Dev Status | MAINTAINED |
| Released | RELEASED |
| Contributing |
Help Wanted (-)
Good First Issues (-) Pull Requests to Review (-) |
Packages
| Name | Version |
|---|---|
| rviz_visual_tools | 3.8.0 |
README
Rviz Visual Tools
C++ API wrapper for displaying shapes and meshes in Rviz via helper functions that publish markers. Useful for displaying and debugging data. For more advanced robot visualization features, see the moveit_visual_tools which builds on this class.
This package includes:
- Rviz Panel GUI to step through your code for debugging and testing
- Rviz-based keyboard control for stepping through application
- Easy to use helper functions for visualizing in Rviz fast
- Basic geometric markers for Rviz
- More complex geometric shapes such as coordinate frames, framed boxes, planes, paths, graphs
- Ability to quickly choose standard colors and sizes
- Tools to ensure proper connection to Rviz before publishing visualizations
- Shortcuts to convert between different types of points and poses - ROS msgs, Eigen, tf, etc
- Batch publishing capabilities to reduce over throttling ROS messages
- A tf publishing helper class
- An interactive marker helper class
Developed by Dave Coleman at the Correll Robotics Lab, University of Colorado Boulder with help from Andy McEvoy and many others.
![]()
-
Travis CI
-
-
-
-

Install
Ubuntu Debian
sudo apt-get install ros-melodic-rviz-visual-tools
Build from Source
Clone this repository into a catkin workspace, then use the rosdep install tool to automatically download its dependencies. Depending on your current version of ROS, use:
rosdep install --from-paths src --ignore-src --rosdistro melodic
Quick Start Demo
To see random shapes generated in Rviz, first launch Rviz:
roslaunch rviz_visual_tools demo_rviz.launch
Then start demo:
roslaunch rviz_visual_tools demo.launch
Code API
Usage
We’ll assume you will be using these helper functions within a class. Almost all of the functions assume you are publishing transforms in the world frame (whatever you call that e.g. /odom).
Initialize
Add to your includes:
#include <rviz_visual_tools/rviz_visual_tools.h>
Add to your class’s member variables:
// For visualizing things in rviz
rviz_visual_tools::RvizVisualToolsPtr visual_tools_;
In your class’ constructor add:
visual_tools_.reset(new rviz_visual_tools::RvizVisualTools("base_frame","/rviz_visual_markers"));
Change the first parameter to the name of your robot’s base frame, and the second parameter to whatever name you’d like to use for the corresponding Rviz marker ROS topic.
Tools
Now in your code you can easily debug your code using visual markers in Rviz
Start rviz and create a new marker using the ‘Add’ button at the bottom right. Choose the marker topic to be the same as the topic you specified in the constructor.
Example Code
In the following snippet we create a pose at xyz (0.1, 0.1, 0.1) and rotate the pose down 45 degrees along the Y axis. Then we publish the pose as a arrow for visualziation in Rviz. Make sure your Rviz fixed frame is the same as the one chosen in the code.
// Create pose
Eigen::Isometry3d pose;
pose = Eigen::AngleAxisd(M_PI/4, Eigen::Vector3d::UnitY()); // rotate along X axis by 45 degrees
pose.translation() = Eigen::Vector3d( 0.1, 0.1, 0.1 ); // translate x,y,z

// Publish arrow vector of pose
File truncated at 100 lines see the full file
CONTRIBUTING
Repository Summary
| Checkout URI | https://github.com/PickNikRobotics/rviz_visual_tools.git |
| VCS Type | git |
| VCS Version | noetic-devel |
| Last Updated | 2020-10-09 |
| Dev Status | MAINTAINED |
| Released | RELEASED |
| Contributing |
Help Wanted (-)
Good First Issues (-) Pull Requests to Review (-) |
Packages
| Name | Version |
|---|---|
| rviz_visual_tools | 3.9.1 |
README
Rviz Visual Tools
C++ API wrapper for displaying shapes and meshes in Rviz via helper functions that publish markers. Useful for displaying and debugging data. For more advanced robot visualization features, see the moveit_visual_tools which builds on this class.
This package includes:
- Rviz Panel GUI to step through your code for debugging and testing
- Rviz-based keyboard control for stepping through application
- Easy to use helper functions for visualizing in Rviz fast
- Basic geometric markers for Rviz
- More complex geometric shapes such as coordinate frames, framed boxes, planes, paths, graphs
- Ability to quickly choose standard colors and sizes
- Tools to ensure proper connection to Rviz before publishing visualizations
- Shortcuts to convert between different types of points and poses - ROS msgs, Eigen, tf, etc
- Batch publishing capabilities to reduce over throttling ROS messages
- A tf publishing helper class
- An interactive marker helper class
![]()
This open source project was developed at PickNik Robotics. Need professional ROS development and consulting? Contact us at projects@picknik.ai for a free consultation.
-
Travis CI
-
-
-
-

Install
Ubuntu Debian
sudo apt-get install ros-melodic-rviz-visual-tools
Build from Source
Clone this repository into a catkin workspace, then use the rosdep install tool to automatically download its dependencies. Depending on your current version of ROS, use:
rosdep install --from-paths src --ignore-src --rosdistro melodic
Quick Start Demo
To see random shapes generated in Rviz, first launch Rviz:
roslaunch rviz_visual_tools demo_rviz.launch
Then start demo:
roslaunch rviz_visual_tools demo.launch
Code API
Usage
We’ll assume you will be using these helper functions within a class. Almost all of the functions assume you are publishing transforms in the world frame (whatever you call that e.g. /odom).
Initialize
Add to your includes:
#include <rviz_visual_tools/rviz_visual_tools.h>
Add to your class’s member variables:
// For visualizing things in rviz
rviz_visual_tools::RvizVisualToolsPtr visual_tools_;
In your class’ constructor add:
visual_tools_.reset(new rviz_visual_tools::RvizVisualTools("base_frame","/rviz_visual_markers"));
Change the first parameter to the name of your robot’s base frame, and the second parameter to whatever name you’d like to use for the corresponding Rviz marker ROS topic.
Tools
Now in your code you can easily debug your code using visual markers in Rviz
Start rviz and create a new marker using the ‘Add’ button at the bottom right. Choose the marker topic to be the same as the topic you specified in the constructor.
Example Code
In the following snippet we create a pose at xyz (0.1, 0.1, 0.1) and rotate the pose down 45 degrees along the Y axis. Then we publish the pose as a arrow for visualziation in Rviz. Make sure your Rviz fixed frame is the same as the one chosen in the code.
// Create pose
Eigen::Isometry3d pose;
pose = Eigen::AngleAxisd(M_PI/4, Eigen::Vector3d::UnitY()); // rotate along X axis by 45 degrees
pose.translation() = Eigen::Vector3d( 0.1, 0.1, 0.1 ); // translate x,y,z
File truncated at 100 lines see the full file