
Repository Summary
| Checkout URI | https://github.com/eyeware/eyeware-ros.git |
| VCS Type | git |
| VCS Version | master |
| Last Updated | 2021-05-19 |
| Dev Status | MAINTAINED |
| Released | UNRELEASED |
| Contributing |
Help Wanted (-)
Good First Issues (-) Pull Requests to Review (-) |
Packages
| Name | Version |
|---|---|
| gazesense_bridge | 2.1.0 |
| gazesense_msgs | 2.1.0 |
README
Eyeware ROS utilities
GazeSense ROS bridge
The GazeSense ROS bridge exposes 3D eye tracking data from the GazeSense application into the Robot Operating System (ROS).
GazeSense is an application developed by Eyeware Tech SA (http://www.eyeware.tech) that provides real-time 3D eye tracking by relying on consumer 3D sensors. GazeSense allows to define virtual 3D objects of the environment, and measure the attention of people towards those objects.
The GazeSense ROS bridge publishes 3D eye tracking data on ROS topics. In addition, this tracking data can be visualized in Rviz:
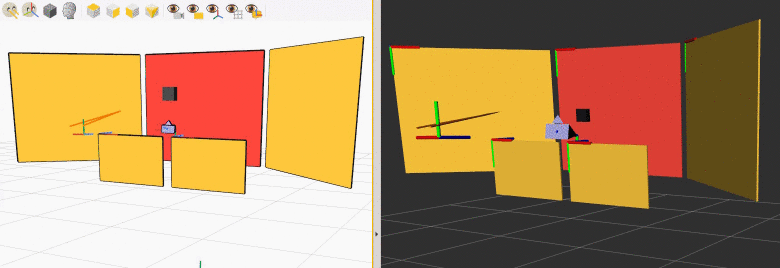
Both visualizations show the position of a camera (purple glyph) and a tracked person's estimated gaze (orange rays), as the person is looking at different areas of the environment (yellow screens).
The area that is being fixated at a given instant is highlighted in red. The black cube represents the point that the person is looking at.</figcaption> </figure> ## Requirements The GazeSense ROS bridge was developed and tested on a system with: * Ubuntu 18.04 * GazeSense (graphical application) 2.1.0 * ROS Melodic with Python 3 support ## Installation In the rest of this guide, we will assume that: * GazeSense (graphical application) is uncompressed in `~/gazesense/` * the ROS workspace is located in `~/gazesense_ws/` However, the two paths can be adjusted as desired. ### GazeSense Uncompress GazeSense (graphical application) in `~/gazesense`. In particular, the directory `~/gazesense/API/python` should exist. ### ROS Melodic and Python 3 First, we install ROS Melodic as described in the [ROS installation page](http://wiki.ros.org/melodic/Installation/Ubuntu): ```bash sudo sh -c 'echo "deb http://packages.ros.org/ros/ubuntu $(lsb_release -sc) main" > /etc/apt/sources.list.d/ros-latest.list' sudo apt-key adv --keyserver 'hkp://keyserver.ubuntu.com:80' --recv-key C1CF6E31E6BADE8868B172B4F42ED6FBAB17C654 sudo apt update sudo apt install ros-melodic-desktop-full ``` The Python API of GazeSense requires Python 3.6, but ROS Melodic ships with Python 2 by default. Therefore, we need to install the Python 3 version of ROS Melodic. We follow the instructions from [here](https://dhanoopbhaskar.com/blog/2020-05-07-working-with-python-3-in-ros-kinetic-or-melodic/): ```bash sudo apt install python3-pip python3-all-dev python3-rospkg # The previous command might uninstall parts of ROS Melodic. We now restore it: sudo apt install ros-melodic-desktop-full --fix-missing sudo apt install python3-numpy sudo apt install ros-melodic-ddynamic-reconfigure ``` ### Compilation of the ROS workspace We create the ROS workspace in `~/gazesense_ws/` in this way: ```bash source /opt/ros/melodic/setup.bash mkdir -p ~/gazesense_ws/src/ catkin_init_workspace ~/gazesense_ws/src/ git -C ~/gazesense_ws/src/ clone https://github.com/eyeware/eyeware-ros catkin_make -C ~/gazesense_ws/ ``` Successful result: ```bash ... [100%] Built target gazesense_msgs_generate_messages_cpp [100%] Built target gazesense_msgs_generate_messages_py [100%] Built target gazesense_msgs_generate_messages_eus Scanning dependencies of target gazesense_msgs_generate_messages [100%] Built target gazesense_msgs_generate_messages ``` ## How to use Below, we first describe how to run a complete demo (including graphical visualization). Then, we will go over specific components (publisher, subscriber) and their available options. ### Complete demo quick start Assuming that everything is installed and compiled as described in the [Installation](#Installation) section, **run GazeSense** in one terminal: ```bash cd ~/gazesense/ ./run_GazeSense.sh ``` Within GazeSense, it is useful to export the 3D Setup description file on the disk as a JSON file. This file encodes the geometric description of the environment, such as the locations and sizes of possible attention targets. We can export the file with this button:  File truncated at 100 lines [see the full file](https://github.com/eyeware/eyeware-ros/tree/master/README.md)
CONTRIBUTING
Repository Summary
| Checkout URI | https://github.com/eyeware/eyeware-ros.git |
| VCS Type | git |
| VCS Version | master |
| Last Updated | 2021-05-19 |
| Dev Status | MAINTAINED |
| Released | UNRELEASED |
| Contributing |
Help Wanted (-)
Good First Issues (-) Pull Requests to Review (-) |
Packages
| Name | Version |
|---|---|
| gazesense_bridge | 2.1.0 |
| gazesense_msgs | 2.1.0 |
README
Eyeware ROS utilities
GazeSense ROS bridge
The GazeSense ROS bridge exposes 3D eye tracking data from the GazeSense application into the Robot Operating System (ROS).
GazeSense is an application developed by Eyeware Tech SA (http://www.eyeware.tech) that provides real-time 3D eye tracking by relying on consumer 3D sensors. GazeSense allows to define virtual 3D objects of the environment, and measure the attention of people towards those objects.
The GazeSense ROS bridge publishes 3D eye tracking data on ROS topics. In addition, this tracking data can be visualized in Rviz:
Both visualizations show the position of a camera (purple glyph) and a tracked person's estimated gaze (orange rays), as the person is looking at different areas of the environment (yellow screens).
The area that is being fixated at a given instant is highlighted in red. The black cube represents the point that the person is looking at.</figcaption> </figure> ## Requirements The GazeSense ROS bridge was developed and tested on a system with: * Ubuntu 18.04 * GazeSense (graphical application) 2.1.0 * ROS Melodic with Python 3 support ## Installation In the rest of this guide, we will assume that: * GazeSense (graphical application) is uncompressed in `~/gazesense/` * the ROS workspace is located in `~/gazesense_ws/` However, the two paths can be adjusted as desired. ### GazeSense Uncompress GazeSense (graphical application) in `~/gazesense`. In particular, the directory `~/gazesense/API/python` should exist. ### ROS Melodic and Python 3 First, we install ROS Melodic as described in the [ROS installation page](http://wiki.ros.org/melodic/Installation/Ubuntu): ```bash sudo sh -c 'echo "deb http://packages.ros.org/ros/ubuntu $(lsb_release -sc) main" > /etc/apt/sources.list.d/ros-latest.list' sudo apt-key adv --keyserver 'hkp://keyserver.ubuntu.com:80' --recv-key C1CF6E31E6BADE8868B172B4F42ED6FBAB17C654 sudo apt update sudo apt install ros-melodic-desktop-full ``` The Python API of GazeSense requires Python 3.6, but ROS Melodic ships with Python 2 by default. Therefore, we need to install the Python 3 version of ROS Melodic. We follow the instructions from [here](https://dhanoopbhaskar.com/blog/2020-05-07-working-with-python-3-in-ros-kinetic-or-melodic/): ```bash sudo apt install python3-pip python3-all-dev python3-rospkg # The previous command might uninstall parts of ROS Melodic. We now restore it: sudo apt install ros-melodic-desktop-full --fix-missing sudo apt install python3-numpy sudo apt install ros-melodic-ddynamic-reconfigure ``` ### Compilation of the ROS workspace We create the ROS workspace in `~/gazesense_ws/` in this way: ```bash source /opt/ros/melodic/setup.bash mkdir -p ~/gazesense_ws/src/ catkin_init_workspace ~/gazesense_ws/src/ git -C ~/gazesense_ws/src/ clone https://github.com/eyeware/eyeware-ros catkin_make -C ~/gazesense_ws/ ``` Successful result: ```bash ... [100%] Built target gazesense_msgs_generate_messages_cpp [100%] Built target gazesense_msgs_generate_messages_py [100%] Built target gazesense_msgs_generate_messages_eus Scanning dependencies of target gazesense_msgs_generate_messages [100%] Built target gazesense_msgs_generate_messages ``` ## How to use Below, we first describe how to run a complete demo (including graphical visualization). Then, we will go over specific components (publisher, subscriber) and their available options. ### Complete demo quick start Assuming that everything is installed and compiled as described in the [Installation](#Installation) section, **run GazeSense** in one terminal: ```bash cd ~/gazesense/ ./run_GazeSense.sh ``` Within GazeSense, it is useful to export the 3D Setup description file on the disk as a JSON file. This file encodes the geometric description of the environment, such as the locations and sizes of possible attention targets. We can export the file with this button:  File truncated at 100 lines [see the full file](https://github.com/eyeware/eyeware-ros/tree/master/README.md)