
Repository Summary
| Checkout URI | https://github.com/ual-arm-ros-pkg/arduino_daq.git |
| VCS Type | git |
| VCS Version | master |
| Last Updated | 2018-07-16 |
| Dev Status | MAINTAINED |
| Released | RELEASED |
| Contributing |
Help Wanted (-)
Good First Issues (-) Pull Requests to Review (-) |
Packages
| Name | Version |
|---|---|
| arduino_daq | 1.0.1 |
README
arduino_daq
This package contains an AVR8 firmware, a host standalone C++ library, and a ROS node for UAL eCAR’s Arduino-based DAQ system, but it is generic enough for use in many other applications.
The DAQ features: 4 analog outputs (via an optional MAX5500 chip), ADC inputs, GPIO and PWM outputs, 2 channels quadrature encoder decoding support, and one absolute encoder (EMS22A) input. Outputs feature an optional watchdog timer that resets the output if not updated periodically (default period is 1 second).
The precompiled firmware is for atmega328P, but it could be recompiled for other larger versions with more I/O pins.
Valid pin numbers
The function of each pin can be configured on the fly from the host (PC) software. Naturally, each microcontroller hardware limits some special functions:
-
atmega328P
- GPIO inputs/outputs: 2-13
- ADC inputs: 0-8
- PWM outputs: pins 3, 5, 6, 9, 10, and 11.
- Quadrature encoders:
- Encoder #0:
- Channel A must be pin 2.
- Channels B & Z can be any free GPIO pin.
- Encoder #1:
- Channel A must be pin 3.
- Channels B & Z can be any free GPIO pin.
- Encoder #0:
Compiling
In GNU/Linux or Windows, use CMake to generate the Makefiles or project files as usual.
Set CMake variables BUILD_ROS and BUILD_STANDALONE_LIB to ON/OFF depending on whether
you want to compile a ROS node or a standalone C++ library.
For compilation within a ROS catkin environment, simple clone
this repository inside your ~/catkin_ws/src/ and run catkin_make.
Prerequisites:
sudo apt install libmrpt-dev
ROS examples of use
Note: Numering of pins follows the Arduino pin number convention
(for example: Arduino ProMini,ATmega328, pin: PB1 <=> chip pin number: 13 <=> Arduino pin number: 9 ).
-
First: Launch the node with
 roscore     # In one terminal
 rosrun arduino_daq arduino_daq_node _SERIAL_PORT:=/dev/ttyUSB0    # In another terminal
Next, in another terminal try any of the following:
-
Setting a DAC analog value (volts):
rostopic pub /arduino_daq_dac0 std_msgs/Float64 1.5 -
Setting a GPIO digital output pin:
rostopic pub /arduino_daq_GPIO_output7 std_msgs/Bool 1 -
Setting a PWM output (0…255 maps to 0%…100% duty cycle):
rostopic pub /arduino_daq_pwm3 std_msgs/UInt8 220 -
Automatically starting ADC sampling at 10 Hz, with 5V reference voltage, on two channels in pins ADC0 and ADC1 (Requires killing
arduino_daqto launch it again with these parameters).rosrun arduino_daq arduino_daq_node _SERIAL_PORT:=/dev/ttyUSB0 _ADC_INTERNAL_REFVOLT:=0 _ADC_MEASURE_PERIOD_MS:=100 _ADC_CHANNEL0:=0 _ADC_CHANNEL1:=1 -
Automatically starting reading an ENCODER sampling at 10 Hz, on one channel with Channel A=pin 2, Channel B=pin 8, and Channel Z=pin 9 (set channel Z to “0” if not wired). (Requires killing
arduino_daqto launch it again with these parameters).rosrun arduino_daq arduino_daq_node _SERIAL_PORT:=/dev/ttyUSB0 _ENC0_PIN_A:=2 _ENC0_PIN_B:=8 _ENC0_PIN_Z:=9 -
Example use of a EMS22A absolute encoder: “, pin_cs);
rosrun arduino_daq arduino_daq_node _SERIAL_PORT:=/dev/ttyUSB0 _ENCABS0_PIN_CS:=1 _ENCABS0_PIN_CLK:=2 _ENCABS0_PIN_DO:=2 _ENCABS_MEASURE_PERIOD_MS:=100
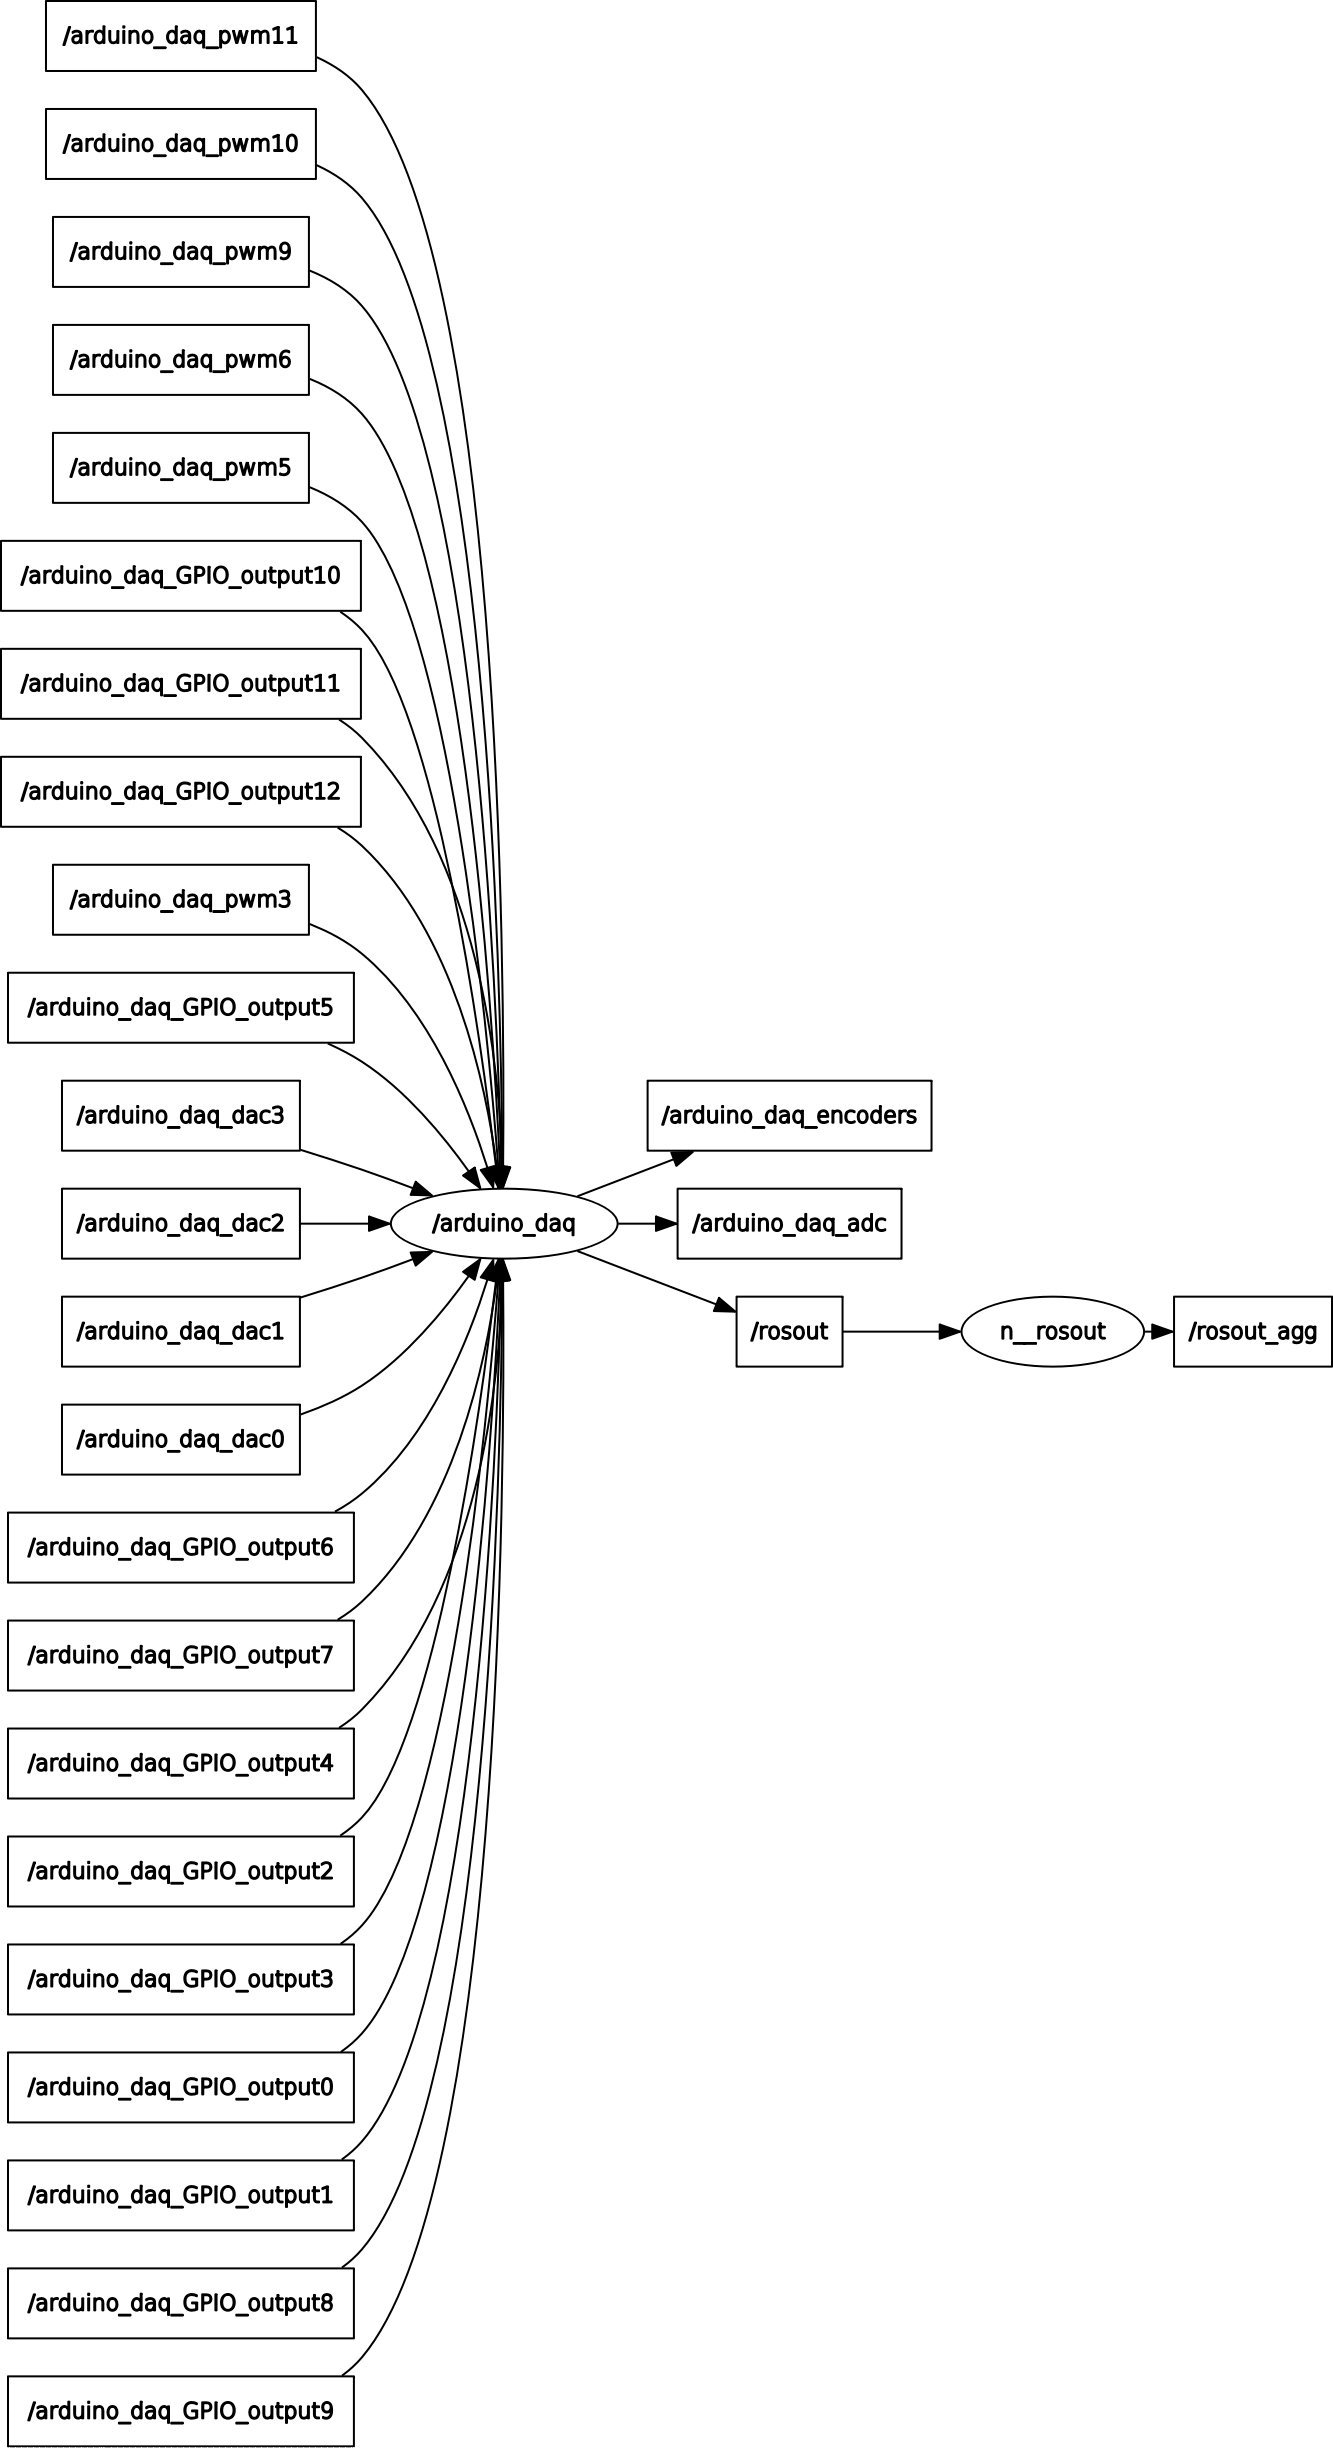
ROS graph
Source code directories
-
arduino_firmware: Contains an AtmelStudio project for the firmware. Written in C++ using the Arduino library. -
includeandlibarduinodaq: Standalone C++ library. -
src: ROS node
File truncated at 100 lines see the full file
CONTRIBUTING
Repository Summary
| Checkout URI | https://github.com/ual-arm-ros-pkg/arduino_daq.git |
| VCS Type | git |
| VCS Version | master |
| Last Updated | 2018-07-16 |
| Dev Status | MAINTAINED |
| Released | RELEASED |
| Contributing |
Help Wanted (-)
Good First Issues (-) Pull Requests to Review (-) |
Packages
| Name | Version |
|---|---|
| arduino_daq | 1.0.1 |
README
arduino_daq
This package contains an AVR8 firmware, a host standalone C++ library, and a ROS node for UAL eCAR’s Arduino-based DAQ system, but it is generic enough for use in many other applications.
The DAQ features: 4 analog outputs (via an optional MAX5500 chip), ADC inputs, GPIO and PWM outputs, 2 channels quadrature encoder decoding support, and one absolute encoder (EMS22A) input. Outputs feature an optional watchdog timer that resets the output if not updated periodically (default period is 1 second).
The precompiled firmware is for atmega328P, but it could be recompiled for other larger versions with more I/O pins.
Valid pin numbers
The function of each pin can be configured on the fly from the host (PC) software. Naturally, each microcontroller hardware limits some special functions:
-
atmega328P
- GPIO inputs/outputs: 2-13
- ADC inputs: 0-8
- PWM outputs: pins 3, 5, 6, 9, 10, and 11.
- Quadrature encoders:
- Encoder #0:
- Channel A must be pin 2.
- Channels B & Z can be any free GPIO pin.
- Encoder #1:
- Channel A must be pin 3.
- Channels B & Z can be any free GPIO pin.
- Encoder #0:
Compiling
In GNU/Linux or Windows, use CMake to generate the Makefiles or project files as usual.
Set CMake variables BUILD_ROS and BUILD_STANDALONE_LIB to ON/OFF depending on whether
you want to compile a ROS node or a standalone C++ library.
For compilation within a ROS catkin environment, simple clone
this repository inside your ~/catkin_ws/src/ and run catkin_make.
Prerequisites:
sudo apt install libmrpt-dev
ROS examples of use
Note: Numering of pins follows the Arduino pin number convention
(for example: Arduino ProMini,ATmega328, pin: PB1 <=> chip pin number: 13 <=> Arduino pin number: 9 ).
-
First: Launch the node with
 roscore     # In one terminal
 rosrun arduino_daq arduino_daq_node _SERIAL_PORT:=/dev/ttyUSB0    # In another terminal
Next, in another terminal try any of the following:
-
Setting a DAC analog value (volts):
rostopic pub /arduino_daq_dac0 std_msgs/Float64 1.5 -
Setting a GPIO digital output pin:
rostopic pub /arduino_daq_GPIO_output7 std_msgs/Bool 1 -
Setting a PWM output (0…255 maps to 0%…100% duty cycle):
rostopic pub /arduino_daq_pwm3 std_msgs/UInt8 220 -
Automatically starting ADC sampling at 10 Hz, with 5V reference voltage, on two channels in pins ADC0 and ADC1 (Requires killing
arduino_daqto launch it again with these parameters).rosrun arduino_daq arduino_daq_node _SERIAL_PORT:=/dev/ttyUSB0 _ADC_INTERNAL_REFVOLT:=0 _ADC_MEASURE_PERIOD_MS:=100 _ADC_CHANNEL0:=0 _ADC_CHANNEL1:=1 -
Automatically starting reading an ENCODER sampling at 10 Hz, on one channel with Channel A=pin 2, Channel B=pin 8, and Channel Z=pin 9 (set channel Z to “0” if not wired). (Requires killing
arduino_daqto launch it again with these parameters).rosrun arduino_daq arduino_daq_node _SERIAL_PORT:=/dev/ttyUSB0 _ENC0_PIN_A:=2 _ENC0_PIN_B:=8 _ENC0_PIN_Z:=9 -
Example use of a EMS22A absolute encoder: “, pin_cs);
rosrun arduino_daq arduino_daq_node _SERIAL_PORT:=/dev/ttyUSB0 _ENCABS0_PIN_CS:=1 _ENCABS0_PIN_CLK:=2 _ENCABS0_PIN_DO:=2 _ENCABS_MEASURE_PERIOD_MS:=100
ROS graph
Source code directories
-
arduino_firmware: Contains an AtmelStudio project for the firmware. Written in C++ using the Arduino library. -
includeandlibarduinodaq: Standalone C++ library. -
src: ROS node
File truncated at 100 lines see the full file