
Repository Summary
| Checkout URI | https://github.com/Ekumen-OS/andino_gz.git |
| VCS Type | git |
| VCS Version | humble |
| Last Updated | 2025-09-30 |
| Dev Status | DEVELOPED |
| Released | RELEASED |
| Contributing |
Help Wanted (-)
Good First Issues (-) Pull Requests to Review (-) |
Packages
| Name | Version |
|---|---|
| andino_gz | 0.1.1 |
README
Andino Gazebo Simulation
:clipboard: Description
This package provides a simulation environment for Andino in Gazebo Fortress relying on ros_gz to integrate it with ROS 2.
:clamp: Platforms
- ROS 2: Humble Hawksbill
- OS:
- Ubuntu 22.04 Jammy Jellyfish
- Gazebo:
- Fortress
:inbox_tray: Installation
From binaries
- Meet prerequisites: ROS 2 Humble installation
- Install
andino_gzpackage
sudo apt install ros-humble-andino-gz
- You can jump directly to Usage section and start using it.
From source using a containerized environment
- Clone this repository
git clone git@github.com:ekumenlabs/andino_gz.git
- Set up docker environment: Refer to docker readme
Once the container is running and dependencies have been installed you can proceed to package building.
:package: Build
The package contains some dependencies that must be installed in order to build it:
rosdep install --from-paths src -i -y
Then build the package and source the install workspace. To do so run the following commands:
colcon build
source install/setup.bash
:rocket: Usage
Andino simulation
Once the package is built and sourced, you can start a simulation.
ros2 launch andino_gz andino_gz.launch.py
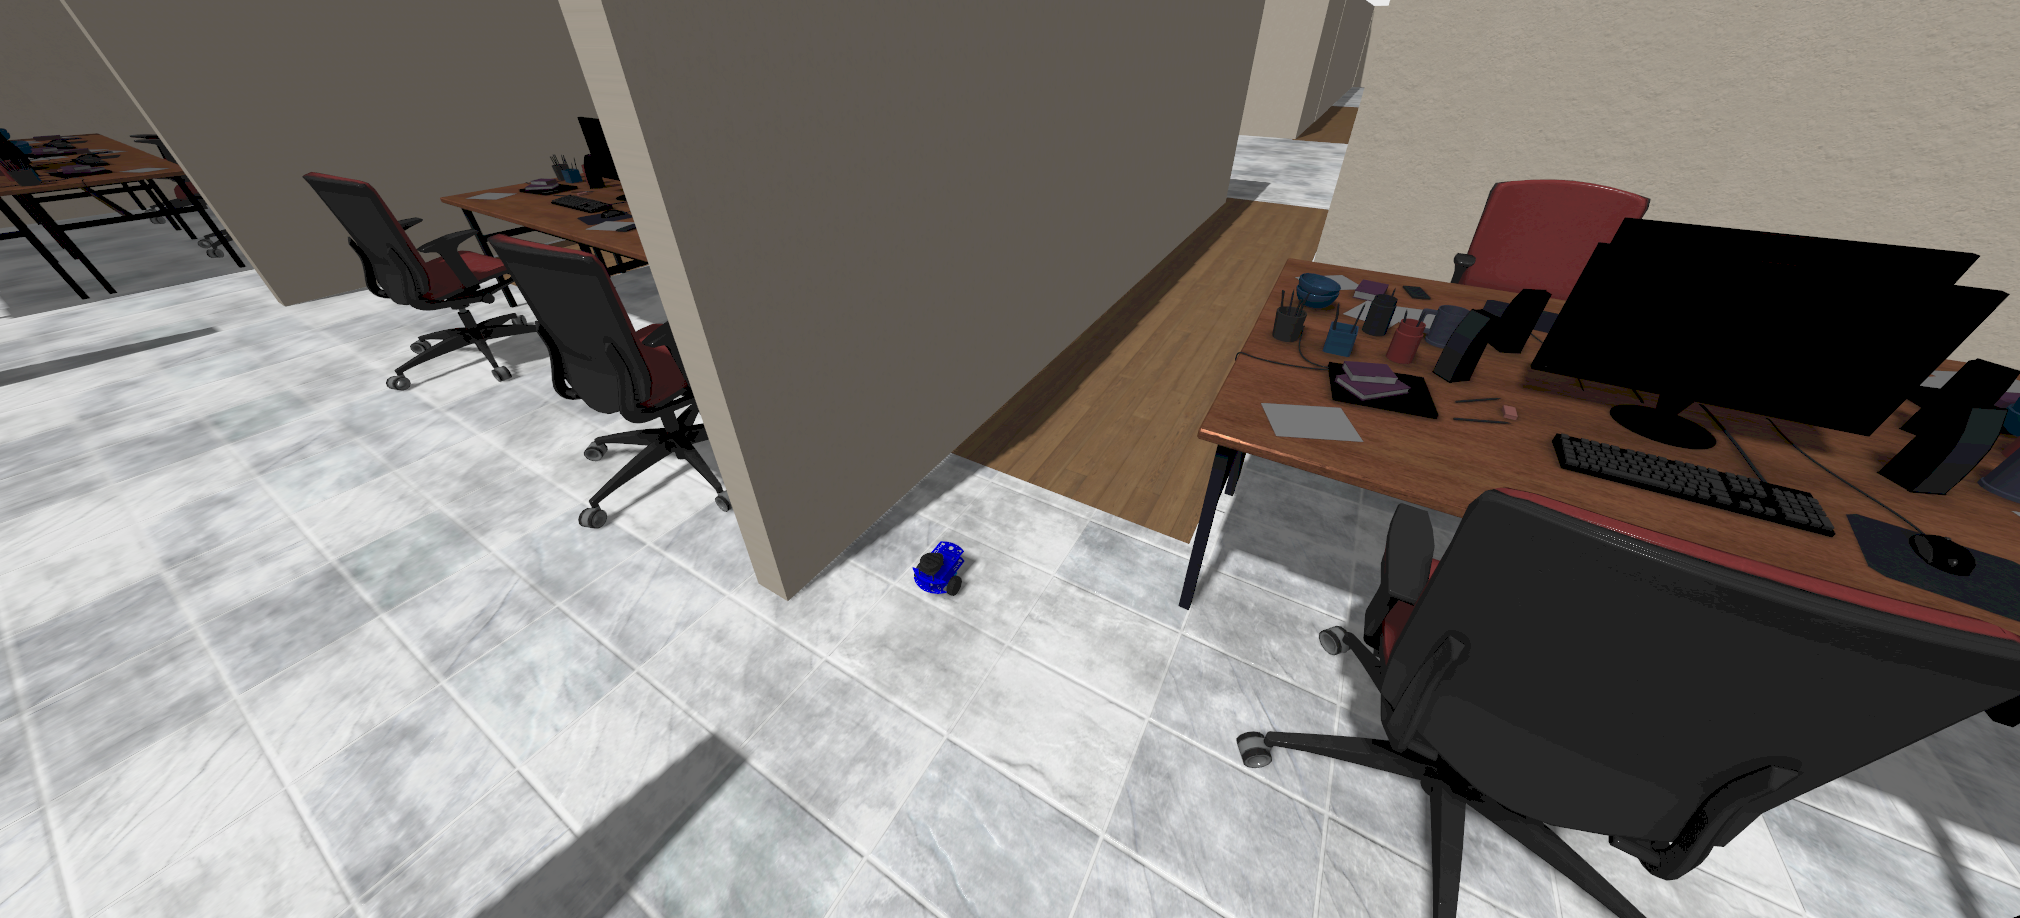
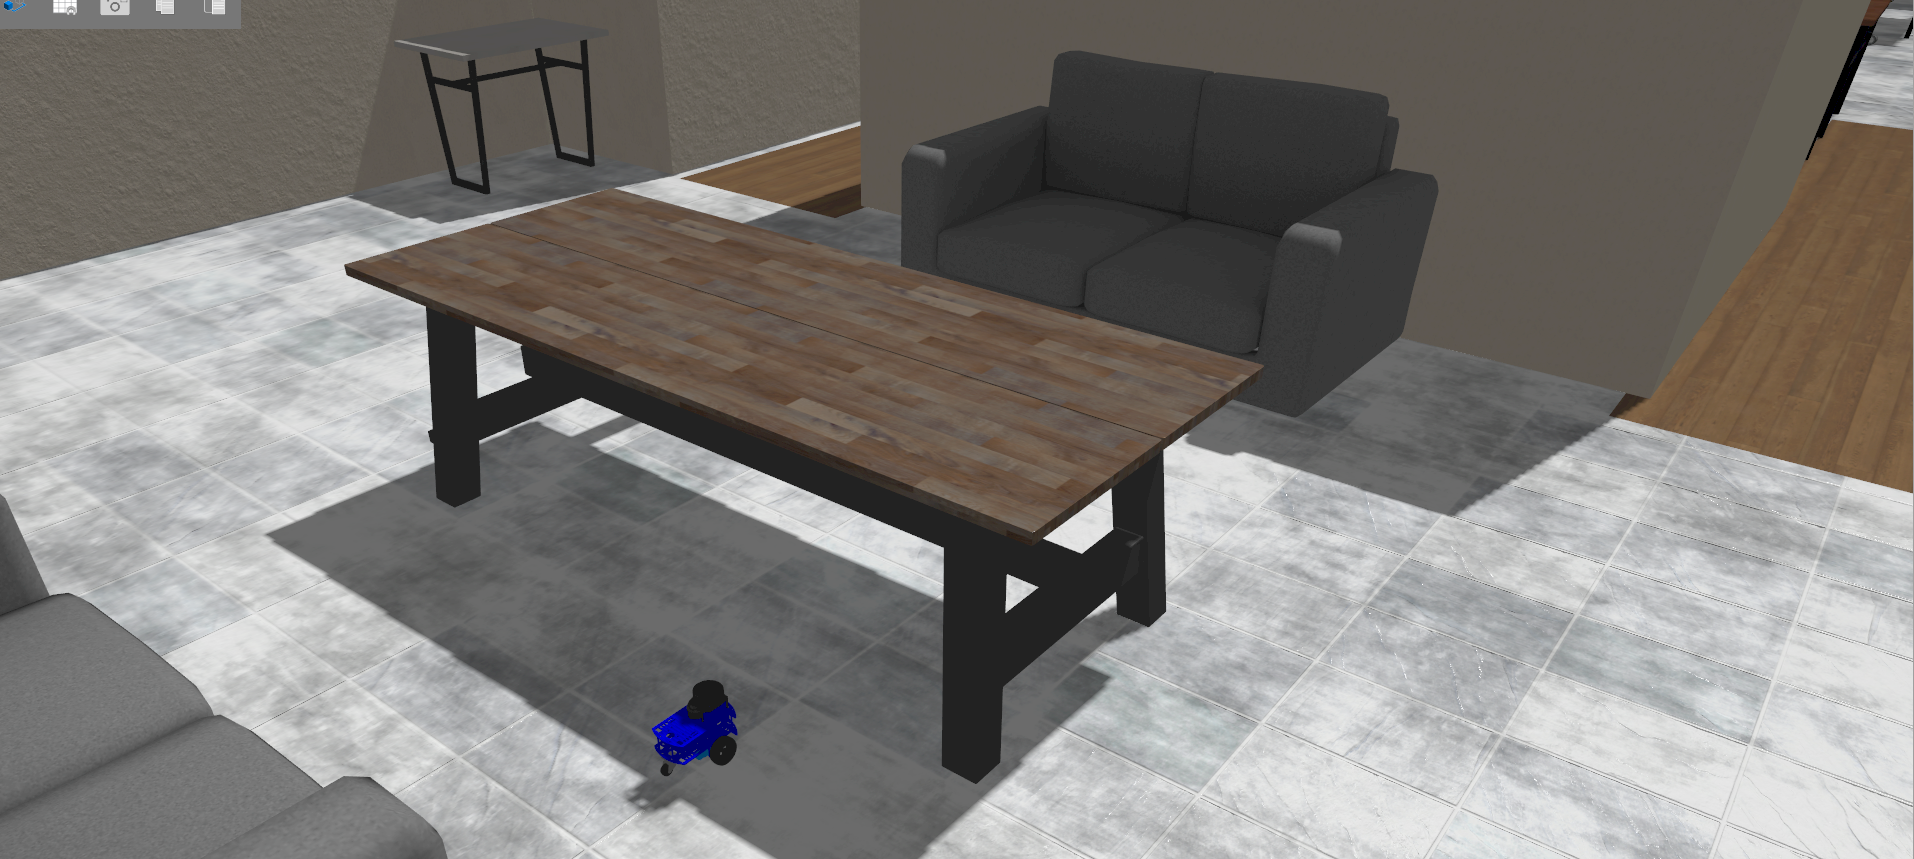
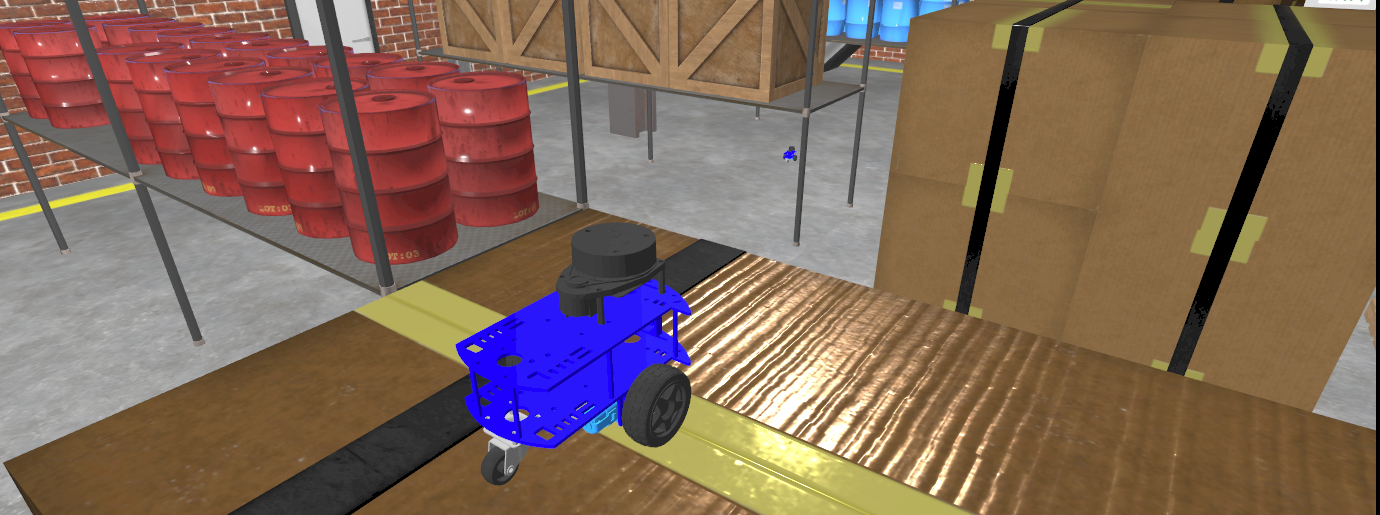
Note: You can use world_name flag to indicate other world to use. (For example: populated_office.sdf(default), office.sdf, depot.sdf, empty.sdf)
By default the ros bridge and rviz are initialized. In case you prefer to disable any of those you can do it via its flags:
ros2 launch andino_gz andino_gz.launch.py ros_bridge:=False rviz:=False
To see a complete list of available arguments for the launch file do:
ros2 launch andino_gz andino_gz.launch.py --show-args
Using a different world:
ros2 launch andino_gz andino_gz.launch.py world_name:=depot.sdf
Make sure to review the required topics using ign topics and ros2 topic CLI tools.
Also, consider using looking at the translation entries under andino_gz/config/bridge_config.yaml.
:robot::robot::robot: Multi robot simulation
This simulation also supports multi-robot simulation.
```sh ros2 launch andino_gz andino_gz.launch.py robots:=” andino1={x: 0.0, y: -1.0, z: 0.1, yaw: 0.};
File truncated at 100 lines see the full file
CONTRIBUTING
Contributing
The contributing guidelines are based on Andino project’s guidelines.
Contributing to andino_gz
The following is a set of guidelines for contributing to andino_gz project. These are mostly guidelines, not rules. Use your best judgment, and feel free to propose changes to this document in a pull request.
Code of Conduct
This project and everyone participating in it is governed by the CODE OF CONDUCT. By participating, you are expected to uphold this code.
How to Contribute
Reporting Bugs
Before Submitting a Bug Report
- Determine the repository which should receive the problem.
- Search the repository’s issues to see if the same or similar problem has been opened. If it has and the issue is still open, then add a comment to the existing issue. Otherwise, create a new issue.
How to Submit a Good Bug Report
Create an issue on the repository that is related to your bug, explain the problem, and include additional details to help maintainers reproduce the problem. Refer to the `Short, Self Contained, Correct (Compilable), Example Guide as well as the following tips:
- Use a clear and descriptive title for the issue to identify the problem.
- Describe the exact steps which reproduce the problem in as many details as possible. When listing steps, don’t just say what you did, but explain how you did it.
- Provide specific examples to demonstrate the steps. Include links to files or projects, or copy/pasteable snippets, which you use in those examples.
- Describe the behavior you observed after following the steps and point out what exactly is the problem with that behavior.
- Explain which behavior you expected to see instead and why.
- Include screenshots and animated GIFs which show you following the described steps and clearly demonstrate the problem.
- If the problem wasn’t triggered by a specific action, describe what you were doing before the problem happened and share more information using the guidelines below.
Provide more context by answering these questions:
- Did the problem start happening recently (e.g. after updating to a new version) or was this always a problem?
- If the problem started happening recently, can you reproduce the problem in an older version? What’s the most recent version in which the problem doesn’t happen?
- Can you reliably reproduce the issue? If not, provide details about how often the problem happens and under which conditions it normally happens.
Include details about your configuration and environment:
- Which version of andino_gz are you using??
- What’s the name and version of the OS you’re using?
- Are you running andino_gz using the provided docker container? See docker.
- Are you running andino_gz in a virtual machine? If so, which VM software are you using and which operating systems and versions are used for the host and the guest?
Suggesting Enhancements
This section guides you through submitting an enhancement suggestion, including completely new features and minor improvements to existing functionality. Following these guidelines helps maintainers and the community understand your suggestion and find related suggestions.
Before creating enhancement suggestions, please check before-submitting-a-bug-report as you
might find out that you don’t need to create one. When you are creating an
enhancement suggestion, please include as many details as possible.
When filling in the issue form for an enhancement suggestion, include the
steps that you imagine you would take if the feature you’re requesting
existed.
Before Submitting An Enhancement Suggestion
- Check if you’re using the latest software version. A more recent version may contain your desired feature.
- Determine which repository the enhancement should be suggested in
- Perform a cursory search to see if the enhancement has already been suggested. If it has, add a comment to the existing issue instead of opening a new one.
How Do I Submit A (Good) Enhancement Suggestion
Enhancement suggestions are tracked as GitHub issues. After you’ve determined which repository your enhancement suggestion is related to, create an issue on that repository and provide the following information:
- Use a clear and descriptive title for the issue to identify the suggestion.
- Provide a step-by-step description of the suggested enhancement in as many details as possible.
- Provide specific examples to demonstrate the steps. Include copy/pasteable snippets which you use in those examples, as Markdown code blocks.
- Describe the current behavior and explain which behavior you expected to see instead and why.
- Include screenshots and animated GIFs which show you following the described steps and clearly demonstrate the problem.
- Explain why this enhancement would be useful to most users and isn’t something that can or should be implemented as a separate application.
- Specify which version of andino_gz you’re using.
- Specify the name and version of the OS you’re using.
Contributing Code
We follow a development process designed to reduce errors, encourage collaboration, and make high quality code. Review the following to get acquainted with this development process.
#. Read the reporting_bugs and suggesting_enhancements sections first.
File truncated at 100 lines see the full file
Repository Summary
| Checkout URI | https://github.com/Ekumen-OS/andino_gz.git |
| VCS Type | git |
| VCS Version | humble |
| Last Updated | 2025-09-30 |
| Dev Status | DEVELOPED |
| Released | RELEASED |
| Contributing |
Help Wanted (-)
Good First Issues (-) Pull Requests to Review (-) |
Packages
| Name | Version |
|---|---|
| andino_gz | 0.1.1 |
README
Andino Gazebo Simulation
:clipboard: Description
This package provides a simulation environment for Andino in Gazebo Fortress relying on ros_gz to integrate it with ROS 2.
:clamp: Platforms
- ROS 2: Humble Hawksbill
- OS:
- Ubuntu 22.04 Jammy Jellyfish
- Gazebo:
- Fortress
:inbox_tray: Installation
From binaries
- Meet prerequisites: ROS 2 Humble installation
- Install
andino_gzpackage
sudo apt install ros-humble-andino-gz
- You can jump directly to Usage section and start using it.
From source using a containerized environment
- Clone this repository
git clone git@github.com:ekumenlabs/andino_gz.git
- Set up docker environment: Refer to docker readme
Once the container is running and dependencies have been installed you can proceed to package building.
:package: Build
The package contains some dependencies that must be installed in order to build it:
rosdep install --from-paths src -i -y
Then build the package and source the install workspace. To do so run the following commands:
colcon build
source install/setup.bash
:rocket: Usage
Andino simulation
Once the package is built and sourced, you can start a simulation.
ros2 launch andino_gz andino_gz.launch.py
Note: You can use world_name flag to indicate other world to use. (For example: populated_office.sdf(default), office.sdf, depot.sdf, empty.sdf)
By default the ros bridge and rviz are initialized. In case you prefer to disable any of those you can do it via its flags:
ros2 launch andino_gz andino_gz.launch.py ros_bridge:=False rviz:=False
To see a complete list of available arguments for the launch file do:
ros2 launch andino_gz andino_gz.launch.py --show-args
Using a different world:
ros2 launch andino_gz andino_gz.launch.py world_name:=depot.sdf
Make sure to review the required topics using ign topics and ros2 topic CLI tools.
Also, consider using looking at the translation entries under andino_gz/config/bridge_config.yaml.
:robot::robot::robot: Multi robot simulation
This simulation also supports multi-robot simulation.
```sh ros2 launch andino_gz andino_gz.launch.py robots:=” andino1={x: 0.0, y: -1.0, z: 0.1, yaw: 0.};
File truncated at 100 lines see the full file
CONTRIBUTING
Contributing
The contributing guidelines are based on Andino project’s guidelines.
Contributing to andino_gz
The following is a set of guidelines for contributing to andino_gz project. These are mostly guidelines, not rules. Use your best judgment, and feel free to propose changes to this document in a pull request.
Code of Conduct
This project and everyone participating in it is governed by the CODE OF CONDUCT. By participating, you are expected to uphold this code.
How to Contribute
Reporting Bugs
Before Submitting a Bug Report
- Determine the repository which should receive the problem.
- Search the repository’s issues to see if the same or similar problem has been opened. If it has and the issue is still open, then add a comment to the existing issue. Otherwise, create a new issue.
How to Submit a Good Bug Report
Create an issue on the repository that is related to your bug, explain the problem, and include additional details to help maintainers reproduce the problem. Refer to the `Short, Self Contained, Correct (Compilable), Example Guide as well as the following tips:
- Use a clear and descriptive title for the issue to identify the problem.
- Describe the exact steps which reproduce the problem in as many details as possible. When listing steps, don’t just say what you did, but explain how you did it.
- Provide specific examples to demonstrate the steps. Include links to files or projects, or copy/pasteable snippets, which you use in those examples.
- Describe the behavior you observed after following the steps and point out what exactly is the problem with that behavior.
- Explain which behavior you expected to see instead and why.
- Include screenshots and animated GIFs which show you following the described steps and clearly demonstrate the problem.
- If the problem wasn’t triggered by a specific action, describe what you were doing before the problem happened and share more information using the guidelines below.
Provide more context by answering these questions:
- Did the problem start happening recently (e.g. after updating to a new version) or was this always a problem?
- If the problem started happening recently, can you reproduce the problem in an older version? What’s the most recent version in which the problem doesn’t happen?
- Can you reliably reproduce the issue? If not, provide details about how often the problem happens and under which conditions it normally happens.
Include details about your configuration and environment:
- Which version of andino_gz are you using??
- What’s the name and version of the OS you’re using?
- Are you running andino_gz using the provided docker container? See docker.
- Are you running andino_gz in a virtual machine? If so, which VM software are you using and which operating systems and versions are used for the host and the guest?
Suggesting Enhancements
This section guides you through submitting an enhancement suggestion, including completely new features and minor improvements to existing functionality. Following these guidelines helps maintainers and the community understand your suggestion and find related suggestions.
Before creating enhancement suggestions, please check before-submitting-a-bug-report as you
might find out that you don’t need to create one. When you are creating an
enhancement suggestion, please include as many details as possible.
When filling in the issue form for an enhancement suggestion, include the
steps that you imagine you would take if the feature you’re requesting
existed.
Before Submitting An Enhancement Suggestion
- Check if you’re using the latest software version. A more recent version may contain your desired feature.
- Determine which repository the enhancement should be suggested in
- Perform a cursory search to see if the enhancement has already been suggested. If it has, add a comment to the existing issue instead of opening a new one.
How Do I Submit A (Good) Enhancement Suggestion
Enhancement suggestions are tracked as GitHub issues. After you’ve determined which repository your enhancement suggestion is related to, create an issue on that repository and provide the following information:
- Use a clear and descriptive title for the issue to identify the suggestion.
- Provide a step-by-step description of the suggested enhancement in as many details as possible.
- Provide specific examples to demonstrate the steps. Include copy/pasteable snippets which you use in those examples, as Markdown code blocks.
- Describe the current behavior and explain which behavior you expected to see instead and why.
- Include screenshots and animated GIFs which show you following the described steps and clearly demonstrate the problem.
- Explain why this enhancement would be useful to most users and isn’t something that can or should be implemented as a separate application.
- Specify which version of andino_gz you’re using.
- Specify the name and version of the OS you’re using.
Contributing Code
We follow a development process designed to reduce errors, encourage collaboration, and make high quality code. Review the following to get acquainted with this development process.
#. Read the reporting_bugs and suggesting_enhancements sections first.
File truncated at 100 lines see the full file